

DevOps Made Easy! with Oracle Autonomous Database using PL/SQL and Git
DevOps Made Easy Part 1


Introduction
The Oracle Autonomous Database (ADB) includes the DBMS_CLOUD_REPO package, an extremely powerful package that provides easy access to files in Cloud Code (Git) Repositories, including: GitHub, AWS CodeCommit, and Azure Repos. This package serves as a single interface for accessing Multicloud Code repositories and allows you to upload SQL files to Git repositories or install SQL scripts directly from the repository. Additionally, this package allows you to use a Code Repository to manage code versions for SQL scripts and to install or update application code from Git repositories. For example, you can perform actions like listing and managing repositories, committing to and managing code within the repository, exporting database schemas and objects directly to the repository, and checking out and executing SQL statements from files committed to the repository.
Prerequisites
Before we start, please make sure you have completed the following prerequisites listed below. This will enable you to move through this guide seamlessly.
OCI Tenancy ✅
Provisioning an Autonomous Database ✅
Accessing an APEX Instance ✅
APEX Application(s) ✅
GitHub account with a Personal Access Token (PAT) ✅
Read more here -> Managing your personal access tokens
Save your Personal Access Token (PAT) in a Cloud Service Credential
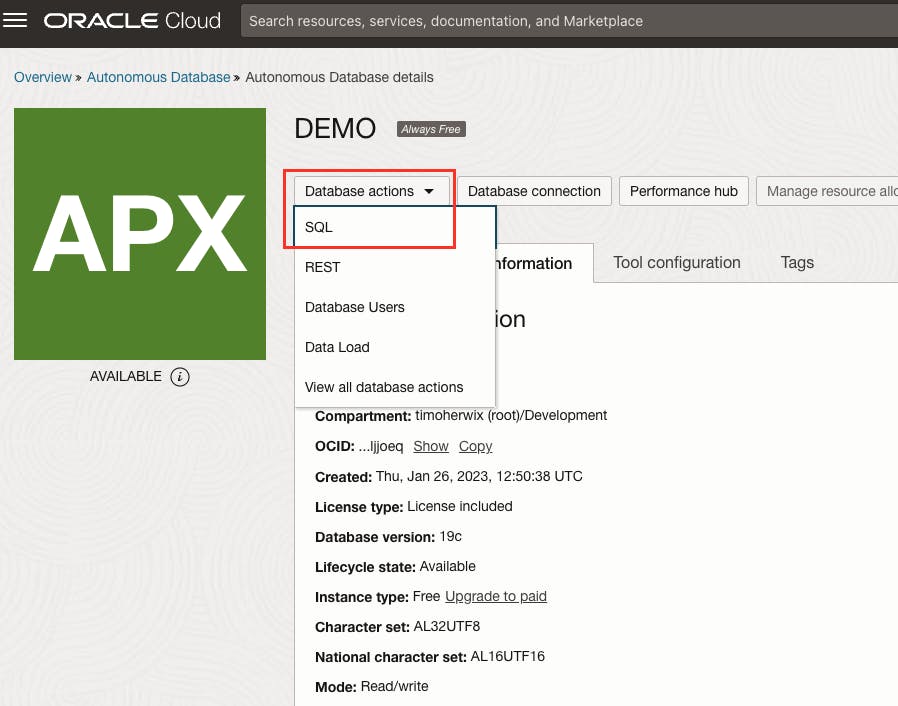
Let's set up the DBMS_CLOUD_REPO package. To do this, sign in to your OCI tenancy, click on Oracle Database in the navigation menu. Then, click on Autonomous Database and choose the ADB you've already set up. When you're on the details page, simply click Database Actions and then SQL.
Now that the SQL-Developer Web is open in a new tab, we can create a credential for the GitHub Personal Access Token (PAT) using the DBMS_CLOUD.CREATE_CREDENTIAL procedure. Here's the command you'll need:
begin
  dbms_cloud.create_credential (
    credential_name => 'GITHUB_CRED',
    username        => 'therwix',
    password        => 'github_pat_...'
  ) ;
end;
/
FYI: You can display the credential information using the USER_CREDENTIALS view ✔
select credential_name,
       username,
       enabled
  from user_credentials
 order by credential_name;
To check if the access works, you can run the following code:
SELECT name, owner, description, created, last_modified
  FROM dbms_cloud_repo.list_repositories(dbms_cloud_repo.init_github_repo(
                                              credential_name => 'GITHUB_CRED', -- Name of the previously created credential
                                              repo_name       => 'therwix',     -- Name of the GitHub Repository
                                              owner           => 'therwix'      -- Name of the GitHub Repository Owner
                                      ));
If everything works well with the credential setup, you should see a list of repositories that your Personal Access Token (PAT) can access.
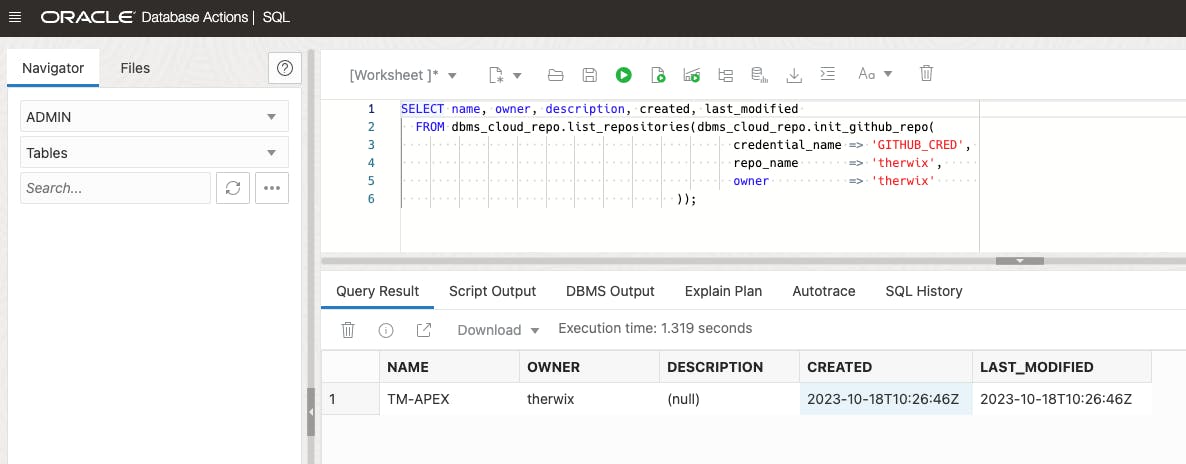
Great! We've completed the initial step and are now ready to interact with the repository 😎
Get started with Repository interaction
With all the necessary preparations and configurations now successfully completed, we're well-equipped and ready to start actively engaging with the GitHub repository. This means we can now perform various operations, like managing repositories, managing files, or exporting database schemas, all while using our Personal Access Token (PAT) for secure and efficient access. So, let's dive in 😉
Code repository administration made easy
In this section, we will explore the DBMS_CLOUD_REPO subprograms, which are essential for effectively managing code repositories.
Managing Repositories
If you want to create a new Repository, it's super easy with the dbms_cloud_repo.create_repository procedure. Just run the script below, and you'll have your new repository:
declare
     repoHandle     clob;
     repoCredential varchar2(50 CHAR) := 'GITHUB_CRED';  -- Name of the previously created credential
     repoName       varchar2(50 CHAR) := 'TEST_REPO';    -- Name of the new GitHub Repository
     repoOwner      varchar2(50 CHAR) := 'therwix';      -- Name of the GitHub Repository Owner
begin
    repoHandle := dbms_cloud_repo.init_github_repo(
                       credential_name => repoCredential,
                       repo_name       => repoName,
                       owner           => repoOwner
                  );

    dbms_cloud_repo.create_repository(
        repo        => repoHandle,
        description => 'Repo created with DBMS_CLOUD_REPO',
        private     => TRUE
    );
end;
/
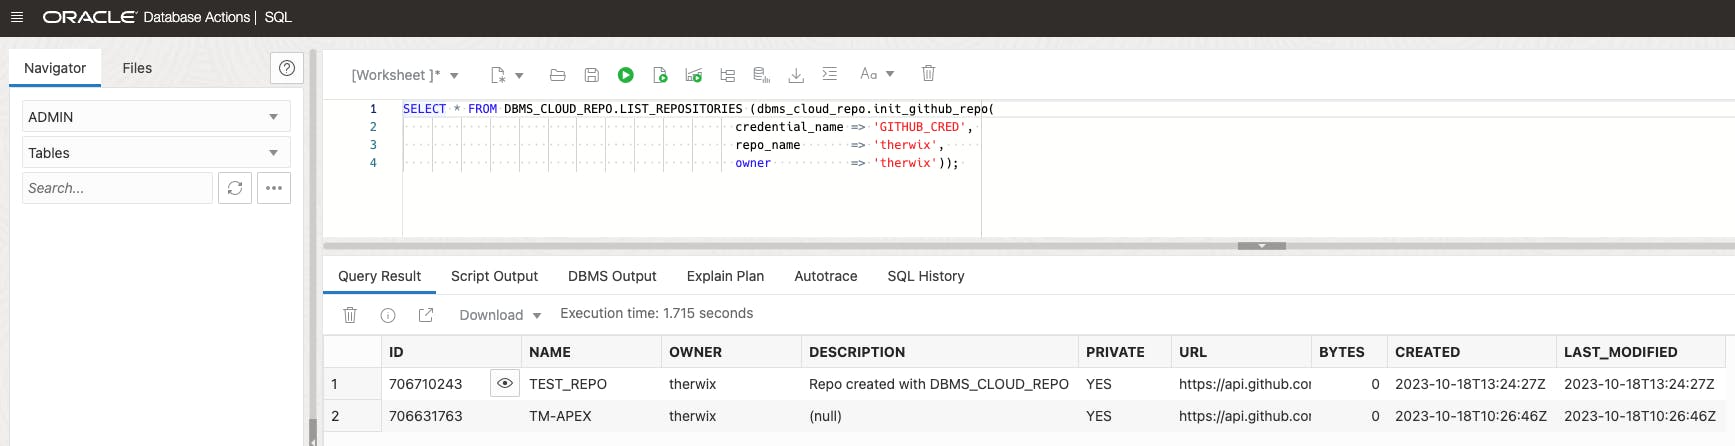
To see all the repositories, simply run this SQL command:
SELECT * FROM DBMS_CLOUD_REPO.LIST_REPOSITORIES (dbms_cloud_repo.init_github_repo(
                                                  credential_name => 'GITHUB_CRED',
                                                  repo_name       => 'therwix',
                                                  owner           => 'therwix'));
If you want to delete a Repository, you can use the dbms_cloud_repo.delete_repository procedure. Run the script below, and the repository will be removed:
declare
     repoHandle     clob;
     repoCredential varchar2(50 CHAR) := 'GITHUB_CRED';  -- Name of the previously created credential
     repoName       varchar2(50 CHAR) := 'TEST_REPO';    -- Name of the new GitHub Repository
     repoOwner      varchar2(50 CHAR) := 'therwix';      -- Name of the GitHub Repository Owner
begin
    repoHandle := dbms_cloud_repo.init_github_repo(
                       credential_name => repoCredential,
                       repo_name       => repoName,
                       owner           => repoOwner
                  );

    dbms_cloud_repo.delete_repository(
        repo        => repoHandle
    );
end;
/
Managing Branches
With the dbms_cloud_repo.create_branch procedure, you can create a new branch in your GitHub Repository identified by the repo handle argument. Just run the script below, and you'll have a new branch in no time:
declare
     repoHandle     clob;
     repoCredential varchar2(50 CHAR) := 'GITHUB_CRED';  -- Name of the previously created credential
     repoName       varchar2(50 CHAR) := 'TM-APEX';      -- Name of the GitHub Repository
     repoOwner      varchar2(50 CHAR) := 'therwix';      -- Name of the GitHub Repository Owner
begin
    repoHandle := dbms_cloud_repo.init_github_repo(
                       credential_name => repoCredential,
                       repo_name       => repoName,
                       owner           => repoOwner
                  );

    dbms_cloud_repo.create_branch(
        repo                => repoHandle,
        branch_name         => 'test_branch',
        parent_branch_name  => 'main'
    );
end;
/
To display all branches in a repository, just run this SQL command:
SELECT * FROM DBMS_CLOUD_REPO.LIST_BRANCHES (dbms_cloud_repo.init_github_repo(
                                              credential_name => 'GITHUB_CRED',
                                              repo_name       => 'TM-APEX',
                                              owner           => 'therwix'));

If you'd like to delete a branch, just use the dbms_cloud_repo.delete_branch procedure. Simply run the following script.
declare
     repoHandle     clob;
     repoCredential varchar2(50 CHAR) := 'GITHUB_CRED';  -- Name of the previously created credential
     repoName       varchar2(50 CHAR) := 'TM-APEX';      -- Name of the GitHub Repository
     repoOwner      varchar2(50 CHAR) := 'therwix';      -- Name of the GitHub Repository Owner
begin
    repoHandle := dbms_cloud_repo.init_github_repo(
                       credential_name => repoCredential,
                       repo_name       => repoName,
                       owner           => repoOwner
                  );

    dbms_cloud_repo.delete_branch(
        repo                => repoHandle,
        branch_name         => 'test_branch'
    );
end;
/
Moving content to the Code Repository
Now let's dive into the exciting part and fill up our Code Repository! By doing this, we'll have scripts to recreate the schema structure and its objects in another environment, making migration and replication easier.
Export Schema DDL-Scripts
In this example, we are working with the TMAPEX schema, which has the Oracle APEX Starter-App Sample-Approvals pre-installed. The Starter-App Sample-Approvals includes a collection of database objects, such as tables, views, and packages, that serve as a foundation for demonstrating various Oracle APEX features and functionalities. Our primary objective in this scenario is to export these database objects in the form of Data Definition Language (DDL) scripts. These DDL scripts will enable us to recreate the schema structure and its associated objects in another environment, if needed, thus ensuring seamless migration and replication of the TMAPEX schema.
Feel free to use your own existing Schema or simply use this SQL command to create a new one:
create user "TMAPEX" identified by "Password1234!";
alter user "TMAPEX" quota unlimited on data;
grant create session to "TMAPEX";
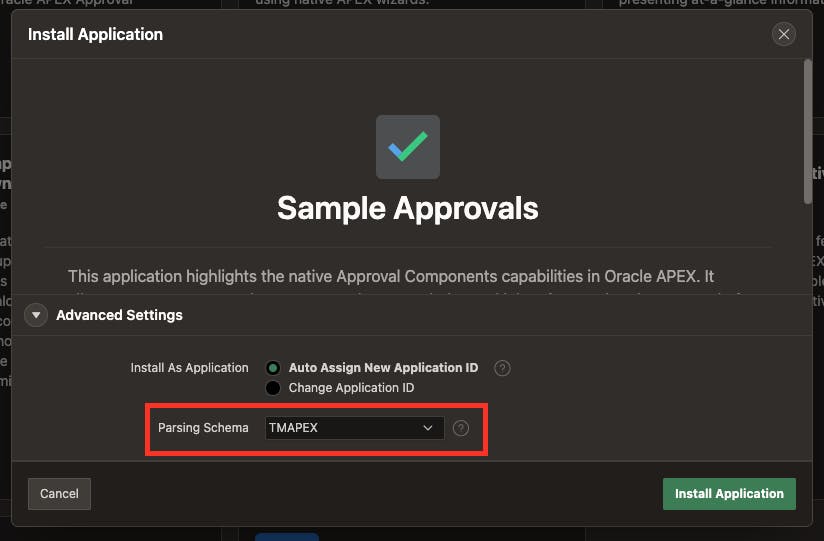
Log in to the APEX Administration Services and assign the Schema to the workspace you're using. Then log out and sign in to your workspace. From there, you're ready to create a new app! Just follow these steps:
In the App Builder, click on Create and choose Starter App
Pick Sample-Approvals and click Install
In Advanced Settings, select the schema you created earlier
Finally, click Install Application
Now we have created several database objects as well as an APEX application that we can move to our repository in the next step. To do this, run the following SQL-Script.
declare
    repoHandle     clob;
    repoCredential varchar2(50 CHAR) := 'GITHUB_CRED';  -- Name of the previously created credential
    repoName       varchar2(50 CHAR) := 'TM-APEX';      -- Name of the GitHub Repository
    repoOwner      varchar2(50 CHAR) := 'therwix';      -- Name of the GitHub Repository Owner
begin
    repoHandle := dbms_cloud_repo.init_github_repo(
                       credential_name => repoCredential,
                       repo_name       => repoName,
                       owner           => repoOwner
                  );

    for rec in (
        select *
          from dba_objects
         where object_type in ('TABLE', 'VIEW', 'PACKAGE', 'PACKAGE BODY')
           and owner = 'TMAPEX'
    )
    loop
        dbms_cloud_repo.export_object(
            repo => repoHandle,
            file_path => case rec.object_type
                           when 'TABLE' then 'tables/' || lower(rec.object_name) || '.sql'
                           when 'VIEW' then 'views/' || lower(rec.object_name) || '.sql'
                           when 'PACKAGE' then 'packages/' || lower(rec.object_name) || '.pks'
                           when 'PACKAGE BODY' then 'packages/' || lower(rec.object_name) || '.pkb'
                         end,
            object_type => case rec.object_type
                             when 'TABLE' then 'TABLE'
                             when 'VIEW' then 'VIEW'
                             when 'PACKAGE' then 'PACKAGE_SPEC'
                             when 'PACKAGE BODY' then 'PACKAGE_BODY'
                           end,
            object_name => rec.object_name,
            object_schema => 'TMAPEX',
            branch_name => 'main',
            commit_details => json_object('message' value 'DBMS_CLOUD_REPO commit',
                                          'author'  value 'therwix',
                                          'email'   value 't.herwix@gmx.de'
                                         ),
            append => false
        );
    end loop;
end;
/
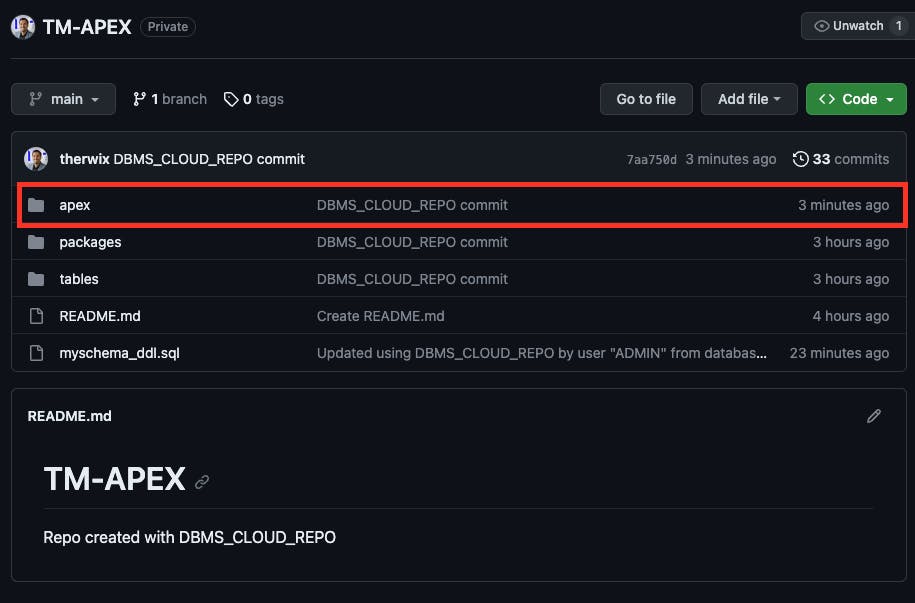
Once you're done with that, go ahead and take a look at your repo to see if the right DDL files have been created. If everything went well, it should look something like this. 😊

To view the DDL script, simply click on tables and then on eba_demo_appr_emp.sql, for example.

dbms_cloud_repo.export_schema procedure. It's super handy 😎declare
repoHandle clob;
repoCredential varchar2(50 CHAR) := 'GITHUB_CRED'; -- Name of the previously created credential
repoName varchar2(50 CHAR) := 'TM-APEX'; -- Name of the GitHub Repository
repoOwner varchar2(50 CHAR) := 'therwix'; -- Name of the GitHub Repository Owner
begin
repoHandle := dbms_cloud_repo.init_github_repo(
credential_name => repoCredential,
repo_name => repoName,
owner => repoOwner
);
dbms_cloud_repo.export_schema(
repo => repoHandle,
schema_name => 'TMAPEX',
file_path => 'myschema_ddl.sql'
);
end;
/
Done, all the database objects are now created in the repository.
Now, let's move on to exporting our APEX application. 😉
Exporting an APEX Application
You can easily export APEX applications to a GitHub repository too. All you need to do is call the APEX_EXPORT package and pass the application ID to the GET_APPLICATION function. But, there's a tiny thing to remember: the output of GET_APPLICATION, which is a CLOB, needs to be converted to a BLOB to work with the DBMS_CLOUD.PUT_FILE procedure. However, APEX_UTIL has a helpful function to do this.
Go ahead and run the SQL-Script below to see how it's done. 😉
declare
    repoHandle     clob;
    repoCredential varchar2(50 CHAR) := 'GITHUB_CRED';  -- Name of the previously created credential
    repoName       varchar2(50 CHAR) := 'TM-APEX';      -- Name of the GitHub Repository
    repoOwner      varchar2(50 CHAR) := 'therwix';      -- Name of the GitHub Repository Owner

    l_file         apex_t_export_files;
    l_app_id       number := 108;                       -- App-ID of the exported application
    l_name         varchar2(255 CHAR);                  -- Name of the exported application
    l_app_clob     clob;
    l_app_blob     blob;
begin
    repoHandle := dbms_cloud_repo.init_github_repo(
                       credential_name => repoCredential,
                       repo_name       => repoName,
                       owner           => repoOwner
                  );

    l_file := apex_export.get_application(p_application_id => l_app_id);
    l_name := l_file(1).name;

    l_app_clob := l_file(1).contents;
    l_app_blob := apex_util.clob_to_blob(l_app_clob);

    dbms_cloud_repo.put_file(
        repo   => repoHandle,
        file_path => 'apex/' || l_name,
        contents => l_app_blob,
        branch_name => 'main',
        commit_details => json_object('message' value 'DBMS_CLOUD_REPO commit',
                                      'author'  value 'therwix',
                                      'email'   value 't.herwix@gmx.de'
                                     )
   );

end;
/
To verify if the APEX app has been exported, check your repository to see if an SQL file has been created. If everything went well, it should look something like this.
We've successfully exported our Database Objects and the APEX application to our Code Repository. Great! Next up, we'll explore how to install everything from the repository.
Perform SQL Operations from Code Repositories
With the previously exported Data DDLs files, we are now ready to proceed with installing them into our secondary environment. This process will ensure that our database objects and the APEX application are properly set up and configured in the new location, allowing us to maintain consistency across different environments.
Install Database Objects from a Script
Before we get started, we need a second Autonomous Database. If no second ADB exists, sign in to your OCI tenancy and provision a new one. When the new database is up, make sure to create a new schema with the same name as the previous schema (e.g. TMAPEX), where we'll install all the database objects.
To do this, launch the SQL Developer from the second ADB and simply execute the following SQL script:
create user "TMAPEX" identified by "Password1234!";
alter user "TMAPEX" quota unlimited on data;
grant create session to "TMAPEX";
In fact, since you are on a different database, you'll need to recreate the credentials to make sure you can access the Code Repository.
begin
  dbms_cloud.create_credential (
    credential_name => 'GITHUB_CRED',
    username        => 'therwix',
    password        => 'github_pat_...'
  ) ;
end;
/
Next, we created a new installation file named install_db.sql in our repository that runs every script in the correct order.
declare
    repoHandle     clob;
    repoCredential varchar2(50 CHAR) := 'GITHUB_CRED';  -- Name of the previously created credential
    repoName       varchar2(50 CHAR) := 'TM-APEX';      -- Name of the GitHub Repository
    repoOwner      varchar2(50 CHAR) := 'therwix';      -- Name of the GitHub Repository Owner
begin
    repoHandle := dbms_cloud_repo.init_github_repo(
                       credential_name => repoCredential,
                       repo_name       => repoName,
                       owner           => repoOwner
                  );

    dbms_cloud_repo.put_file(
        repo   => repoHandle,
        file_path => 'install_db.sql',
        contents => utl_raw.cast_to_raw('
-- install_db.sql
@@tables/eba_demo_appr_approvers.sql
@@tables/eba_demo_appr_dept.sql
@@tables/eba_demo_appr_emp.sql
@@tables/eba_demo_appr_laptop_requests.sql
@@tables/eba_demo_appr_sal_history.sql
@@packages/eba_demo_appr.pks
@@packages/eba_demo_appr_data.pks
@@packages/eba_demo_appr.pkb
@@packages/eba_demo_appr_data.pkb'),
        branch_name => 'main',
        commit_details => json_object('message' value 'DBMS_CLOUD_REPO commit',
                                      'author'  value 'therwix',
                                      'email'   value 't.herwix@gmx.de'
                                     )
   );

end;
/
Once this is completed, you can proceed to run the install script for the entire schema. This will install everything we need in one process.
declare
    repoHandle     clob;
    repoCredential varchar2(50 CHAR) := 'GITHUB_CRED';  -- Name of the previously created credential
    repoName       varchar2(50 CHAR) := 'TM-APEX';      -- Name of the GitHub Repository
    repoOwner      varchar2(50 CHAR) := 'therwix';      -- Name of the GitHub Repository Owner
begin
    repoHandle := dbms_cloud_repo.init_github_repo(
                       credential_name => repoCredential,
                       repo_name       => repoName,
                       owner           => repoOwner
                  );

    dbms_cloud_repo.install_file(
        repo          => repoHandle,
        file_path     => 'install_db.sql',
        branch_name   => 'main',
        stop_on_error => true
    );

end;
/
If everything works well, you will see the Database Objects in your schema.

Alright, now let's move on to importing the APEX application.
Deploy an APEX Application from a Script
Last but not least, we want to deploy the APEX application in our new environment.
If everything is set up correctly, execute the following SQL script.
declare
    repoHandle     clob;
    repoCredential varchar2(50 CHAR) := 'GITHUB_CRED';  -- Name of the previously created credential
    repoName       varchar2(50 CHAR) := 'TM-APEX';      -- Name of the GitHub Repository
    repoOwner      varchar2(50 CHAR) := 'therwix';      -- Name of the GitHub Repository Owner
    repoApp        clob;
    l_file         apex_t_export_files;
    l_app_id       number := 108;
begin
    repoHandle := dbms_cloud_repo.init_github_repo(
                      credential_name => repoCredential,
                      repo_name       => repoName,
                      owner           => repoOwner
                  );

    repoApp := dbms_cloud_repo.get_file(
                   repo           => repoHandle,
                   file_path      =>'apex/f'||l_app_id||'.sql',
                   branch_name    => 'main'
               );

    l_file := apex_t_export_files (
                  apex_t_export_file (
                      name     => 'apex/f'||l_app_id||'.sql',
                      contents => repoApp));

    apex_util.set_workspace('DEMO');

    apex_application_install.set_application_id (
        p_application_id => l_app_id);

    apex_application_install.install(
        p_source => l_file,
        p_overwrite_existing => true);

end;
/
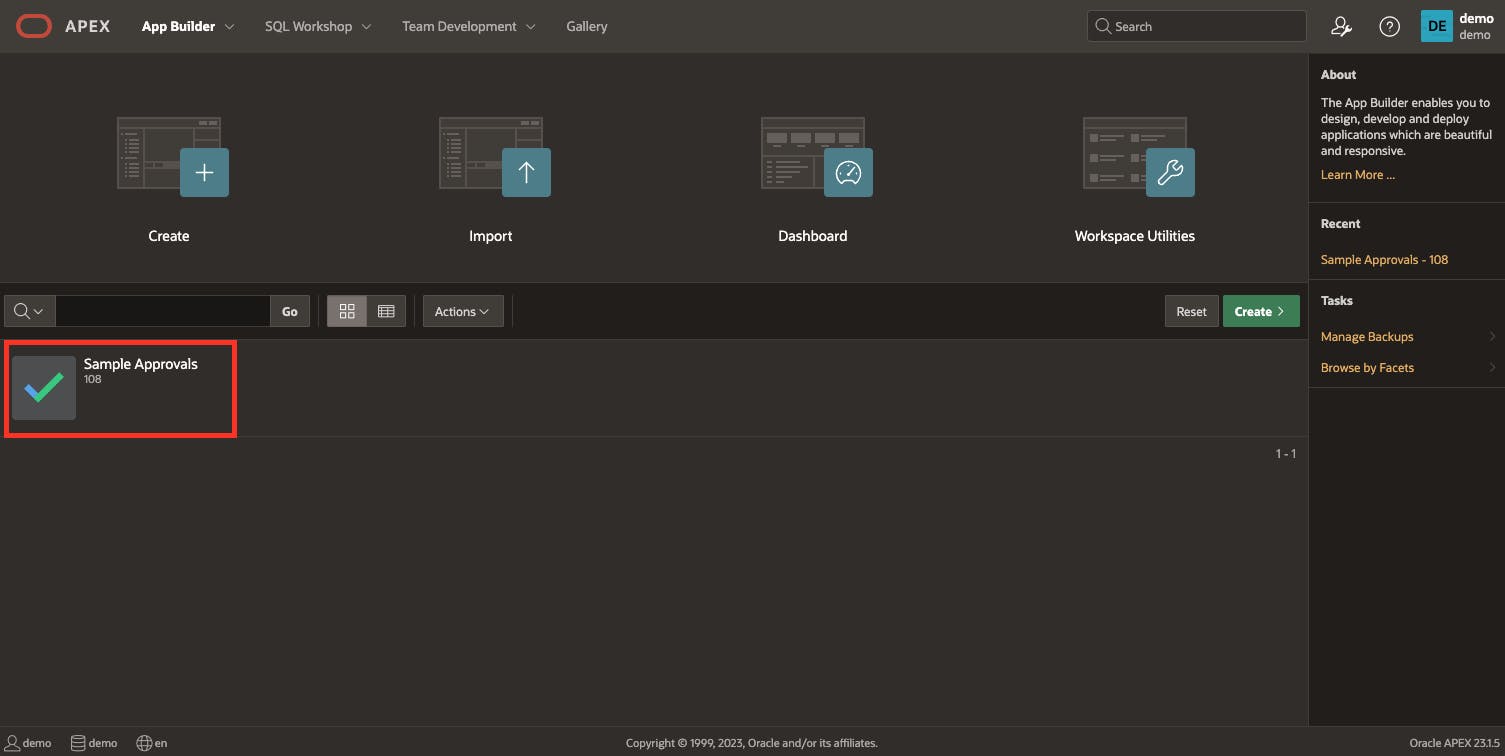
If the script runs without any issues, the APEX App will be installed. Verify this by logging into your Workspace and clicking on the App Builder.
So that´s it for now. We have completed all tasks, successfully exporting our source environment to the Code Repository and seamlessly importing it into another target environment ✅
Conclusion
In conclusion, the DBMS_CLOUD_REPO package simplifies CI/CD workflows for APEX applications on Autonomous Database by providing a single interface for managing Code Repositories. This powerful package allows you to perform various repository operations, such as managing branches and repositories, exporting database schemas, and executing SQL scripts directly from the repository. By leveraging this package, you can streamline your DevOps processes and enhance the efficiency of your APEX applications.