

Implementing Social Sign-In with Oracle Cloud Infrastructure in APEX
Secure Access Made Easy: A Step-by-Step Guide Part 1


Introduction
In APEX, we've got various Authentication Options, like the default Oracle APEX Accounts, Database Accounts, LDAP, Social Sign-In, and more. In this guide, we'll discuss using the Oracle Cloud Infrasructure Identity Access Management (IAM) for authentication in APEX Apps. There are some great reasons to use a third-party identity provider like OCI, such as enabling Single Sign-On (SSO) to access multiple apps with just one set of credentials, Multi-Factor Authentication (MFA) for an extra layer of security, and passwordless solutions for a more convenient and secure alternative to traditional passwords. Additionally, OCI provides useful Sign-On reports that simplify activity auditing.
To get started with OCI as our Authentication Scheme, we'll need to set up Social Sign-In Authentication. Social Sign-In supports Authentication with Google, Facebook, and other social networks that play well with OpenID Connect or OAuth2 standards, and guess what? OCI supports OAuth2, too 😎
Prerequisites
Before we dive in, please make sure you have completed the following prerequisites listed below. This will enable you to move through this guide seamlessly.
OCI Tenancy ✅
Provisioning an Autonomous Database ✅
Accessing an APEX Instance ✅
Build an APEX Application
Before we can start we need an APEX application to set up Social Sign-In. So, go ahead and log in to your APEX Workspace, then create a new application using the App Builder. Feel free to name it something like OCI Demo App in the wizard.
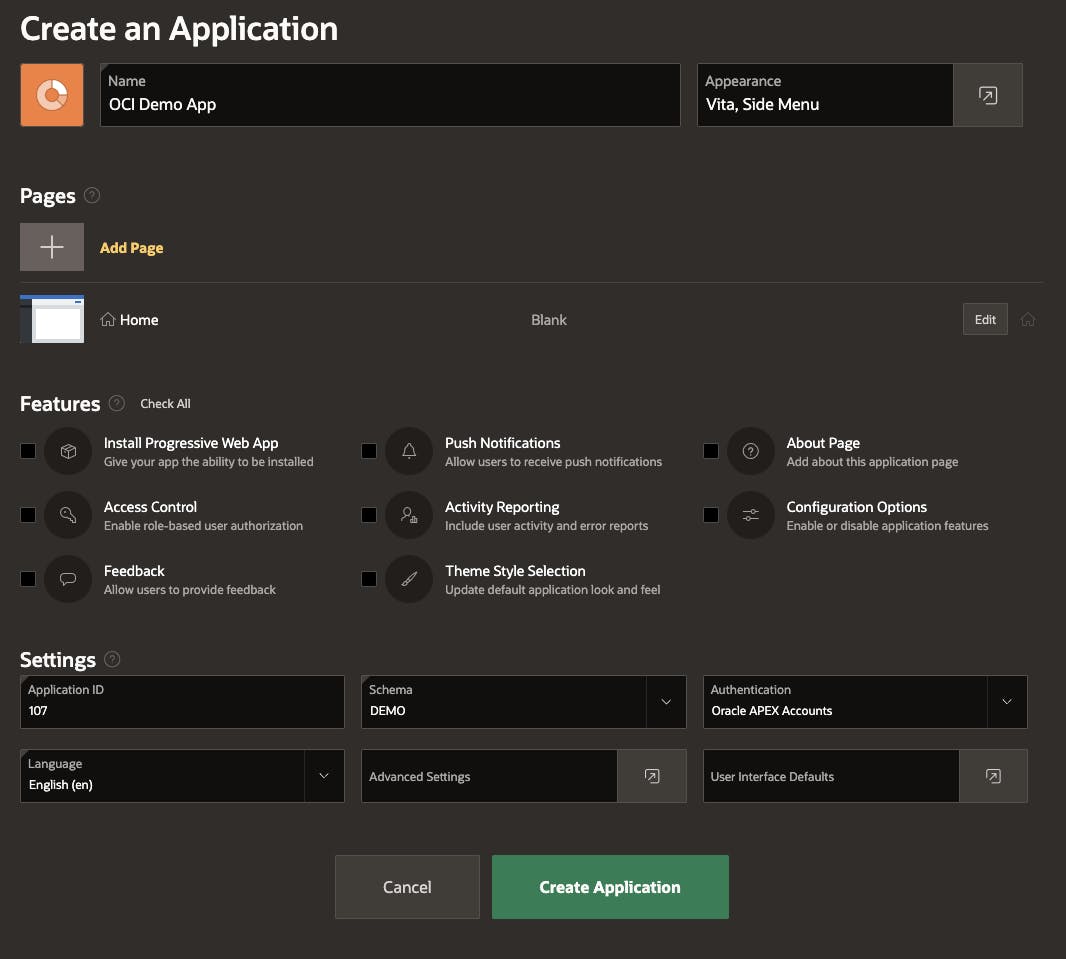
Once you've set up your APEX application set up, go ahead and run it. Take a look at the URL for future reference. In this example, the URL would be:
https://gfc4fe40cd2a327-apex1.adb.eu-frankfurt-1.oraclecloudapps.com/ords/r/demo/oci-demo-app/home
OCI Configuration for APEX Social Login
First, let's create a new Application in OCI. To do this, log in to your OCI tenancy, and click on the navigation menu. From there, go to Identity & Security, and then choose Domains. Pick the default domain and find the Integrated applications link in the left navigation menu and click on it. Then click the Add Application button.
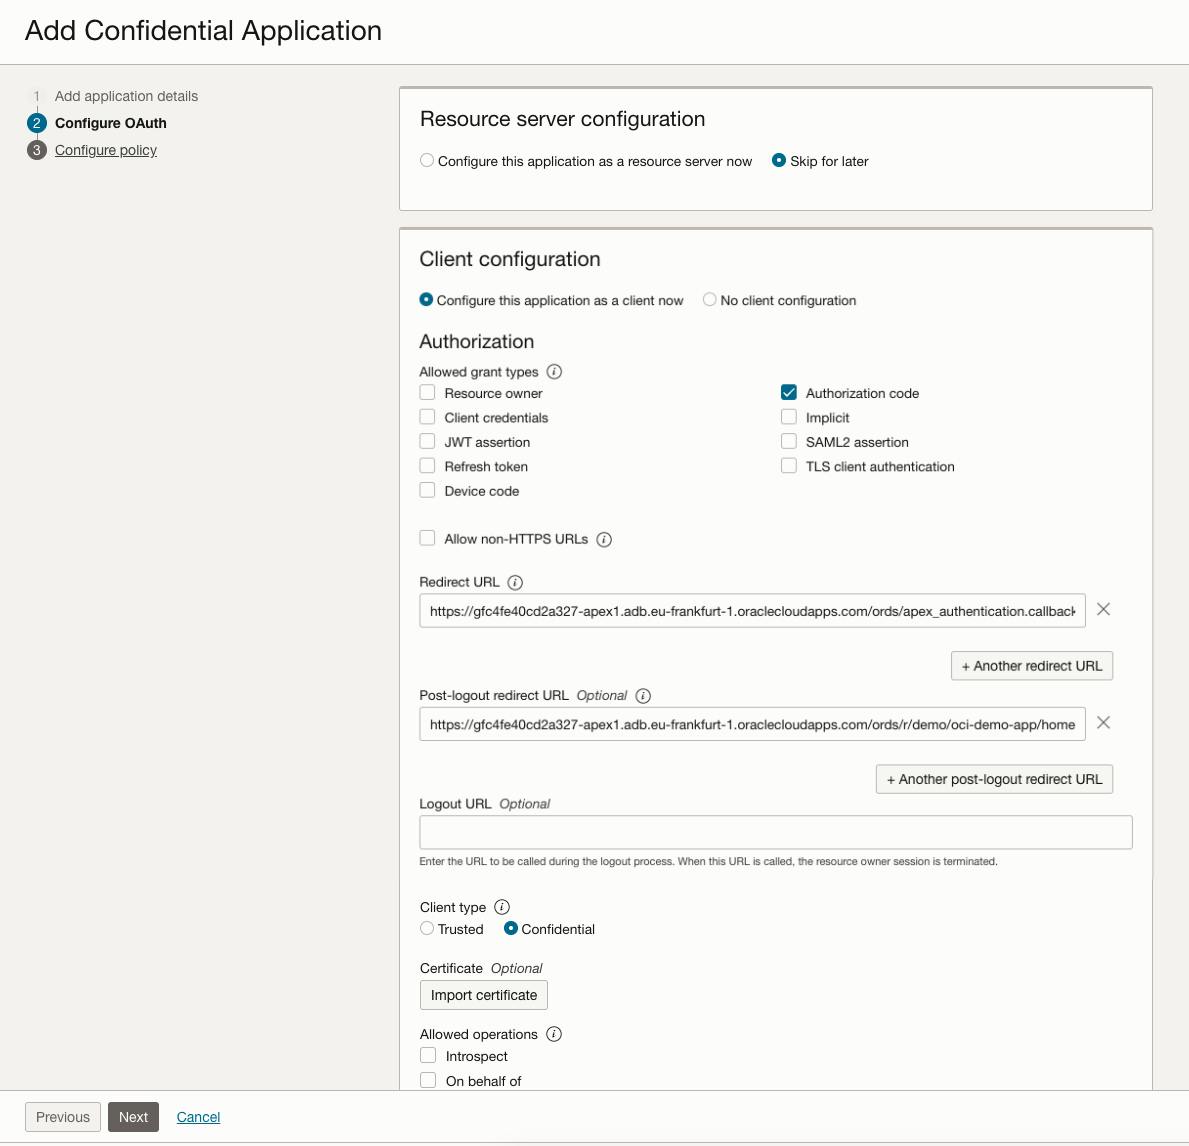
Choose Confidential Application for your APEX app representation and click on Launch Workflow.
A confidential application is accessed by multiple users and hosted on a secure and protected server. Applications that can protect their OAuth client ID and client secret are called confidential applications. These applications typically run on a server and can maintain the confidentiality of their client secret.
Go ahead and give the app a name, for example, My APEX Application. If you want, you can also add a description and choose an icon for it. Enter the URL from the previous step into the Application URL field. Ignore all other options for now - we can just skip them and click Next.

Now it's time to set up the OAuth Client. To do this, click on the radio button Configure this application as a client now. Make sure to check the box for Authorization Code under the allowed grant types. For the Redirect URL, we'll need to enter the APEX callback URL. If you're not sure what your callback URL is, you can find it by running this SQL:
select APEX_AUTHENTICATION.GET_CALLBACK_URL from dual;
Your result should look something like this:
https://gfc4fe40cd2a327-apex1.adb.eu-frankfurt-1.oraclecloudapps.com/ords/apex_authentication.callback
Then paste the callback URL into the Redirect URL field. For the Post-logout-URL, simply use your APEX application URL once again and click Next.
In the final step, you can skip the Web Tier Policy. Click the Finish button.
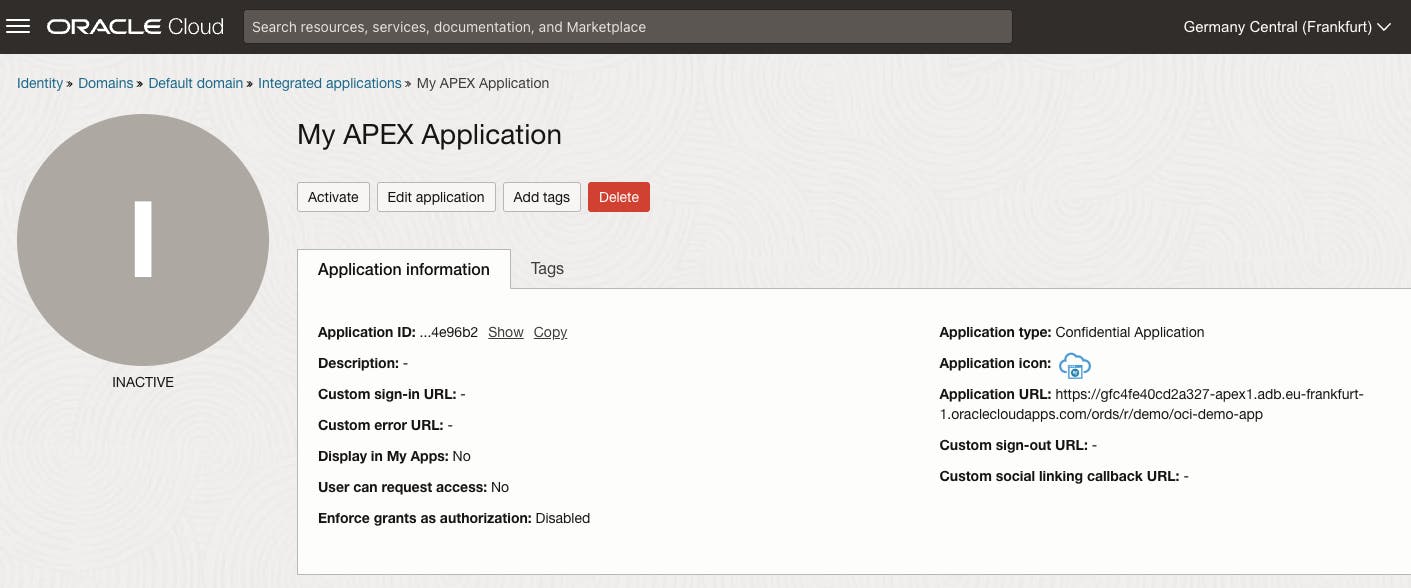
Your application is ready to be activated. To do this, click the Activate button.
Finally, note the Client-ID and Client-Secret, as we'll need them later in Oracle APEX.
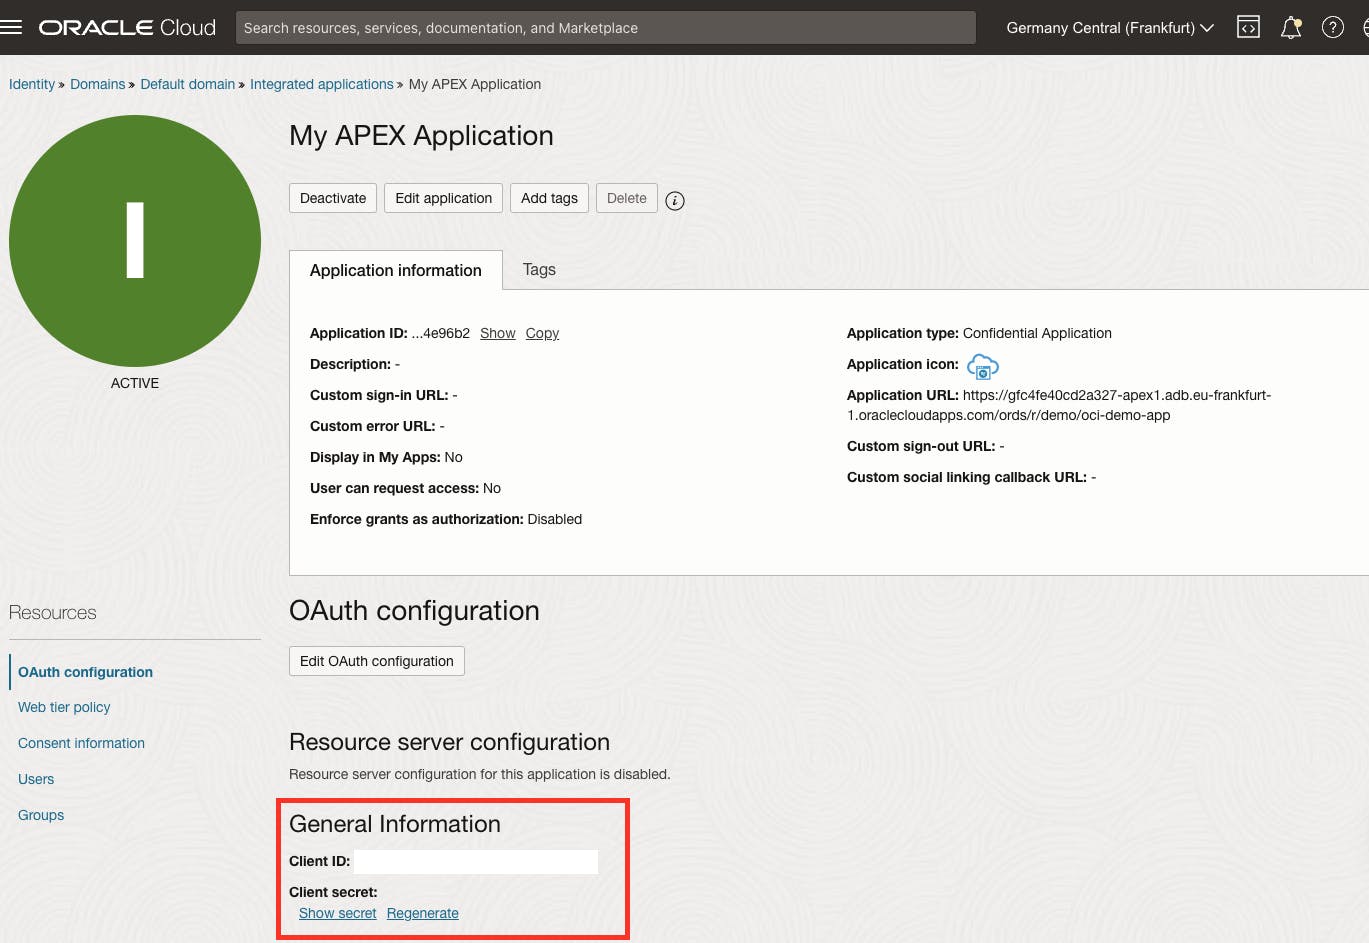
Before we move on to the next part and start with the APEX Configuration make sure to take note of the Domain URL, which you can find on the default domain page. We'll need it later, so keep it handy.

APEX Configuration for APEX Social Login
The first part is complete. So go back to the APEX Builder and let´s continue there.
Setting Up Web Credentials for Authentication
First things first, we'll need to create a new Web Credential for our authentication process. Web Credentials are really useful because they securely store and encrypt authentication credentials for Oracle APEX components and APIs. These credentials can't be retrieved in plain text. Plus, they're stored at the Workspace Level, which means they're visible in all applications.
To create a new Web Credential in APEX, click on Workspace Utilities in the App Builder. Once you're there, look for Web Credentials and give it a click. Finally, click the Create button to make your new Web Credential.
Give it a name and a Static ID, for example, OCI. Keep the Authentication Type as Basic Authentication, and then paste in your Client ID and Client Secret from the OCI OAuth Client we created earlier.

Create the APEX Application Login Mechanism
Finally, we need to let our application know that the login is coming from OCI. To do this, we'll set up a new Authentication Scheme. Go back to your APEX App and click on Shared Components. Look for the Security section, and click on the link for Authentication Schemes. Click Create and keep the option Based on a preconfigured scheme from the gallery selected and then click Next.
In the final step, we have to fill out some settings for the Authentication Scheme. Give it a unique name, like OCI Sign-In and choose the Scheme-Type Social Sign-In. Next, select the Web Credential OCI we created earlier. Pick the Authentication Provider OpenID Connect Provider and type in the Domain URL as the Discovery URL.
Note: To get the Discovery URL, simply add "/.well-known/openid-configuration" to the Domain URL from OCI. For example:
https://idcs-d1aac9203f554619968a2fd77c60a3e0.identity.oraclecloud.com:443/.well-known/openid-configuration

Scroll a little down to the Post-Logout URL Section, set Go To to URL and enter the application URL in the URL field.
For the Post-logout-URL, simply use your APEX application URL once again e.g.
https://gfc4fe40cd2a327-apex1.adb.eu-frankfurt-1.oraclecloudapps.com/ords/r/demo/oci-demo-app/home

And there you have it ✅
Test your Social Login
To verify if everything's working fine, go ahead and run the application. If all is good, you'll see the OCI Login Dialog.
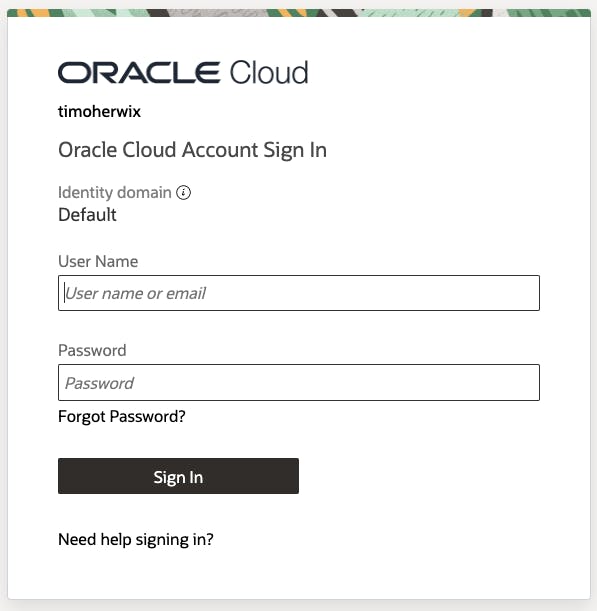
Enter your username/email and password, and click the Sign-In button to log in to your APEX App.
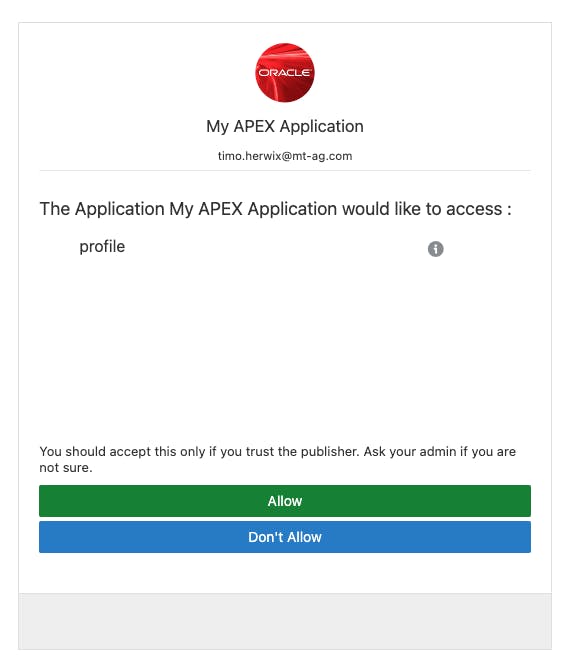
Note: When you sign in for the first time, you'll need to allow access.
Here we go 🚀

Conclusion
In conclusion, integrating Oracle Cloud Infrastructure with APEX applications for Social Sign-In offers numerous benefits such as Single Sign-On, Multi-Factor Authentication, and passwordless solutions. By following the steps outlined in this guide, you can easily set up OCI as your Authentication Scheme and enhance the security and user experience of your APEX application.
In the upcoming blog posts, we will demonstrate how to implement User Access Control in APEX with Oracle Identity and Access Management. So, stay tuned 😎