

Maximizing Application Availability and Scalability with Load Balancers in the Cloud


Introduction
Load balancers are an important component of cloud computing that helps to distribute incoming network traffic across multiple servers. They ensure high availability, scalability, and reliability of the applications running on a server in the cloud. In this article, we will discuss load balancers in cloud computing, the benefits of using a load balancer, and the different types of load balancers, with a focus on the Oracle Cloud Infrastructure (OCI) load balancer.
Load Balancer in OCI
OCI offers two types of load balancers, a network load balancer (layer-3 and 4), and a layer-7 load balancer, both of which you can use as a public or private load balancer. Load balancers are managed by OCI, but you have the option to configure the algorithm used in the load balancer, the shape and the type of your load balancer, you can also configure multiple listeners for a load balancer.
💡 A listener is an entity that checks for incoming traffic on a load balancer's public floating IP.
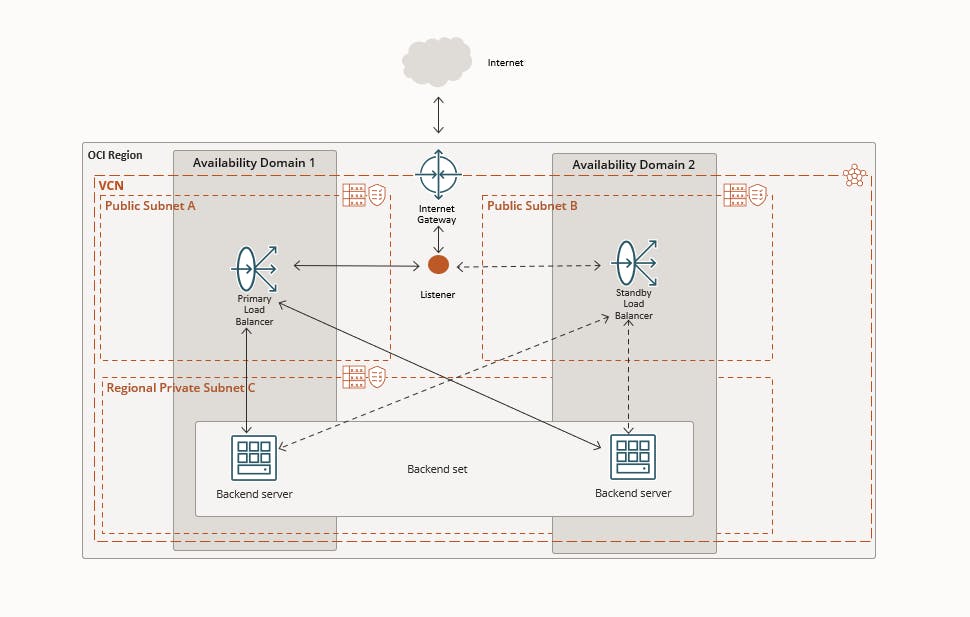
When you create a load balancer, you have to provide the backend servers to include in the backend set. The load balancer will then route the traffic to those servers based on the policy you specified. The load balancer is highly available by default, whenever you create a load balancer, OCI will create a standby load balancer to ensure high availability. OCI recommends that you use a regional VCN when creating a load balancer, If your region has multiple availability domains, OCI will place the standby load balancer in a different availability domain than the primary load balancer. If you choose to create your load balancer in an availability domain-specific subnet, then you have to create a second subnet in a different availability domain for OCI to place the standby load balancer. If your region includes only one availability domain, the service requires just one subnet, either regional or AD-specific, to host both the primary and standby load balancers. But keep in mind, you can not choose the primary and the standby load balancer, OCI will manage this, it will assign a floating IP to the primary load balancer and in case of failure, OCI will switch the IP to the standby load balancer.
Public and Private Load balancers
To accept traffic from the internet, you will need a public load balancer. A public load balancer must be created in a public subnet. As we mentioned before, OCI will automatically create a standby load balancer, each load balancer will get a private IP from its hosted subnet, and the primary load balancer will get a floating public IP that will serve as an entry point for incoming traffic, you can associate the public IP address with a friendly DNS name through any DNS vendor. Public load balancer used to distribute traffic coming from the internet to the webservers.
💡 The floating public IP address does not come from your backend subnets.
If you want to isolate your load balancer from the internet and use it to distribute traffic to the Database instances, you can use a private load balancer. The private load balancer can not have public IP Instead, each private load balancer (Primary and standby) will get a private IP from its host subnet and the primary one will get a floating private IP. So why would use a private load balancer? You use a private load balancer to distribute traffic across multiple database servers and then you can sync the data between those two databases.
Layer-7 Load balancer
This type of load balancer operates on the application layer of the OSI Model. A layer-7 load balancer can read the content of the incoming message and route the request based on the message content.
The layer-7 load balancer service supports three primary policy types:
Round robin (Default): The traffic will be distributed sequentially.
Least connections: routes incoming non-sticky request traffic to the backend server with the fewest active connections.
IP hash: uses an incoming request's source IP address as a hashing key to route non-sticky traffic to the same backend serve.
💡Load balancer policy decisions apply differently to TCP load balancers, cookie-based session persistent HTTP requests (sticky requests), and non-sticky HTTP requests. More info is available here
Network Load balancer
This type of load balancer operates at the connection level and distributes incoming traffic to healthy backend servers based on Layer 3/Layer 4 (IP protocol) data. The service offers a load balancer with your choice of a regional public or private IP address that is elastically scalable and scales up or down based on client traffic with no bandwidth configuration requirement.
The Network Load Balancer service supports three primary network load balancer policy types:
5-Tuple Hash (Default): Routes incoming traffic based on source IP and port, destination IP and port, and protocol
3-Tuple Hash: Routes incoming traffic based on source IP, destination IP, and protocol.
2-Tuple Hash: Routes incoming traffic based on source IP, and destination IP
💡It is good to mention that the network load balancer is faster than the layer-7 load balancer.
How does a load balancer work?
Load balancers can be hardware or software that runs on a server, they are highly scalable and can handle millions of requests, they are placed between the client and a set of backend servers. When clients send a request to an application that runs in the cloud, the request is directed first to the load balancer through the listener. The load balancer then uses different algorithms or policies to determine which backend instance can handle the request, and based on the decision, it redirects the request to that server. The server then will process the request and send the response back to the load balancer, which then sends the response to the client.
Benefits of the Load balancer
The load balancer comes with many benefits. As we previously mentioned, the main purpose of a load balancer is to distribute traffic among multiple backend servers. Load balancer improves resource utilization, facilitates scaling, and helps ensure high availability. One other important purpose of using a load balancer is a health check strategy. Load balancers performs frequently a health check on the backend instances that are connected to it. It ensures that all the instances are running properly, if one of the instances fails, the load balancer will redirect all the traffic to another functioning instance to ensure that the application remains available, which leads to reducing the maintenance window by draining traffic from an unhealthy application server before you remove it from service for maintenance. One other benefit of the load balancer is naming abstraction, you do not have to release the IP address of your server that sets behind the load balancer to the public, instead, you only release the IP address of the load balancer.
💡 A health check is a test to confirm the availability of backend servers. A health check can be a request or a connection attempt. Based on a time interval you specify, the load balancer applies the health check policy to continuously monitor backend servers.
Demo
So, it is time to try it out. In this demo, we will create a layer-7 load balancer and route the incoming traffic from the internet across to Nginx servers. We have already created a VCN and two Compute instances in a sandbox compartment. We also have installed Nginx on the web servers. So go ahead and do the same to be able to continue with us.
Read our post about installing Nginx sever in OCI, here
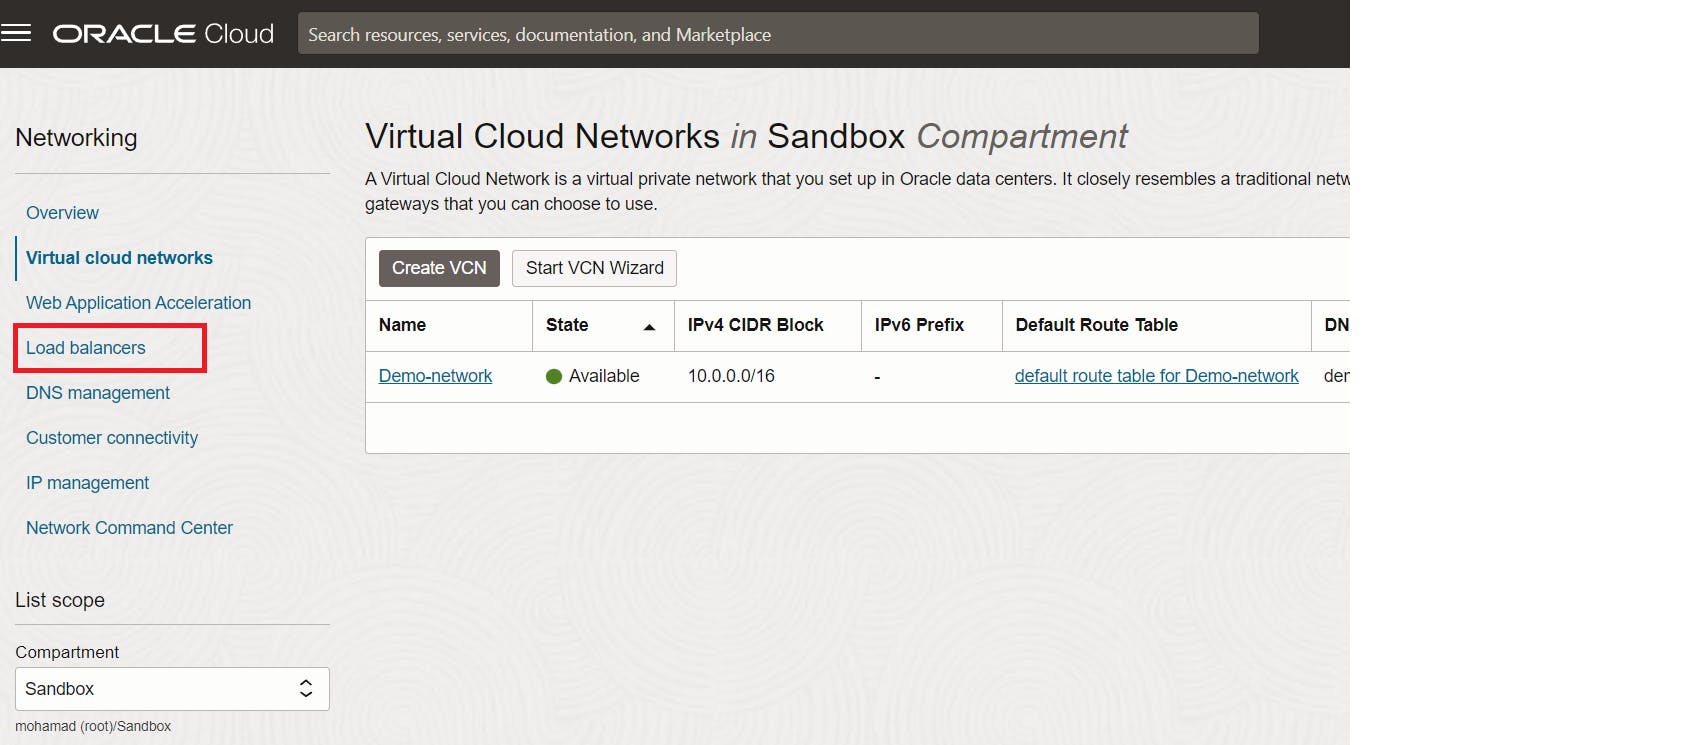
After you created all the required resources, navigate to your VCN, there you will find the load balancer service.
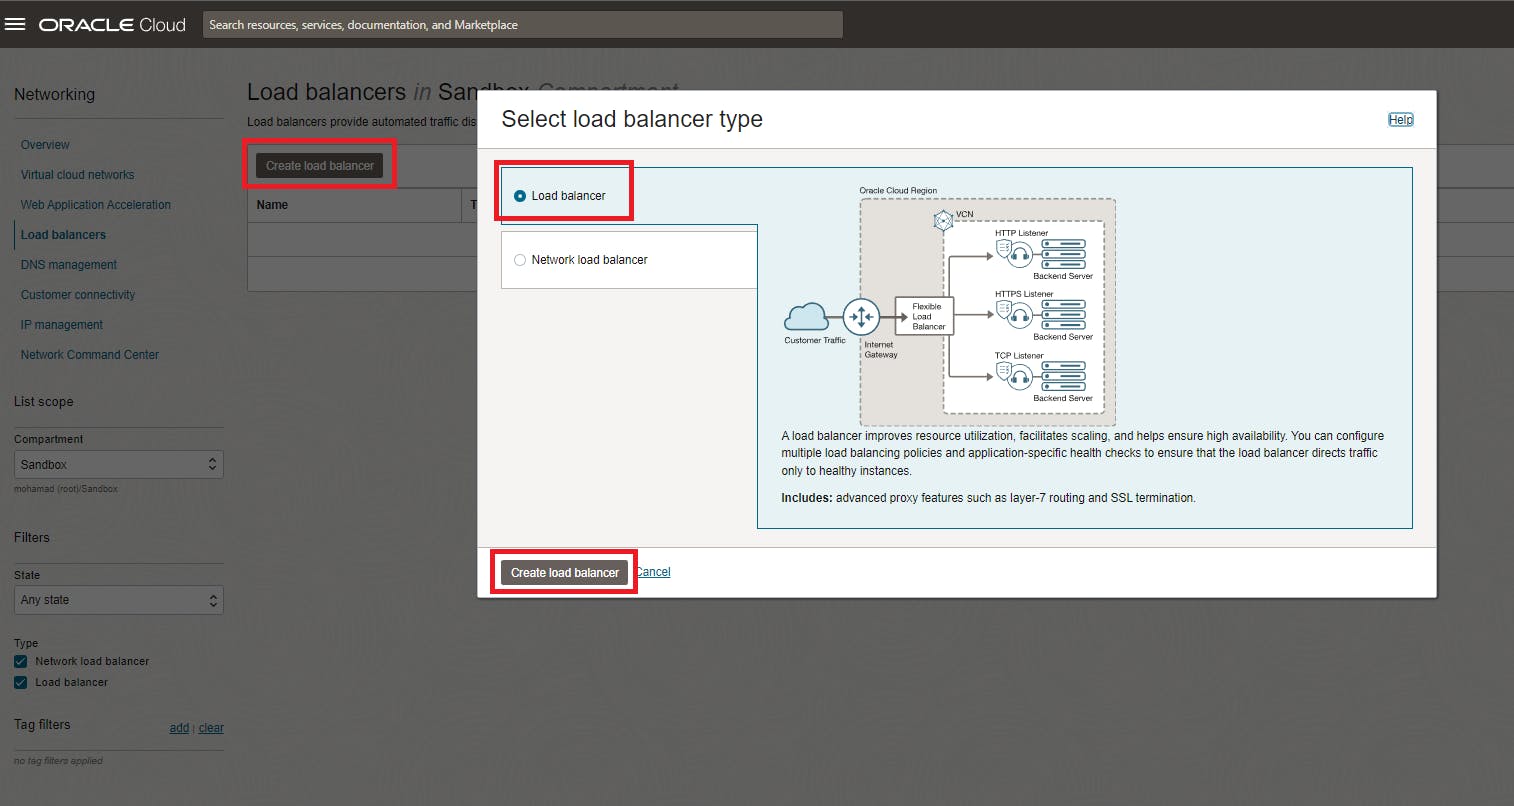
Go to the load balancer page and then click on Create Load Balancer button, a popup will be shown asking you to choose a type, select the first option and click Create.
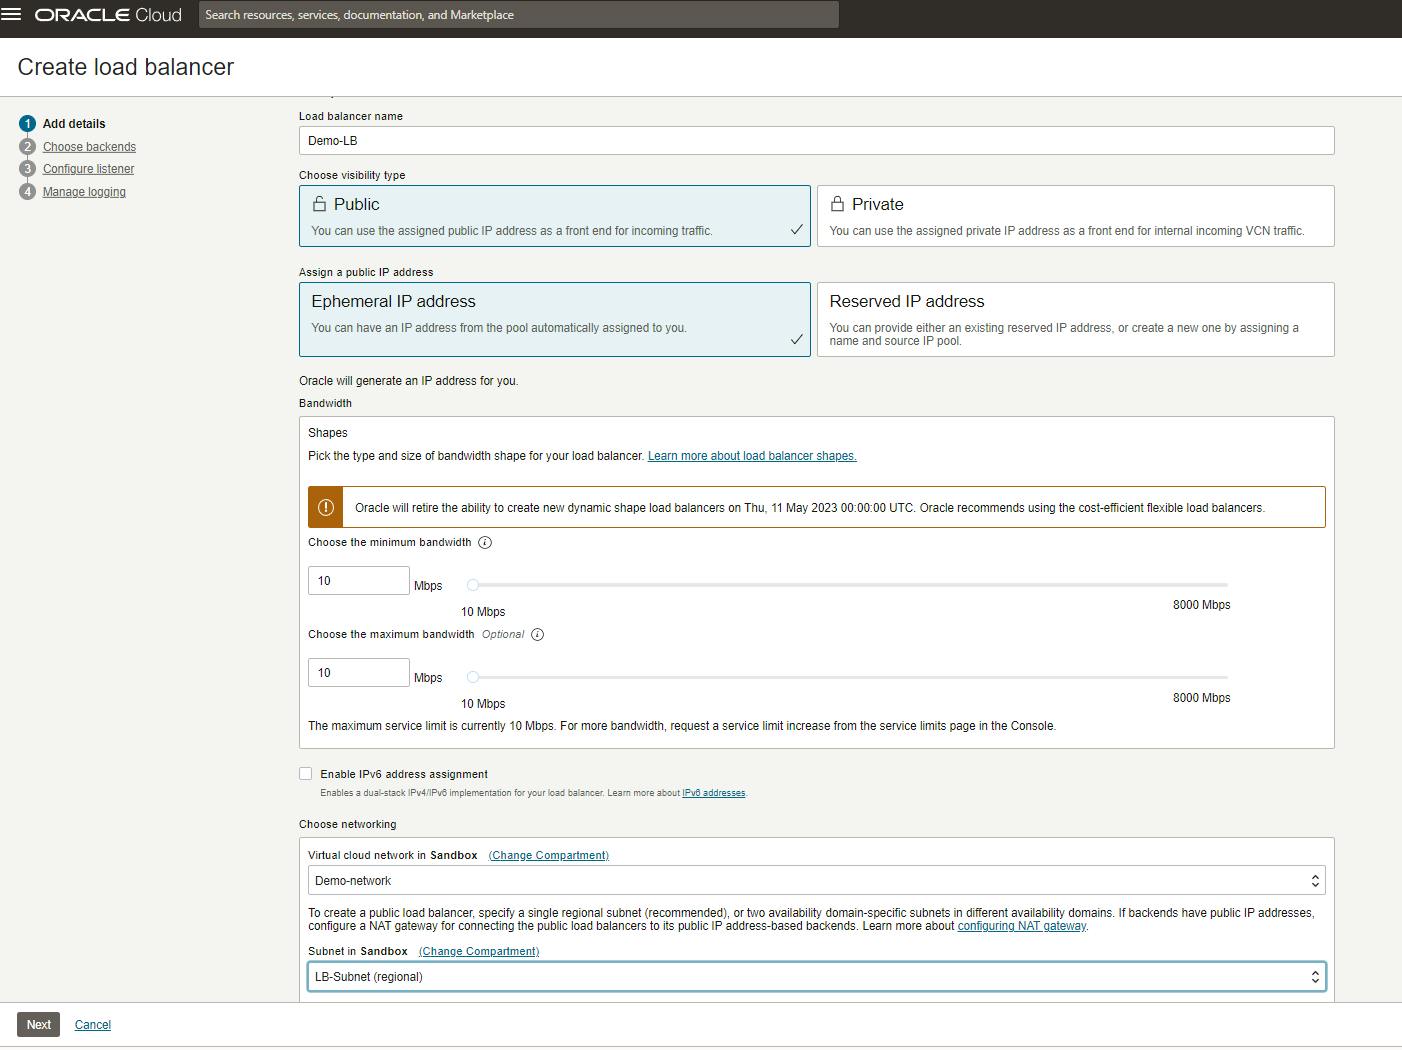
Now, we need to configure the load balancer, give a name and choose some other attributes. In the first step give your LB a name and specify it as a public LB. For the IP choose the Ephemeral IPV4 or if you have a reserved IP then choose the second option and provide the IP. Then choose the VCN and the subnet where you want to place the LB. We have already created a regional public subnet for the Load balancer. leave all other options with default and click next.
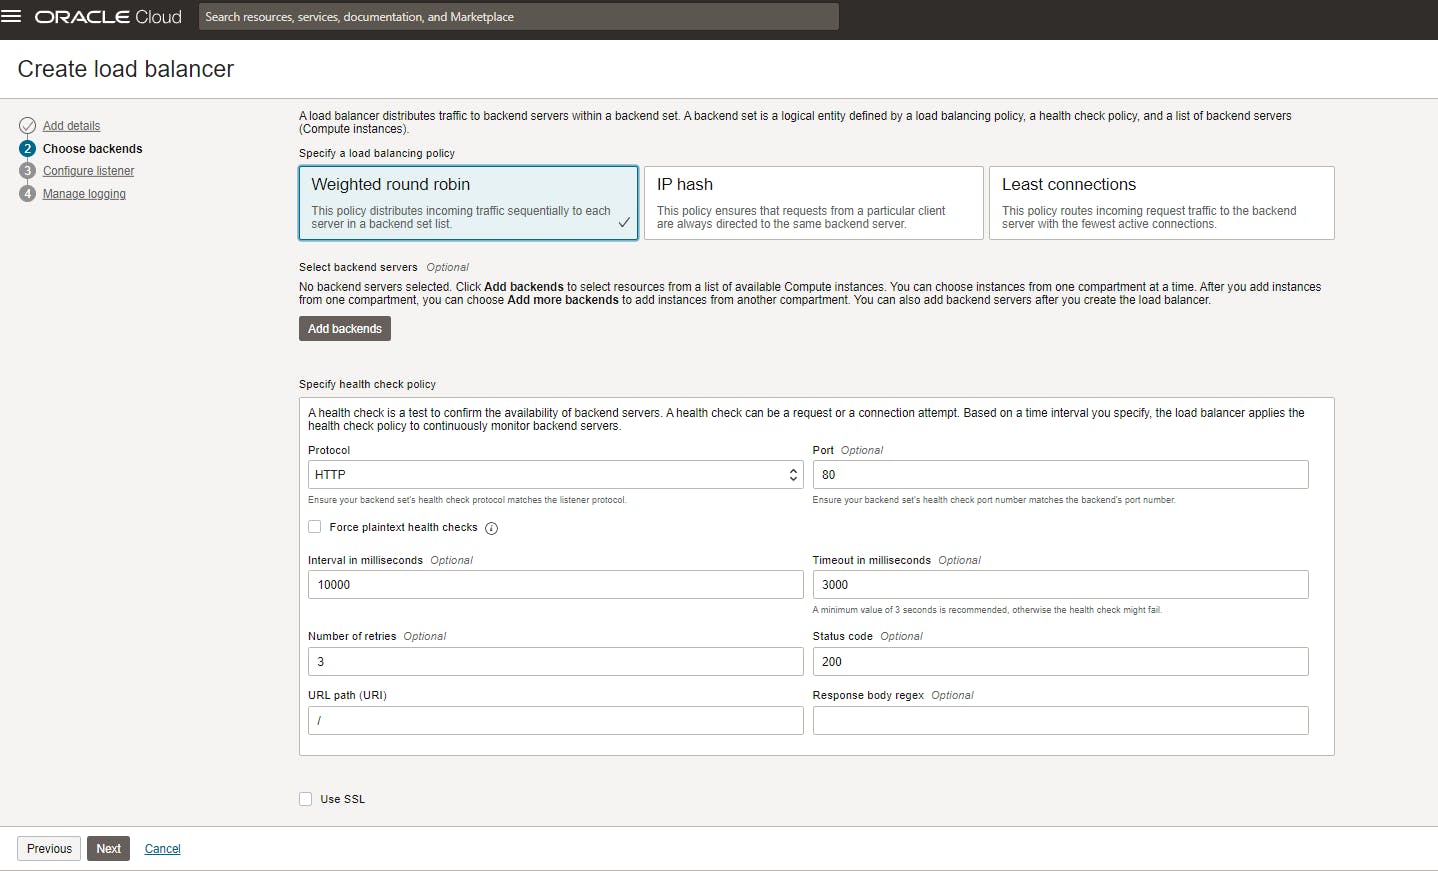
In the next step, choose the balancing policy to be used for this particular Load Balancer.
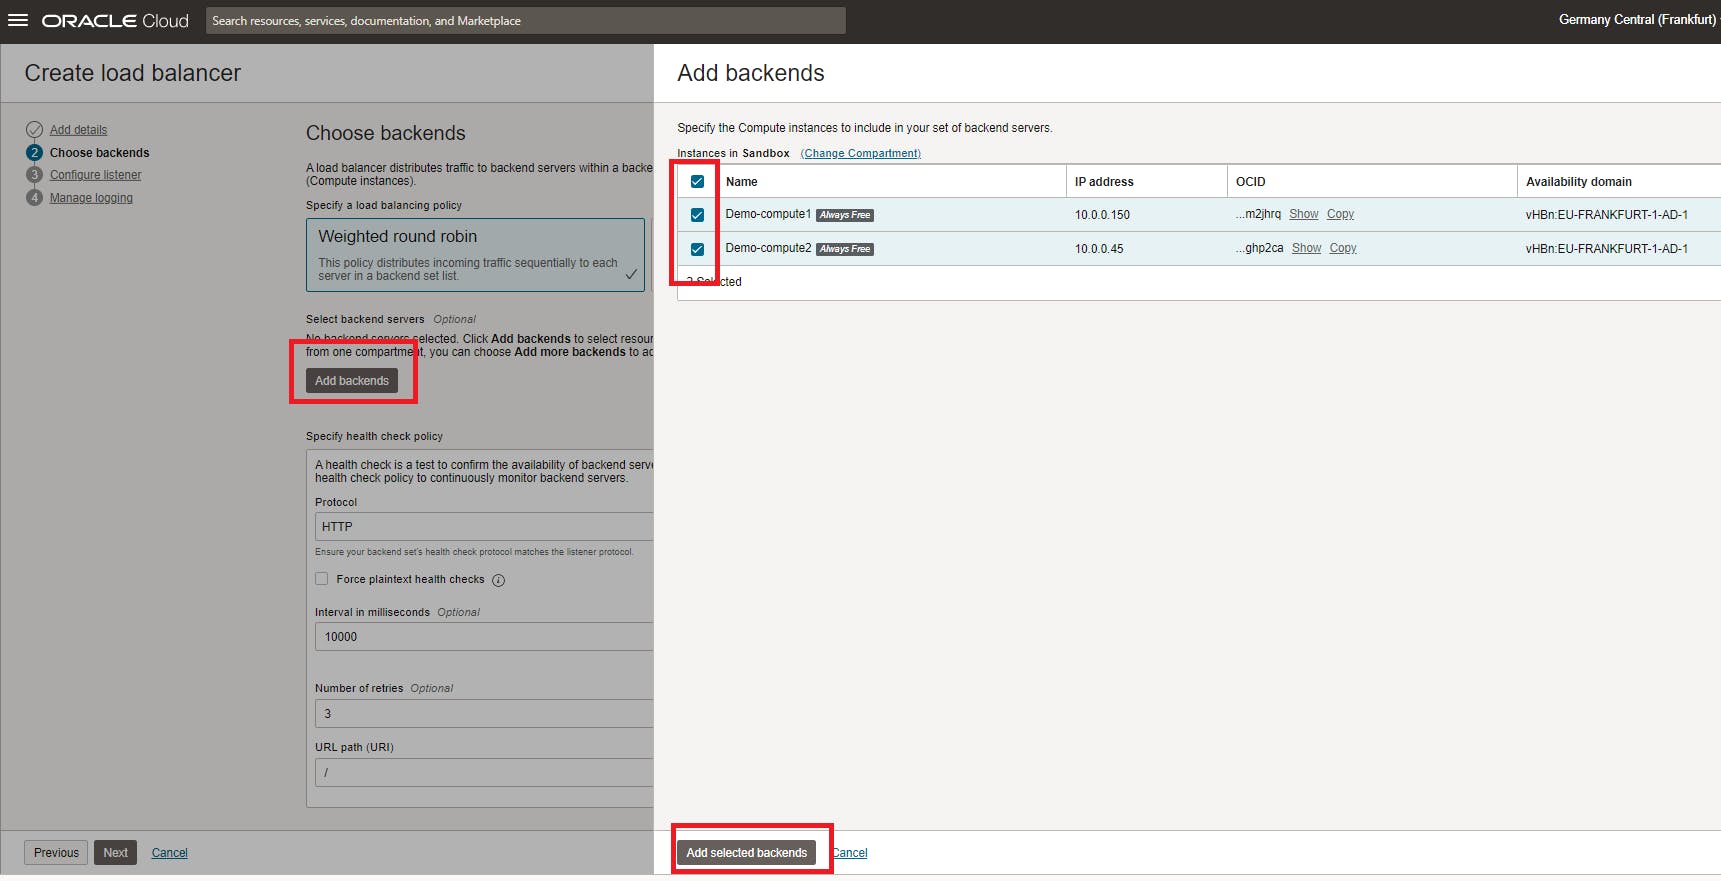
Now, click on Add Backends and select the Nginx servers that you have already created.
For the health-check policy keep everything as default and click next.
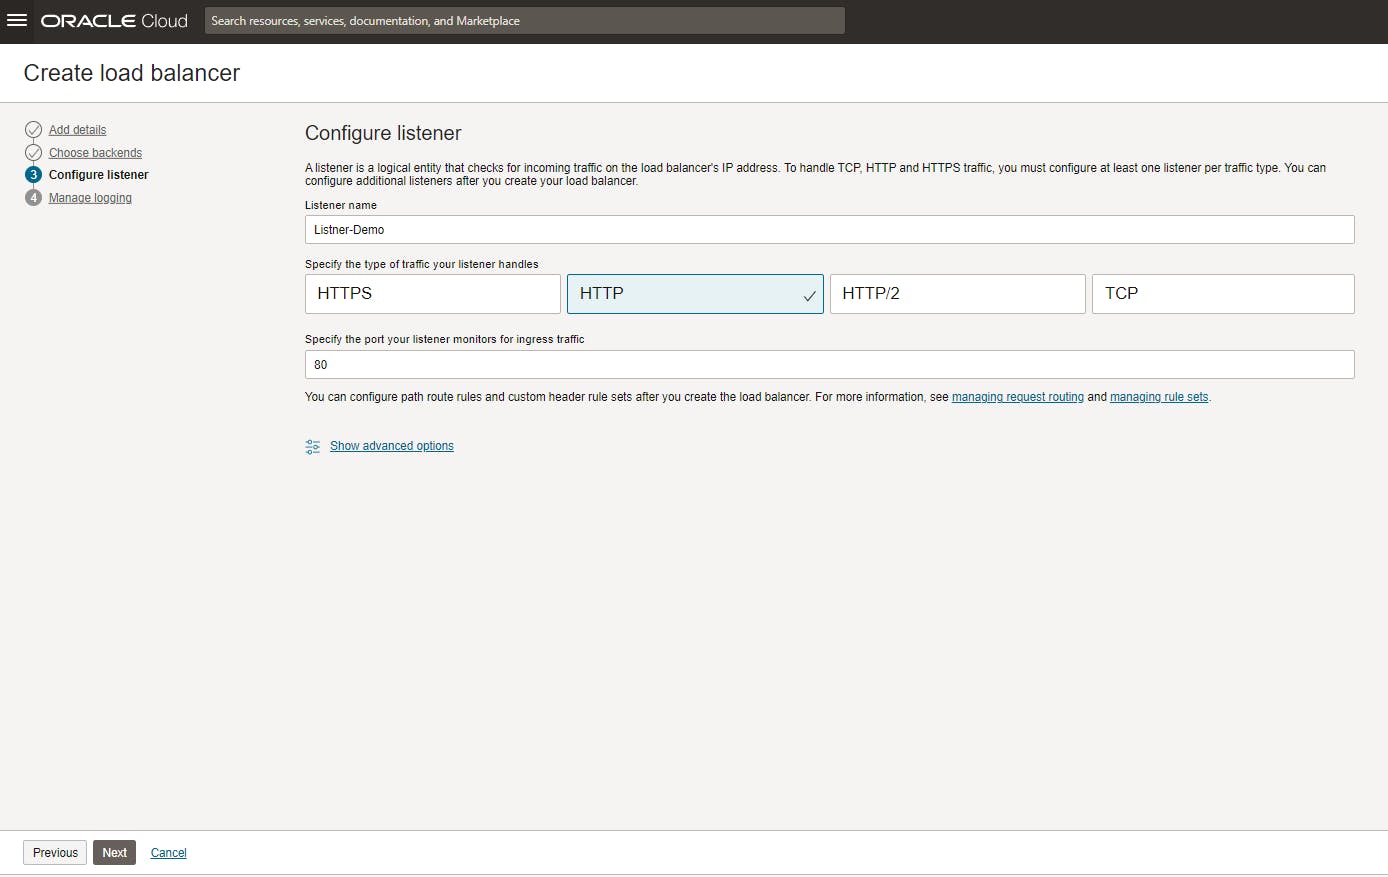
Finally, configure a listener. In our case, we will listen to the HTTP traffic coming on port 80, so configure the Listener as it is shown and click next
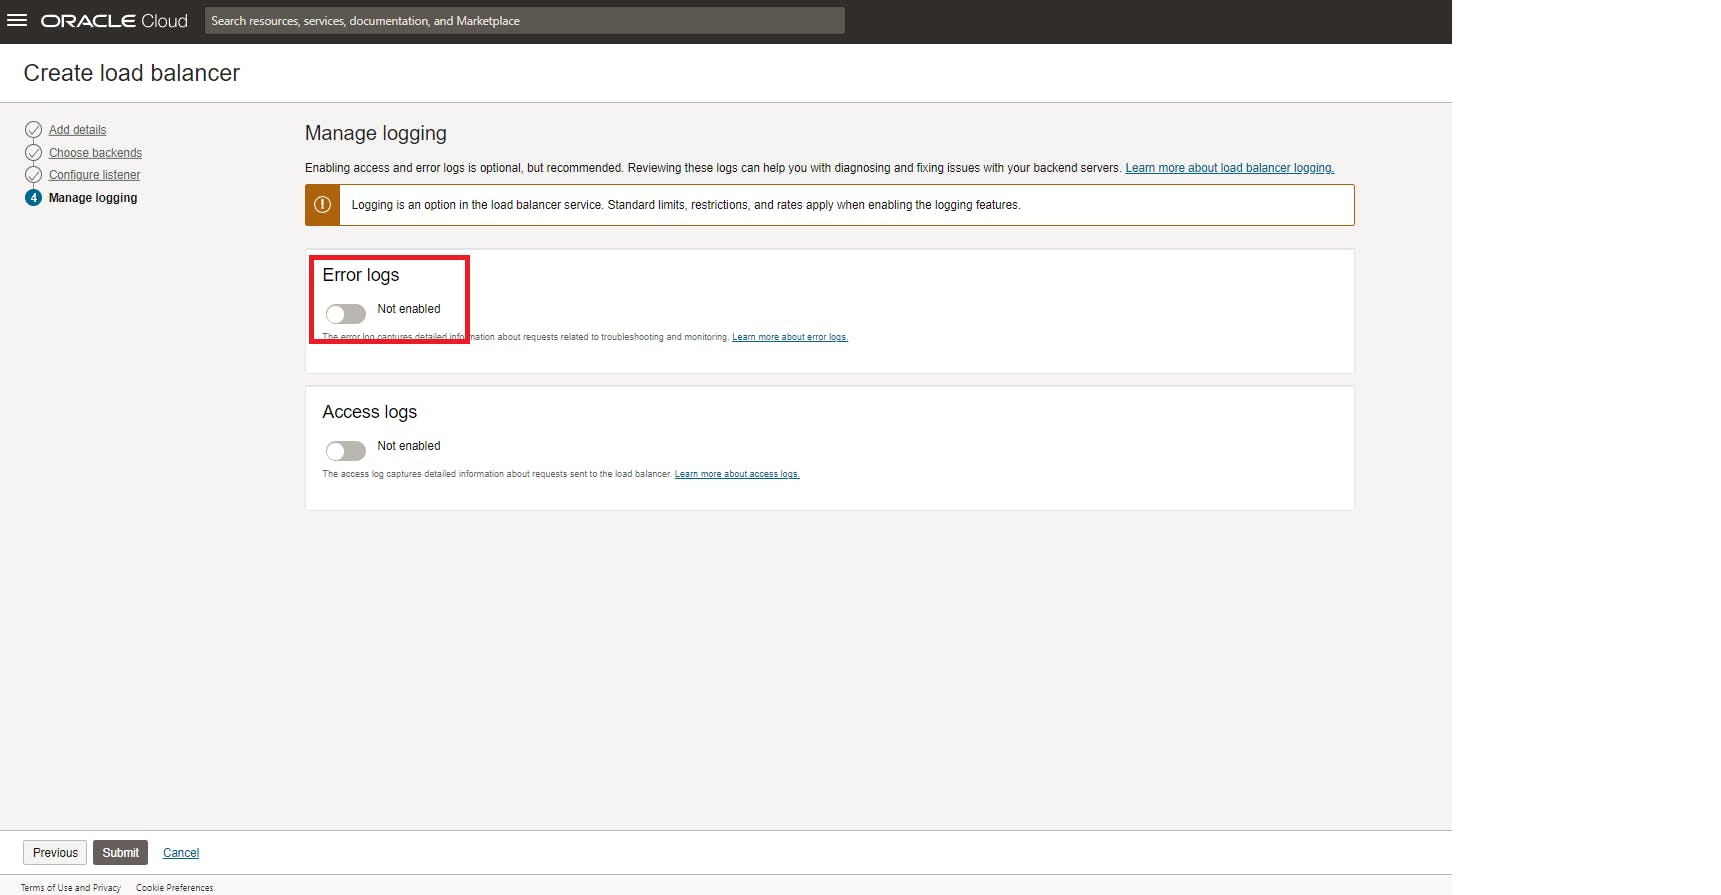
We don't need to log the errors for now, so disable the Error logs option and click submit.
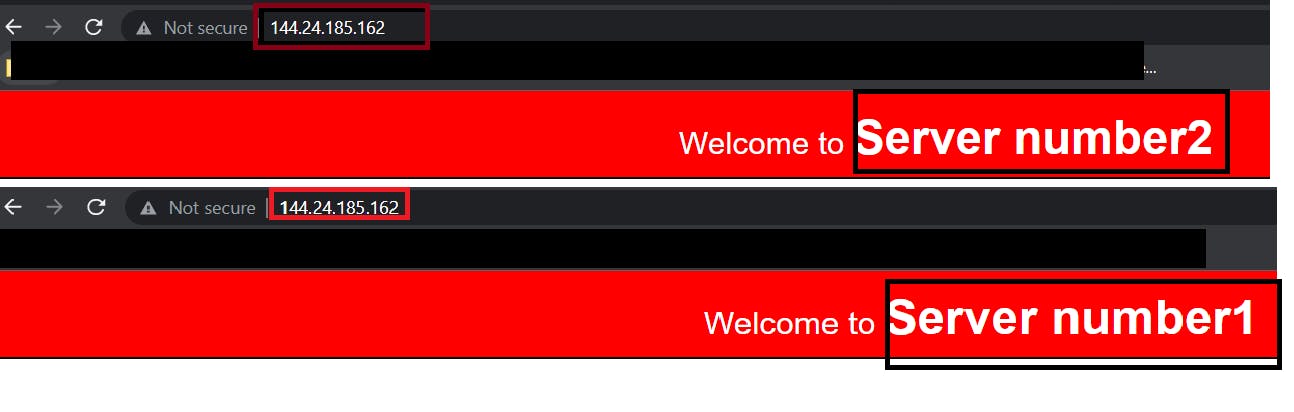
Once your load balancer displays an available status and the backend health status is marked as ok, copy the public IP address of the load balancer and enter it into your browser.

Notice that every time we refresh the browser, it will redirect me to a different server.
Conclusion
The load balancer is a critical component when designing a system regardless a cloud system or an on-premise. It helps to improve the end-user experience and provides high availability and scalability of the system. They can be used to handle incoming requests from the public internet or even to handle other service requests within the same system.
In the next post, we will talk more in detail about the layer-7 balancer and we will go through a demo to show how to implement a load balancer in OCI.