

Optimize File Management in Oracle APEX Applications through OCI Object Storage

Timo joined Hyand in Ratingen, Germany, as a Senior Consultant in 2019, focusing on Oracle databases and APEX applications. With a background as a Data Warehouse Specialist, he has expertise in Database Administration, performance tuning, and SQL development. Timo is passionate about web development, cloud computing, and the architecture behind it, and became part of the Oracle ACE Community in 2023. He enjoys sharing his knowledge at conferences and through blog posts. When he's not working, you can find him traveling, hanging out with his family, or cooking up something in the kitchen.
Introduction
In this guide, we will explore how to integrate OCI Object Storage with Oracle APEX applications for efficient file management. By leveraging the powerful DBMS_CLOUD package, you can effortlessly upload files to object storage directly from your APEX application.
Why use OCI Object Storage?
OCI Object Storage is a scalable, durable, and cost-effective solution for storing and managing files in the cloud, which can be easily integrated with Oracle APEX applications for efficient file management. The Object Storage service can store an unlimited amount of unstructured data of any content type, including analytic data and rich content, such as images and videos. With Object Storage, you can securely store or retrieve data directly from the internet or within the cloud platform.
Prerequisites
Before we start, please make sure you have completed the following prerequisites listed below. This will enable you to move through this guide seamlessly.
OCI Tenancy ✅
Provisioning an Autonomous Database ✅
Accessing an APEX Instance ✅
Setting Up
To get started with your Object Storage, a few basic requirements need to be set up in the Oracle Cloud infrastructure. First off, you'll need an Object Storage itself. To keep everything safe and secure, you'll also need a user and an authentication token. To access your Object Storage, you'll have to create credentials that are stored safely in an encrypted format within the database. And last but not least, you'll need an APEX application to access the Object Storage.
Alright, we got some stuff to do, let's dive in 😎
Create an OCI Object Storage.
Let's get started on setting up an OCI Object Storage for our APEX application's users to store their uploaded files. To do this, log in to your OCI tenancy, click on the navigation menu, head over to Storage, and then select Buckets.
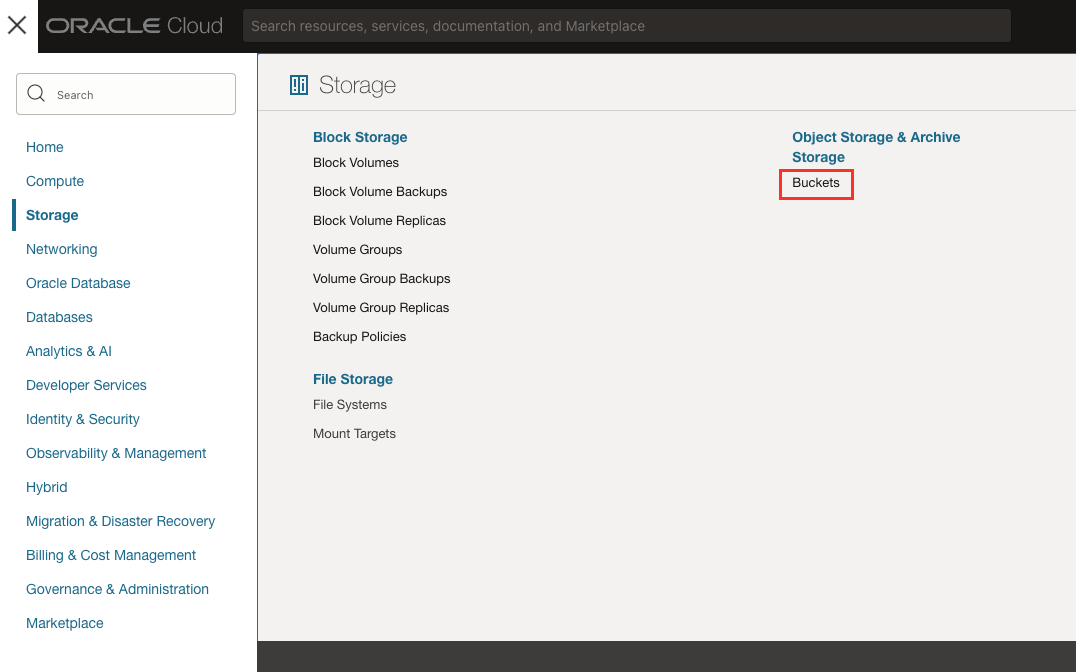
When you're on the Buckets page, make sure the desired compartment is selected. Then, go ahead and click the Create Bucket button. A dialog will open to create the bucket. Give it a name, for example, mybucket and choose the Standard storage tier. For this demo, there's no need to select any other Object Storage features - just click Create, and you'll have your bucket in no time.
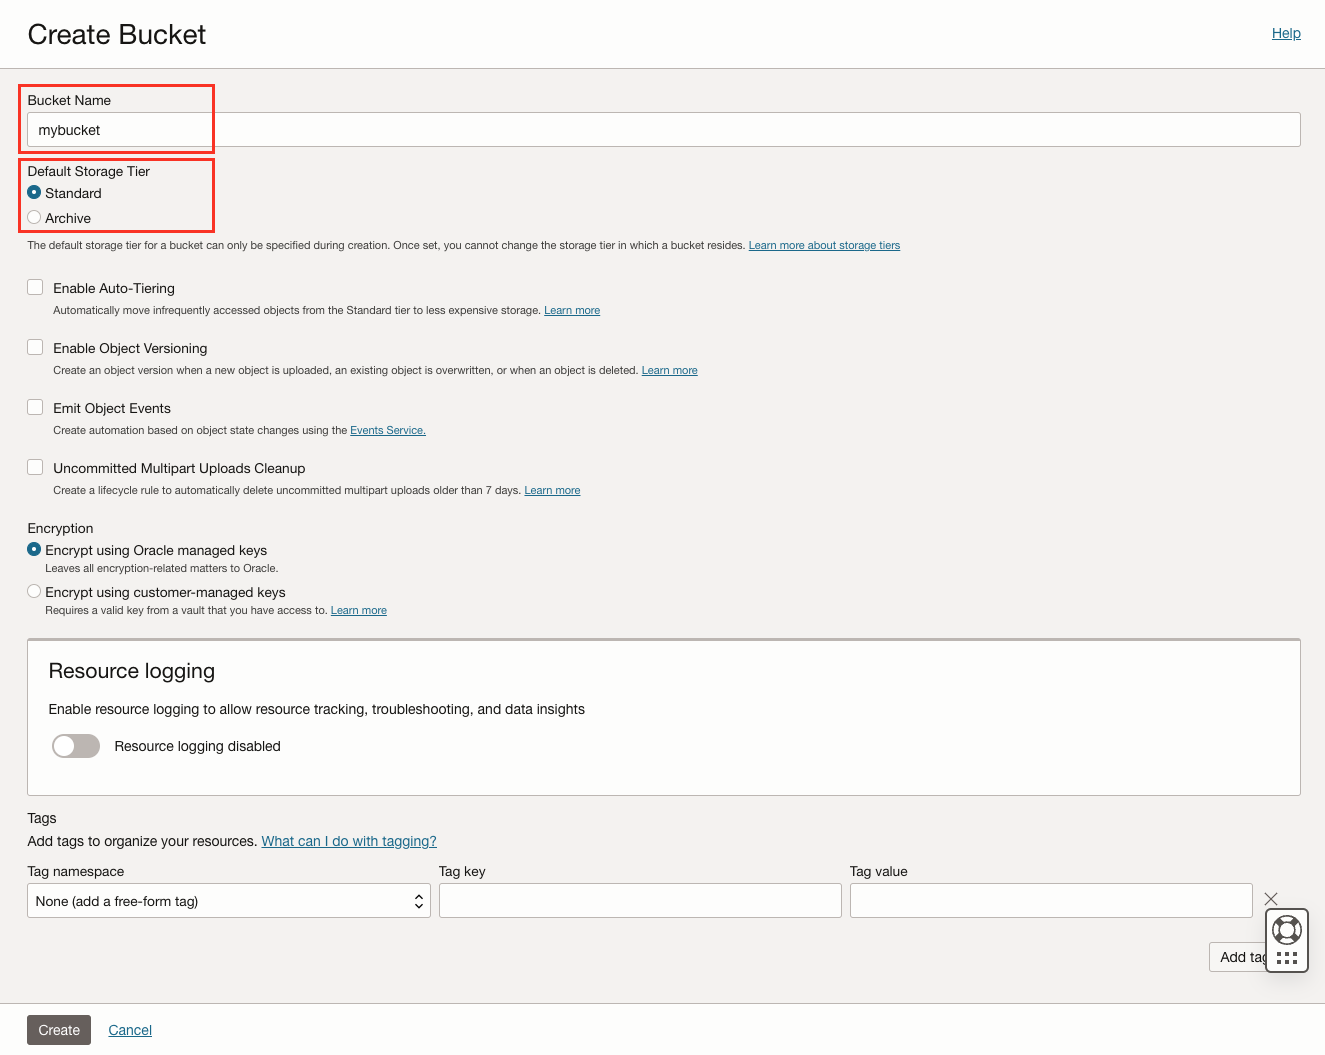
Ensure that the bucket has been created successfully.
If everything is good and things are running smoothly, move on to the next step.
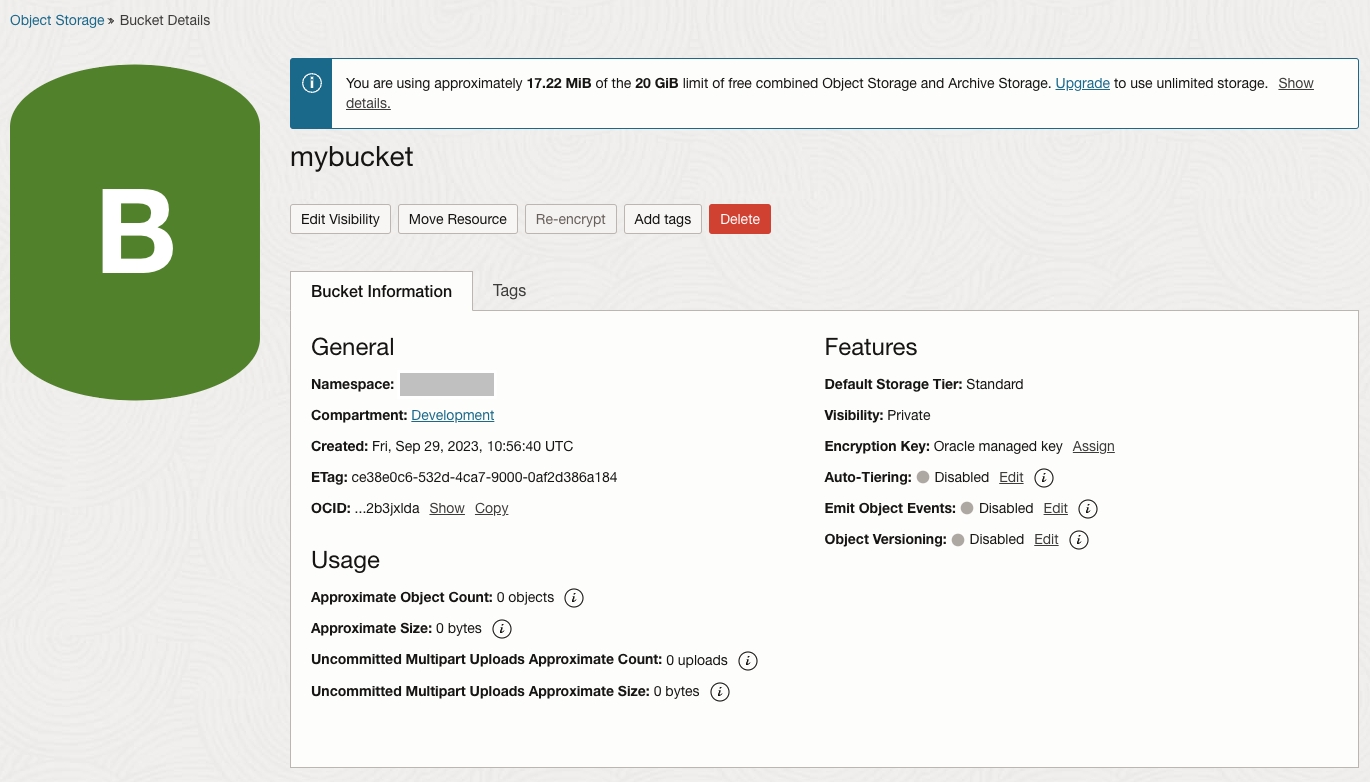
Create the Identity and Access Management Resources
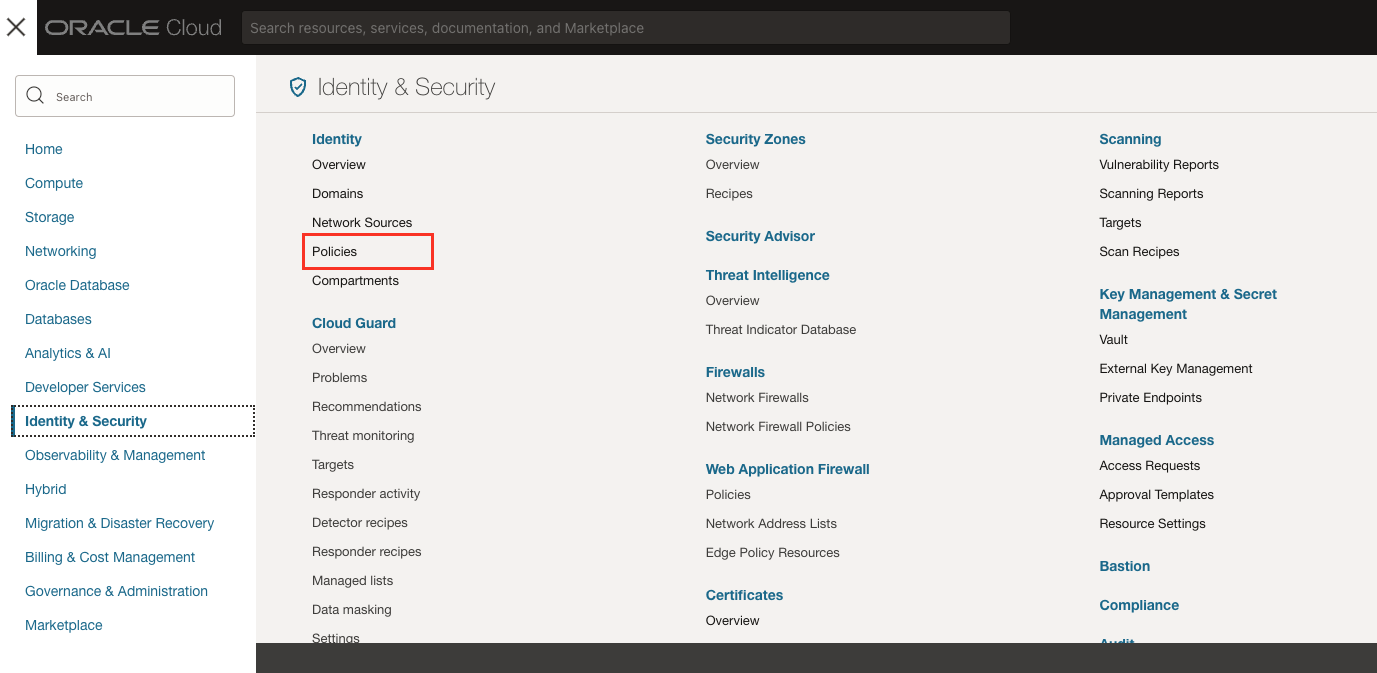
In this step, we'll be setting up the necessary Identity and Access Management (IAM) resources to help us work with Object Storage using the DBMS_CLOUD package. So, access the navigation menu again and click the Identity & Security link. Then, under Identity, go ahead and click on Domains.
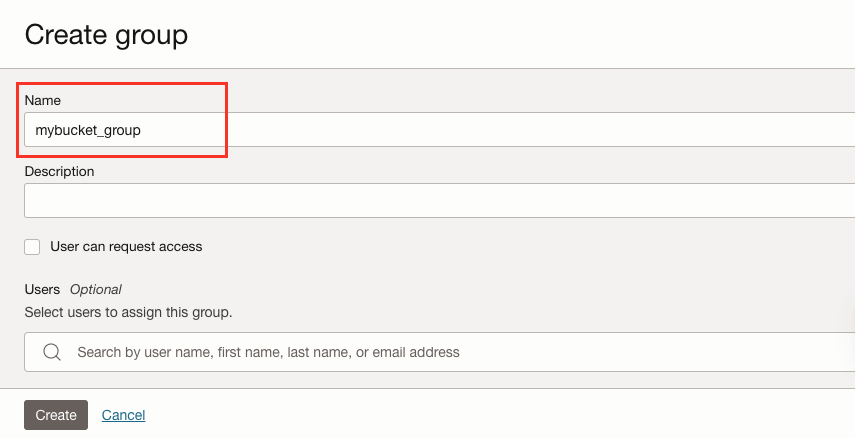
Just below the table of domains, you'll find a link to the Default domain. If you don't see the right domain, just take a quick look at the left side of the page and ensure the root compartment is selected. Now, on the left navigation menu, give the Groups link a click and then click the Create Group button. Name your group e.g. mybucket_group and add an optional description if you'd like. Finally, click the Create button to create the group.
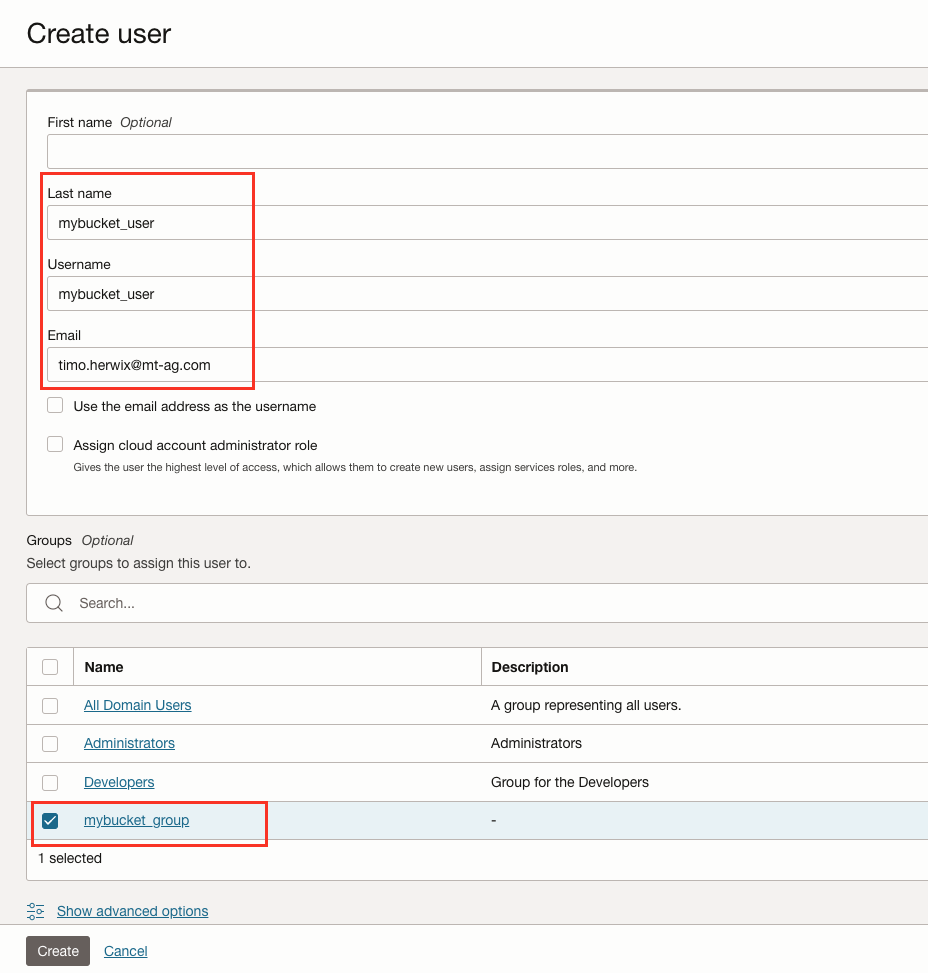
Next, we create a user that is used to authenticate. First, head to the group's details page and click on the Default domain breadcrumb link at the top to go back to the domain's details page. Now, find the Users link in the left navigation menu and click on it, then click the Create User button.
At a minimum, enter a Last name and your preferred Username. Keep in mind that depending on your domain's settings, you might need to provide an email address as well. If you'd like a different username, simply uncheck the Use the email address as the username option and fill in both the Username and Email fields.
Next, scroll down to assign the user to the group you created earlier by checking the box next to the desired group's name. Finally, click the Create button to create the user.
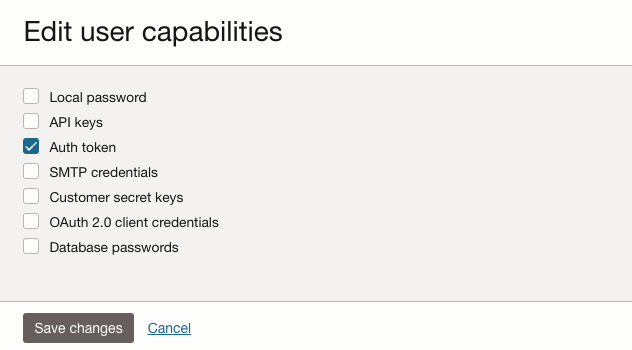
On the user's details page, click the Edit user capabilities button. Uncheck all capabilities except Auth token, and then click the Save changes button.
On the user's details page, click the Edit user capabilities button. Make sure to uncheck all the capabilities, leaving only Auth token checked. Once that's done, click the Save changes button.
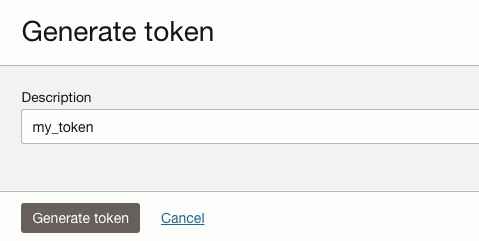
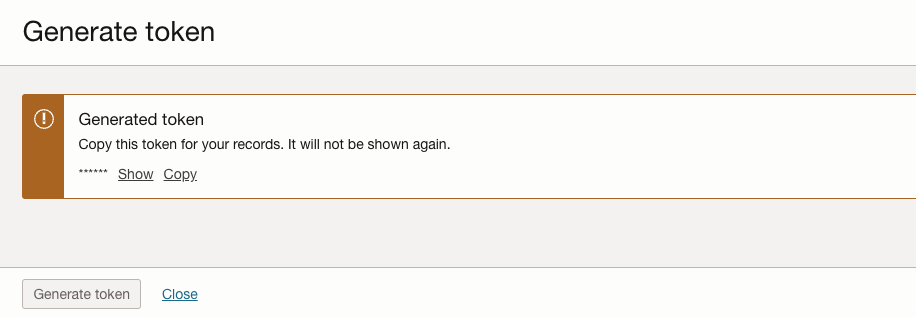
Alright, now let's create an Auth Token for the user so they can access the Object Storage securely. From the user's details page, under the Resources menu, you'll find the Auth tokens link. Click the Generate token button. This will open a generate token details page. Enter a description if you'd like, and then click the Generate token button.
Finally, we need to set up a policy that specifies the actions our group members are allowed to perform. In this case, we will create a policy that allows the group read and manage the bucket created earlier.
To do this, navigate back to Identity & Security. Then, under the Identity section, you'll find the Policies link - go ahead and click on that.
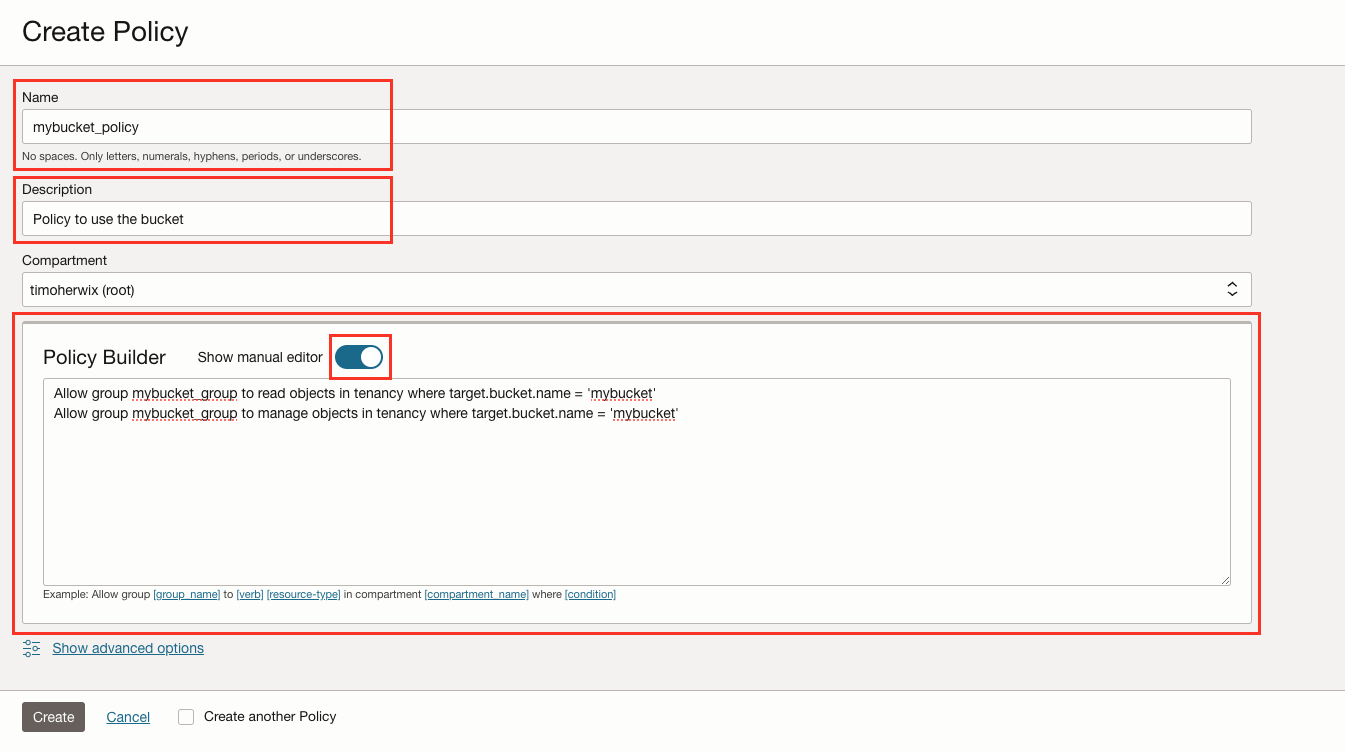
Click the Create Policy button. Once you're on the Create Policy Details page, give your policy a name, for example, mybucket_policy and add a description. Choose the root compartment for where this resource will be created. Now, switch the Show manual editor toggle to enable it and enter the two statements below, and then click the Create button.
Allow group mybucket_group to read objects in tenancy where target.bucket.name = 'mybucket'
Allow group mybucket_group to manage objects in tenancy where target.bucket.name = 'mybucket'
That's it. You've completed the first part in Oracle Cloud Console ✅
Configuring the DBMS_CLOUD package
The DBMS_CLOUD package is a feature in Autonomous Database that enables easy interaction with OCI Object Storage and other cloud storage services like AWS S3 and Azure Blob Storage, from the database. It is also compatible with on-premises installations for versions 19c or higher.
Note: To ensure that the user can create credentials and grant access to the
DBMS_CLOUDpackage, you can run the following SQL command:grant create credential to demo; grant execute on dbms_cloud to demo;
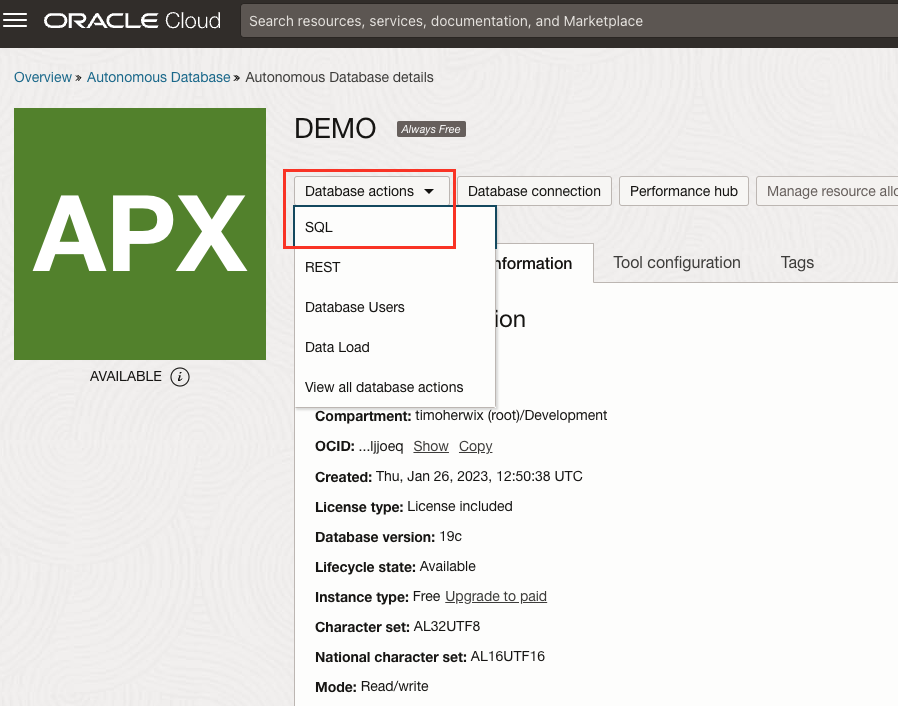
Let's get the DBMS_CLOUD package set up. First, go ahead and open SQL-Developer Web by clicking on Oracle Database in the navigation menu. Then, click on Autonomous Database and choose the ADB you've already set up. When you're on the details page, simply click Database Actions and then SQL.
Check that you're connected to the correct schema. If you're not - simply sign out and log in using the user credentials for the desired schema.
Now that the SQL-Developer Web is open in a new tab, we can create a credential for the Object Store using the DBMS_CLOUD.CREATE_CREDENTIAL procedure. For an Oracle Object Storage bucket, just use the username and the Auth Token we generated earlier. Here's the command you'll need:
begin
  dbms_cloud.create_credential (
    credential_name => 'mybucket_cred',
    username        => 'mybucket_user',
    password        => 'my-Auth-Token'
  ) ;
end;
/
FYI: You can display the credential information using the USER_CREDENTIALS view ✔
select credential_name,
       username,
       enabled
  from user_credentials
 order by credential_name;
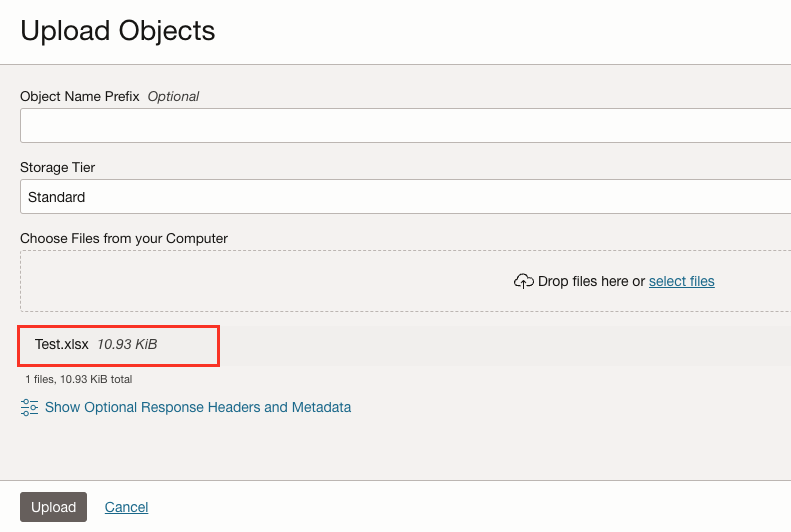
To check if the connection works, you can upload a test file to your OCI Object Storage and then display it using SQL.
Simply go back to the OCI console and navigate to your Object Storage bucket. Once you're there, click on Objects and then click Upload. Choose a file you want to upload.
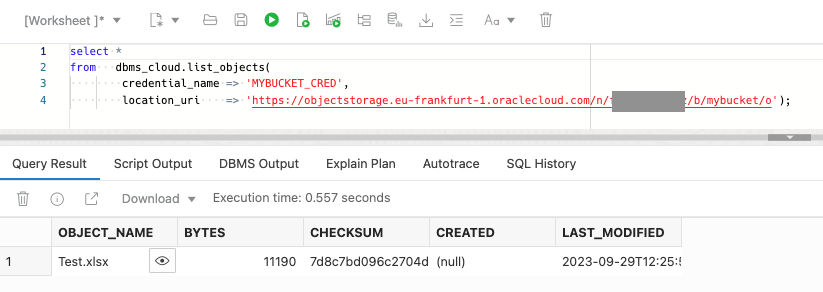
Go back to SQL-Developer Web and enter this SQL command:
select *
from   dbms_cloud.list_objects(
        credential_name => 'MYBUCKET_CRED',
        location_uri    => 'https://objectstorage.eu-frankfurt-1.oraclecloud.com/n/namespace/b/mybucket/o');
region and namespace with the region of your tenancy and namespace ID of your Object Storage.https://objectstorage.{region}.oraclecloud.com/n/{namespace}/b/{bucket}/o/{objectname}
You can find the namespace ID on the bucket details page see below.

If everything is set up correctly, you should see the file you uploaded earlier appear in the SQL output.
Woohoo! Our connection is up and running perfectly! Time to dive in and create an APEX demo app! So let's do this 😉
Create an APEX Application
Let´s start by creating a demo app
Create a new application in the App Builder. You can name your application for example File Management Demo in the wizard.

Create Substitution Strings
Now, from the Application home page, look for the Edit Application Definition button near the top-right corner of the page, and give it a click. This will take you to the application definition. Next, simply tap on the Substitutions tab, and let's create the two Substitution Strings mentioned below.
CREDENTIAL_NAME
LOCATION_URI
Use the CREDENTIAL_NAME and LOCATION_URI that you previously configured in the Configuring the DBMS_CLOUD Package step.
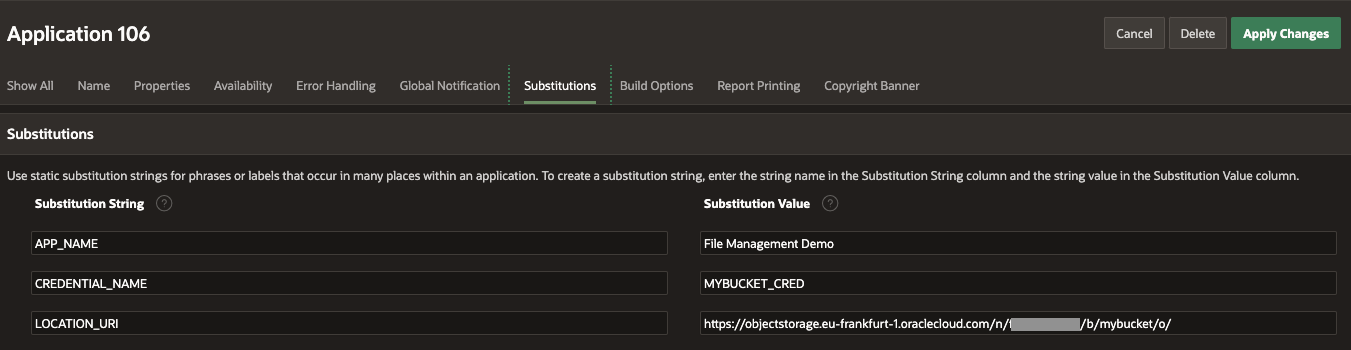
Finally, click Apply Changes.
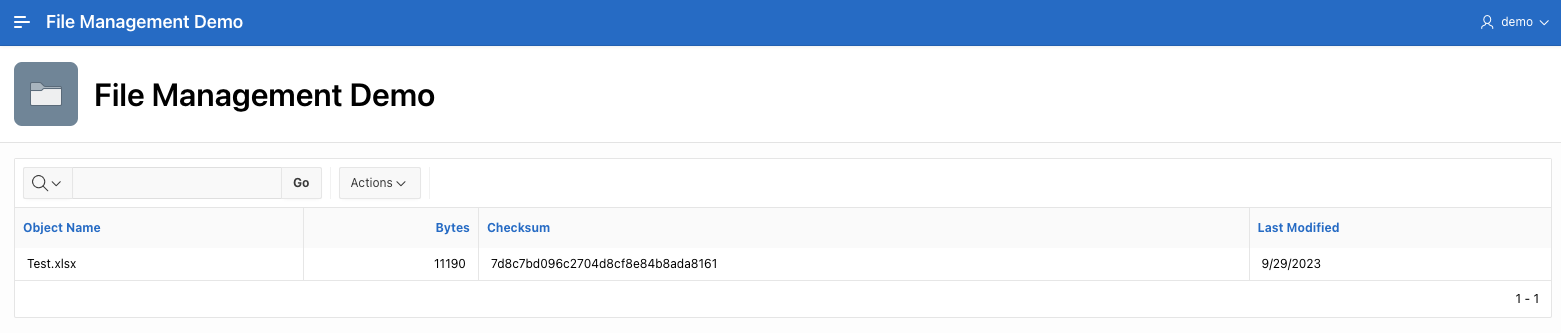
Create a Report to List Objects
Let's go ahead and create a report to display all the objects in our object storage. For that navigate to Page 1 and add an Interactive report to the body region. Name the IR for example My Objects. Next, choose SQL Query as the source type and enter the following SQL Query:
SELECT object_name,
       bytes,
       checksum,
       last_modified
  FROM dbms_cloud.list_objects(:CREDENTIAL_NAME,
                               :LOCATION_URI);
So, we're using the
list_objectsfunction here, which is helpful for showing us all the objects in the specified location on the object store.
Once you have finished, click Save and Run to test if everything works properly. If successful, the results should appear similar to this.
Create a Download function
Since the files are stored in a private Object Storage, users won't be able to access them directly through their browsers. So we'll be creating an Application Item and an Application Process that will allow Oracle APEX to fetch the object.
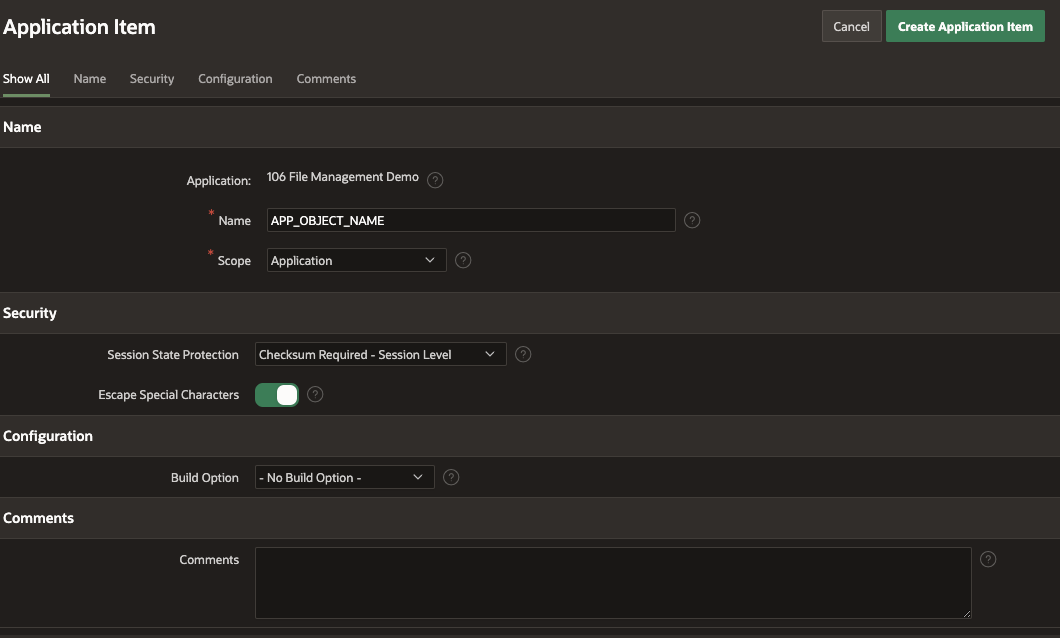
From the application home page, go to the Shared Components. Click the link Application Items. Click the button Create. Enter the attributes of the application item APP_OBJECT_NAME, and then click the button Create Application Item.
To create a download function, just follow these simple steps from your application's home page:
Goto Shared Components
Look for Application Items
Now, click the Create button
Enter the attributes of the application item
Name: APP_OBJECT_NAME
Scope: Application
Session State Protection: Checksum Required - Session Level
Escape Special Characters: Enabled
Click Create Application Item button
Navigate back to Shared Components
Look for Application Processes
Click the "Create" button
Enter the attributes of the application process
Name: DOWNLOAD_OBJECT
Point: Ajax Callback: Run this application process when requested by a page process.
Click the Next button
For the next step, enter the following PL/SQL procedure as the source for your application process:
declare
  l_file blob;
  l_mime_type varchar2(32767);
begin

  l_file := dbms_cloud.get_object(
    credential_name => :CREDENTIAL_NAME,
    object_uri      => :LOCATION_URI || :APP_OBJECT_NAME);

  l_mime_type := 'application/octet-stream';

  sys.htp.init;
  sys.owa_util.mime_header(l_mime_type, false);
  sys.htp.p('content-length: ' || dbms_lob.getlength(l_file));
  sys.htp.p('content-disposition: filename="' || :app_object_name || '"');
  sys.owa_util.http_header_close;
  sys.wpg_docload.download_file(l_file);

  apex_application.stop_apex_engine;

end;
Click the Next button
To make sure your application process is secure, the Condition Type is set to User is Authenticated (not public). After that, click on the Create Process button to wrap things up and finish the wizard.

Go back to Page 1 and modify the SQL Query in the interactive report. Replace the existing SQL with the following:
SELECT object_name,
       bytes,
       checksum,
       last_modified,
       'Download' as download_object
  FROM dbms_cloud.list_objects(:CREDENTIAL_NAME,
                               :LOCATION_URI);
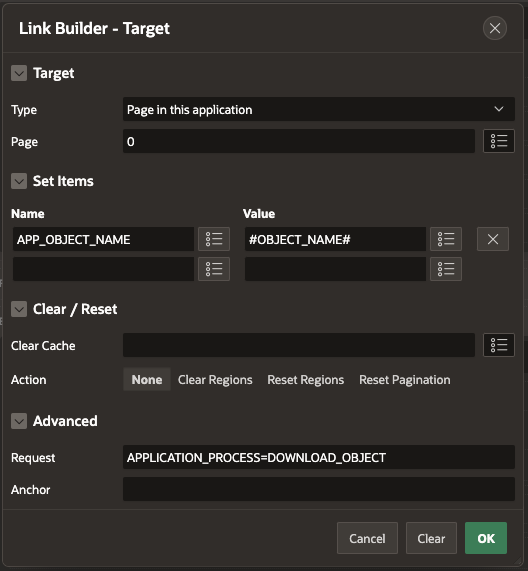
Let's make some changes to the IR column DOWNLOAD in the My Objects region so it shows up as a link. For the Link Text, use #DOWNLOAD_OBJECT#. Next, find the Target option under Link and set the Target Page to 0. Now, under Set Items, add the Name APP_OBJECT_NAME and value #OBJECT_NAME#. Lastly, type in the request APPLICATION_PROCESS = DOWNLOAD_OBJECT and click OK.
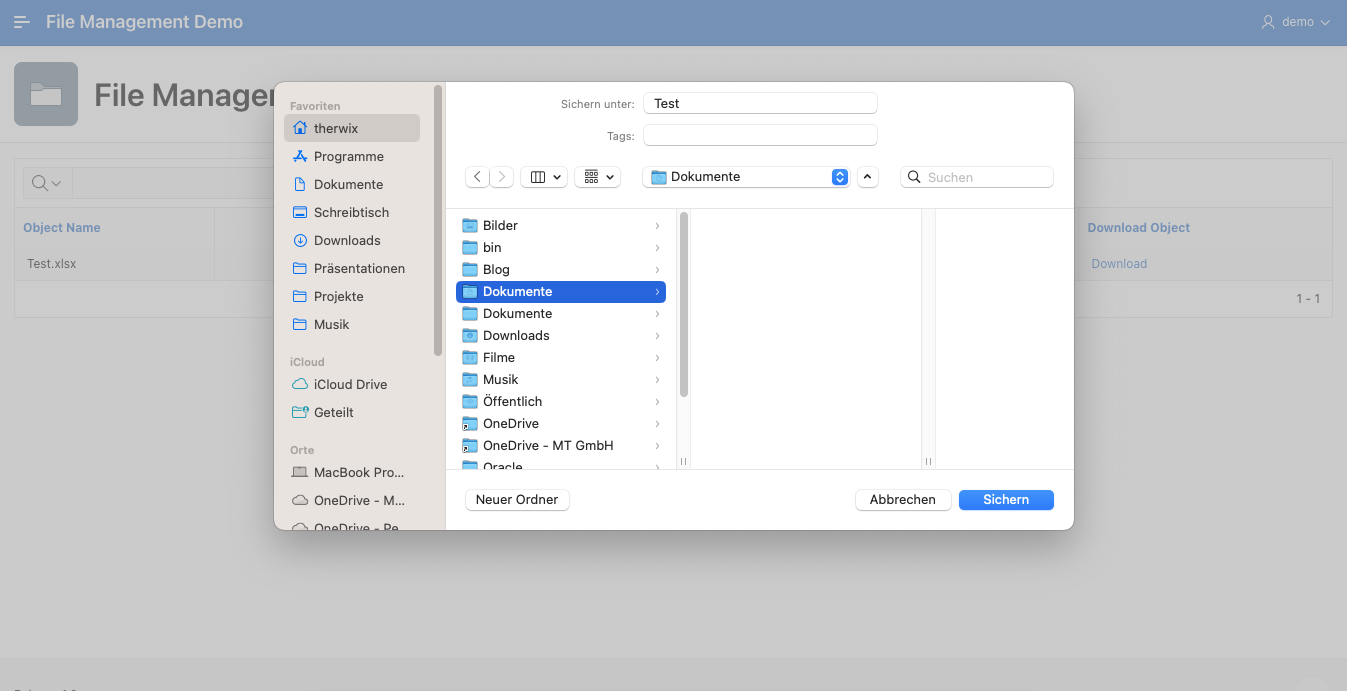
And that's it! You're all set with your new download function. Click Save and Run to test if everything works smoothly.
Your app should now look something like this, and you'll be able to download files with just a click on the download link.
Create a Delete function
The delete function is much easier than the download function. Go back again to Page 1 and modify the SQL Query in the interactive report. Replace the existing SQL with the following:
SELECT object_name,
       bytes,
       checksum,
       last_modified,
       'Download' as download_object,
       'Delete' as delete_object
  FROM dbms_cloud.list_objects(:CREDENTIAL_NAME,
                               :LOCATION_URI);
Let's tweak the IR column DELETE in the My Objects area to make it appear as a link, too. For the Link Text, use #DELETE_OBJECT#. Then, for Link Attributes, type in data-object="#OBJECT_NAME#" class="delete". After that, locate the Target option under Link, set the Type to URL, and enter javascript:void(null); for the URL. Once you're done, just click OK.

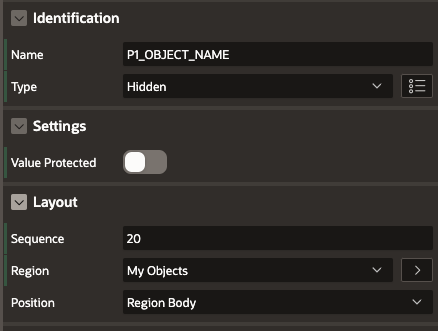
To save the OBJECT_NAME, we'll need a hidden Page Item. Just right-click on the My Objects Region and select Create Page Item. Name it P1_OBJECT_NAME and choose the Hidden Type. Make sure the Value Protected Toogle is disbaled.
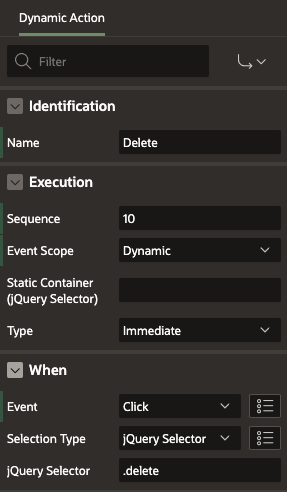
Alright, let's create a Dynamic Action that fires when we click the delete link. To do this, simply right-click on the Click event and choose Create Dynamic Action. Give it a name like Delete and set the Event Scope to Dynamic. Then, for the Selection type, choose jQuery Selector and enter .delete as the jQuery Selector.
Now, let's add some true actions to make it work.
For the first action, we'll use an Execute JavaScript Code event. Just type in the following JS Code in the Code-Editor:
$s('P1_OBJECT_NAME', $(this.triggeringElement).data('object'));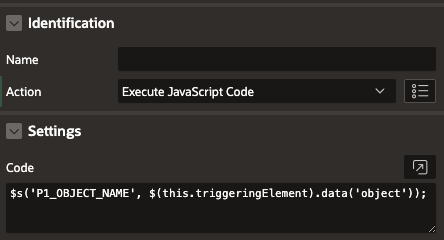
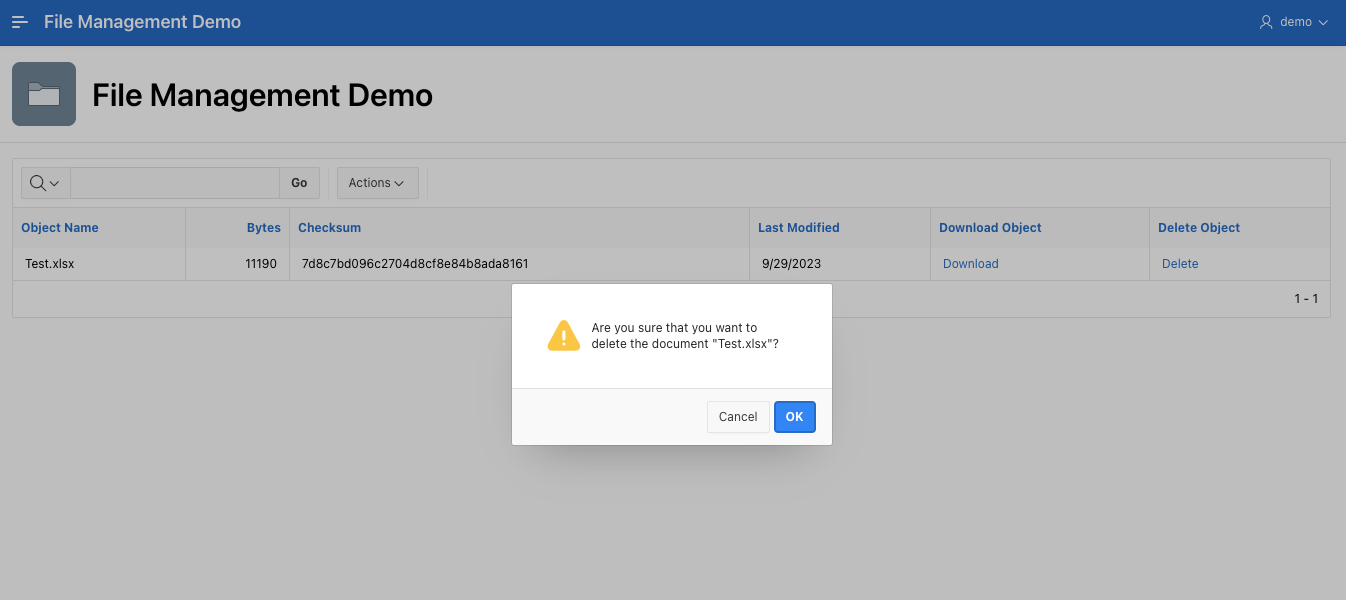
Next, add a Confirm action to check if you truly want to delete the object. Enter the following message and set the Style to Warning:
Are you sure that you want to delete the document "&P1_OBJECT_NAME."?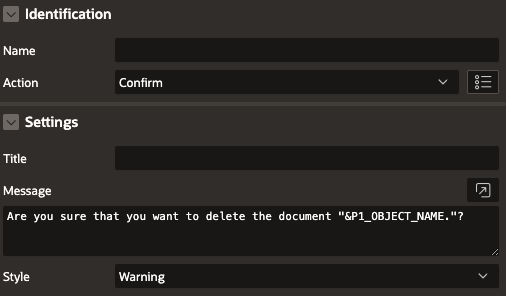
Now let's move on to the action that deletes the object. To do this, add an Execute Server-Side Code Action, choose the PL/SQL language, and then input the following PL/SQL code:
 dbms_cloud.delete_object(
     credential_name => :CREDENTIAL_NAME,
     object_uri      => :LOCATION_URI || :P1_OBJECT_NAME);
Enter P1_OBJECT_NAME for items to submit.
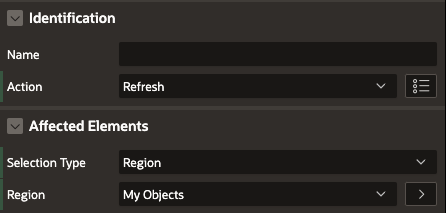
Lastly, to refresh the Interactive report, just add a Refresh action, set the Selection Type to Region, and pick the My Objects region.
That's it! Click Save and Run to test if everything works smoothly. Your app should now look something like this, and you'll be able to delete files with just a click on the delete link.
Once you're done, simply click the Save and Run button to see if everything runs like a charm. Your app should now appear something like this, and you'll be able to remove files with just a click on the delete link.
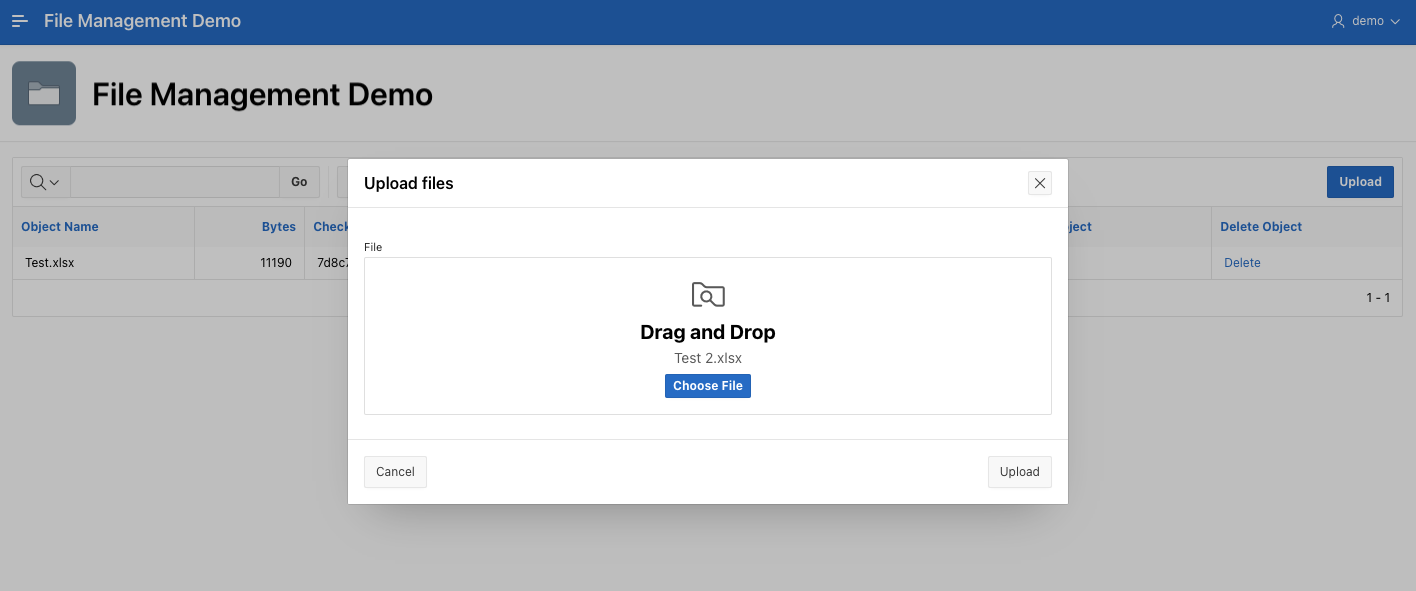
Create an Upload function
At the moment, we can list, download, and delete objects stored in the object storage. To wrap it up, let's add an upload function so we can easily put new files in the object storage. For this, we'll create a new page where we can upload files
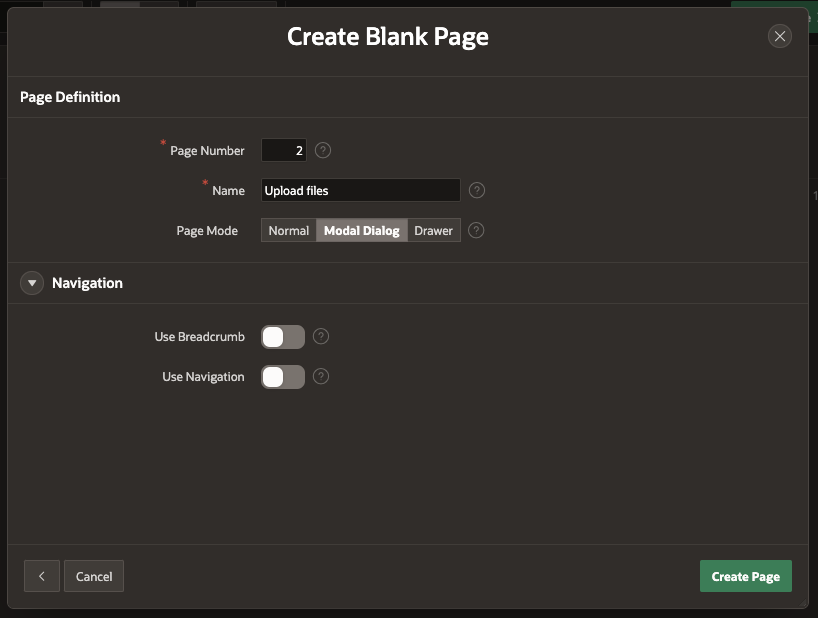
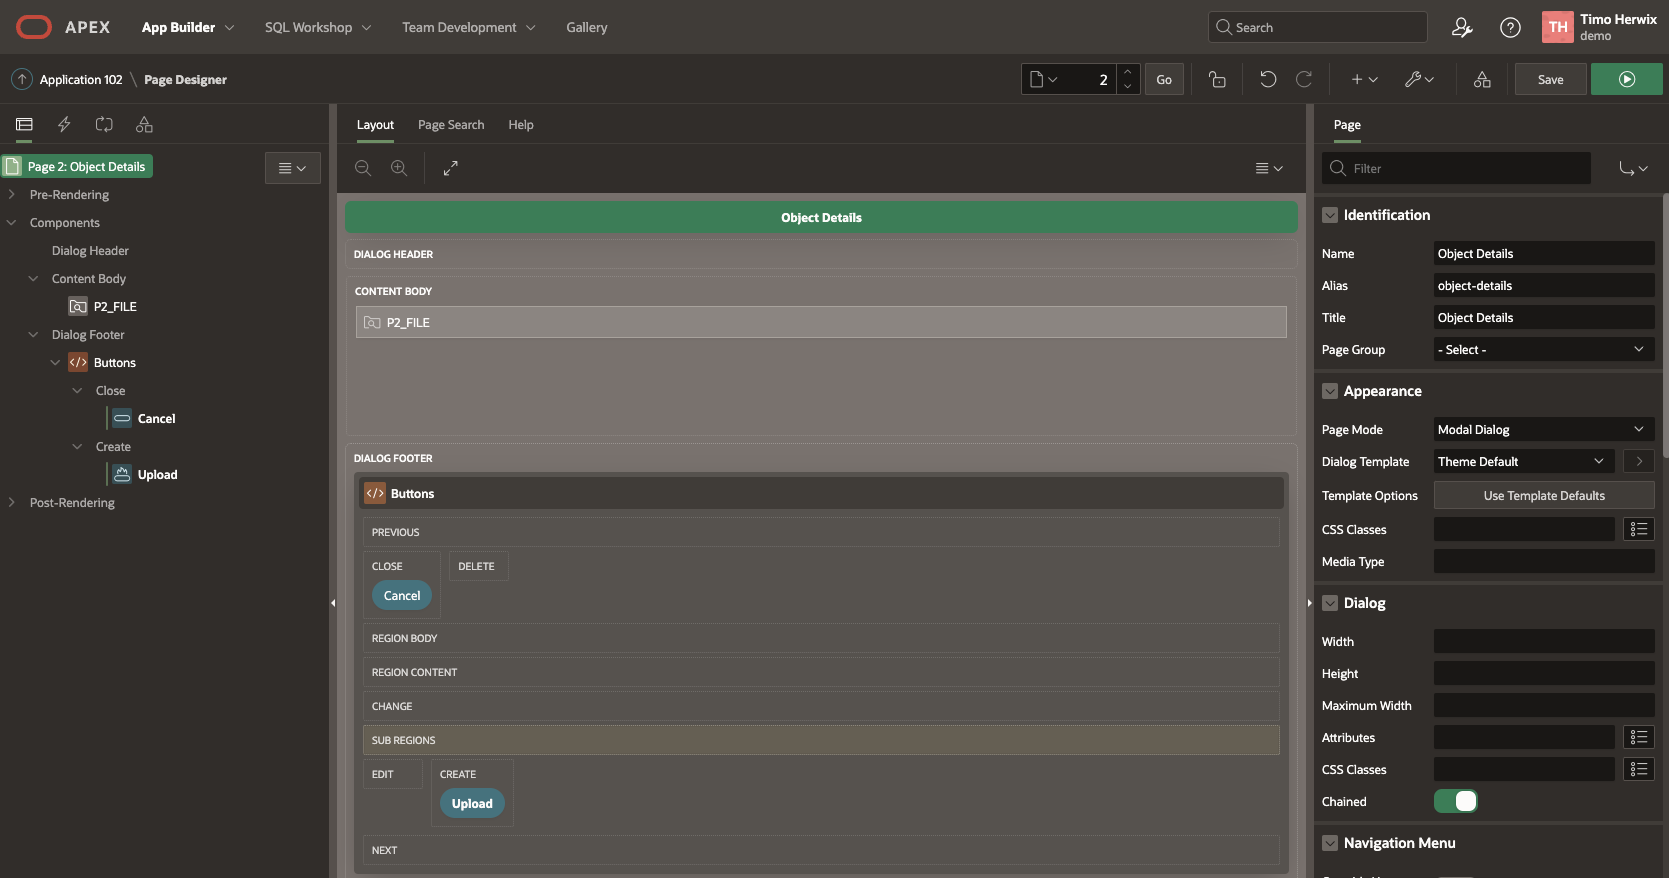
So go back to the application's home page and click on Create Page. When the modal page pops up, choose the Blank Page icon. If the wizard doesn't move forward automatically, just give the Next button a click. For the page number, enter 2 and name the page e.g. Upload files. Keep the page mode as Modal Dialog and disable the Breadcrumb and Navigation toggle since we won't be needing those. Lastly, click Create Page.
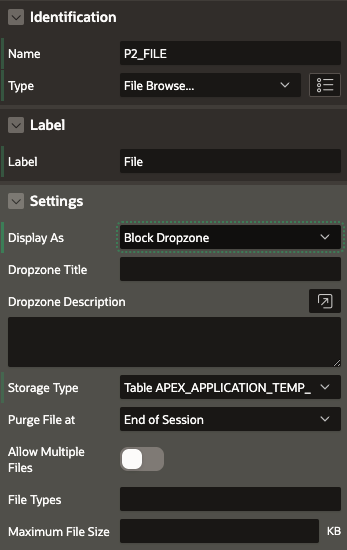
When the page is set up, go ahead and create a new Page Item in the Content Body region. Give it the name P2_FILE. For the type, pick File Browse. Then, under Settings, choose the Display as Block Dropzone option. You can ignore the other options for now, as they won't be necessary in this case.
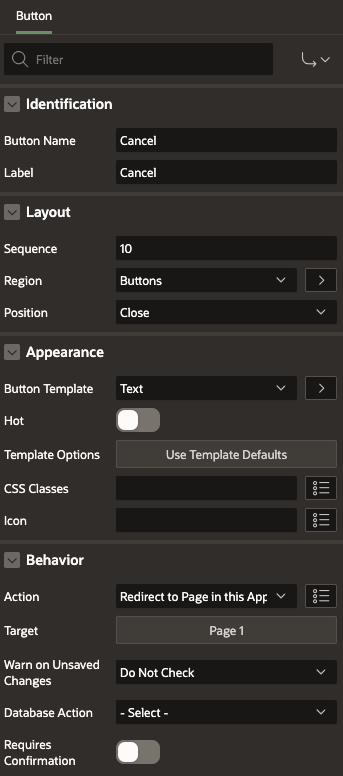
Next, add two buttons. For that we add a new Static Content region to the Dialog Footer region. Name it e.g. Buttons and choose the Buttons Container Template. Then add two buttons to region.
For the first button to cancel the upload and close the dialog, simply add a Text button in the Close position and name it Cancel. Then, choose the Redirect to Page in this Application action and set the Target Page to 1.
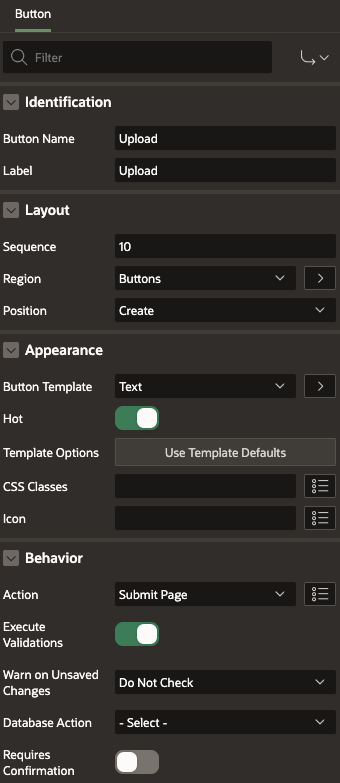
To upload a new file, add a second Text button in the Create position and name it something like Upload. After that, just choose the Submit Page action.
Your page should end up looking something like this after following those steps:
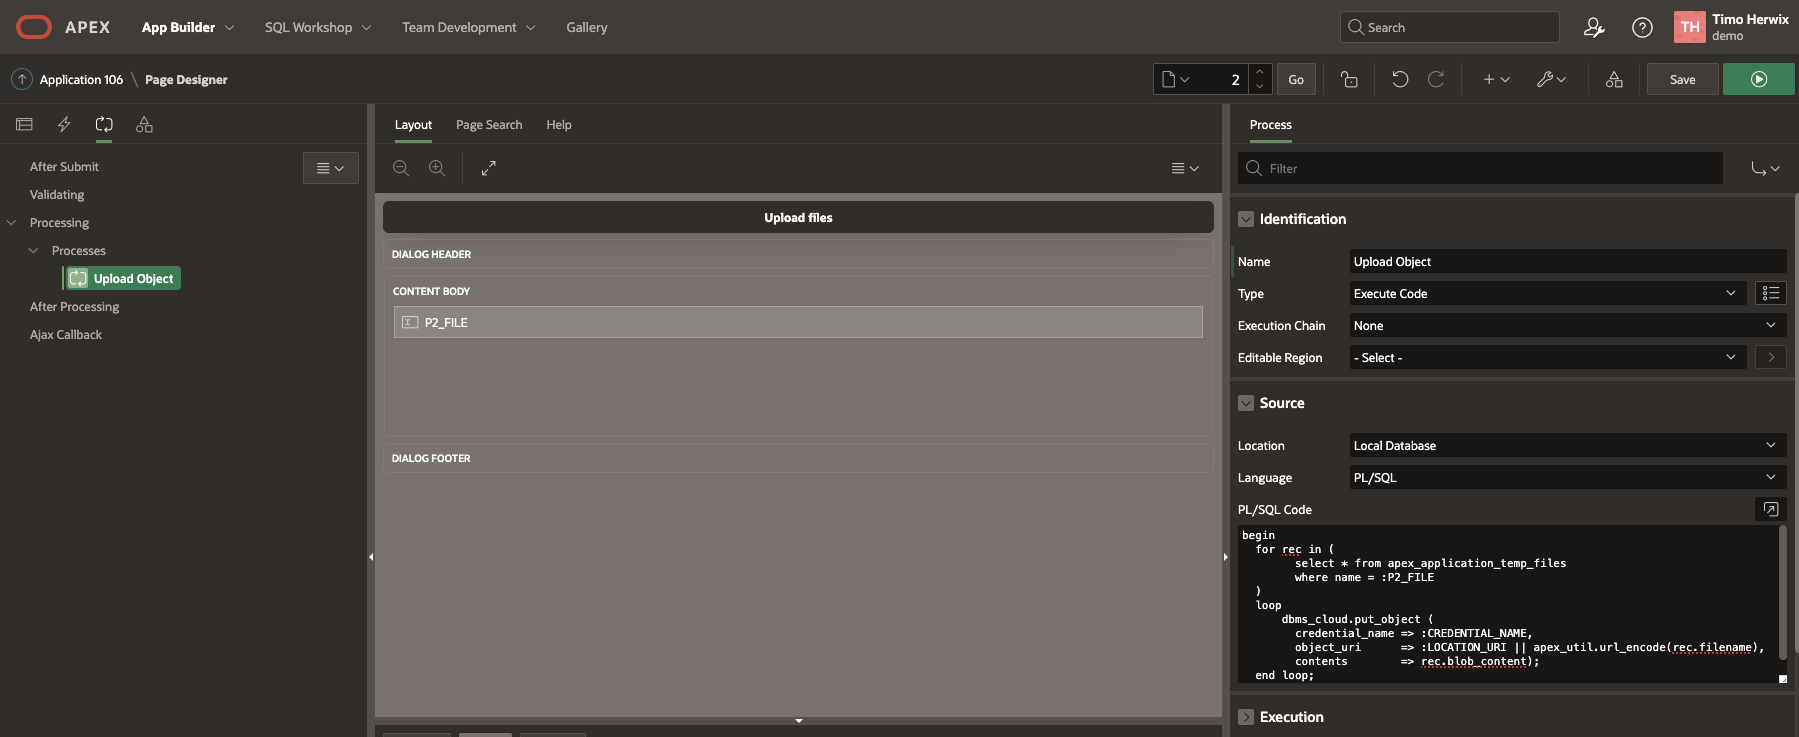
Now, we need a page process to upload the file to the Object Storage. Simply create a new page process named Upload Object with the type set to Execute Code. Then, just enter the following PL/SQL code into the source section:
begin
  for rec in (
        select * from apex_application_temp_files
        where name = :P2_FILE
  )
  loop
      dbms_cloud.put_object (
        credential_name => :CREDENTIAL_NAME,
        object_uri      => :LOCATION_URI || apex_util.url_encode(rec.filename),
        contents        => rec.blob_content);
  end loop;
end;
To check if your code is good to go, just click on the little checkmark icon in the toolbar. If everything looks great, go ahead and click the OK button. All other options can be simply ignored for now.
The last thing you need to do is to create an after-processing branch that'll take you back to Page 1 once the object is uploaded successfully. For that right click on after processing and then click on Create Branch. Name it Go to Page 1 and set the Target Type to Page in this application and then enter Page 1.
The final step is to make an after-processing branch that'll bring you back to Page 1 once the object uploads successfully. To do this, right-click on After Processing and then click Create Branch. Give it a name like Go to Page 1, set the Type to Page in this application, and then Target to Page 1.
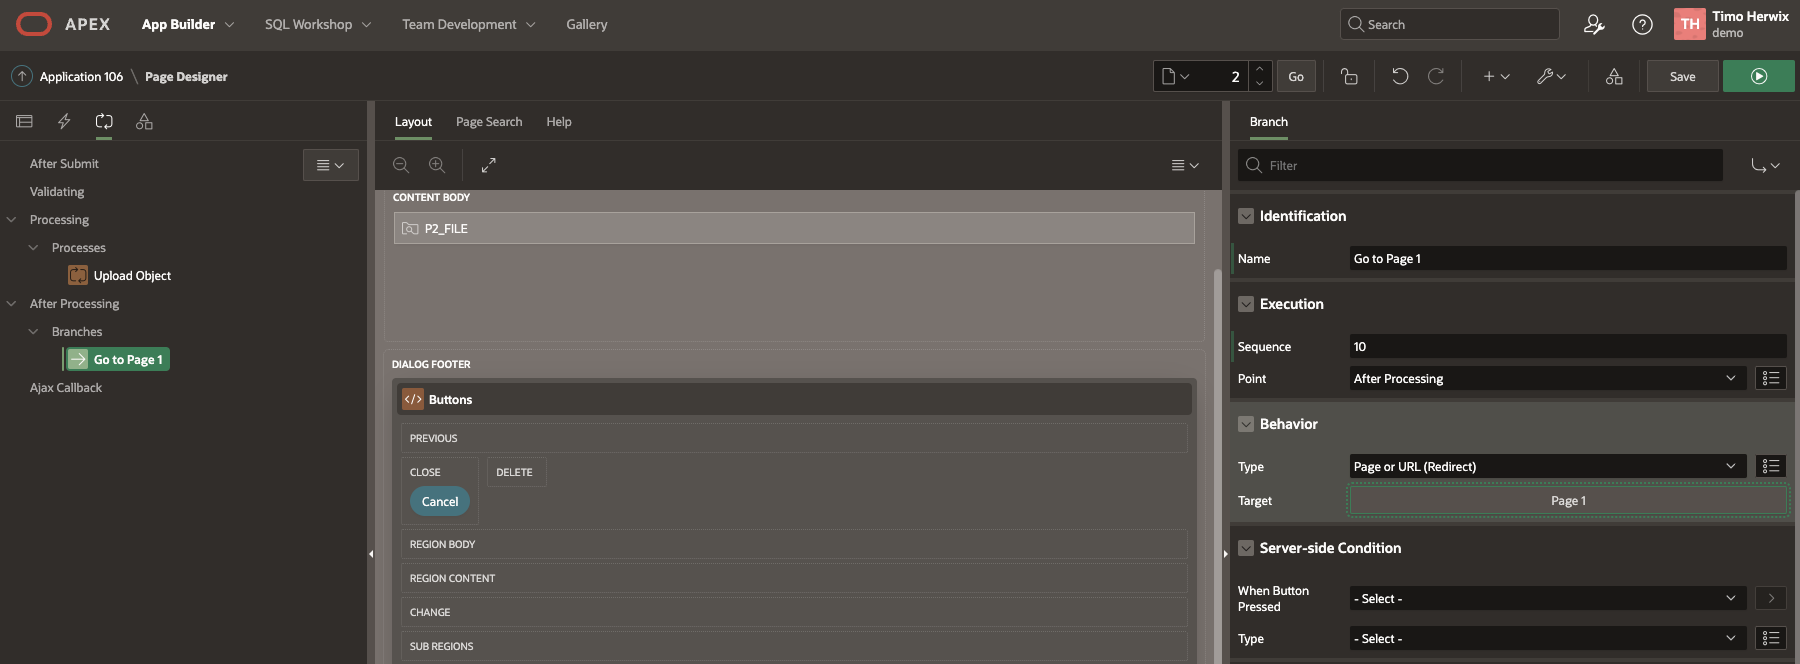
Click the Save button to save all changes and return back to Page 1 in the Application Builder.
Last Step, add a new Text (Hot) button to the Interactive Report. Place it to the right of the Interactive Report Search Bar position and name it Upload. Next, pick the Redirect to Page in this Application action and set the Target Page to 2.
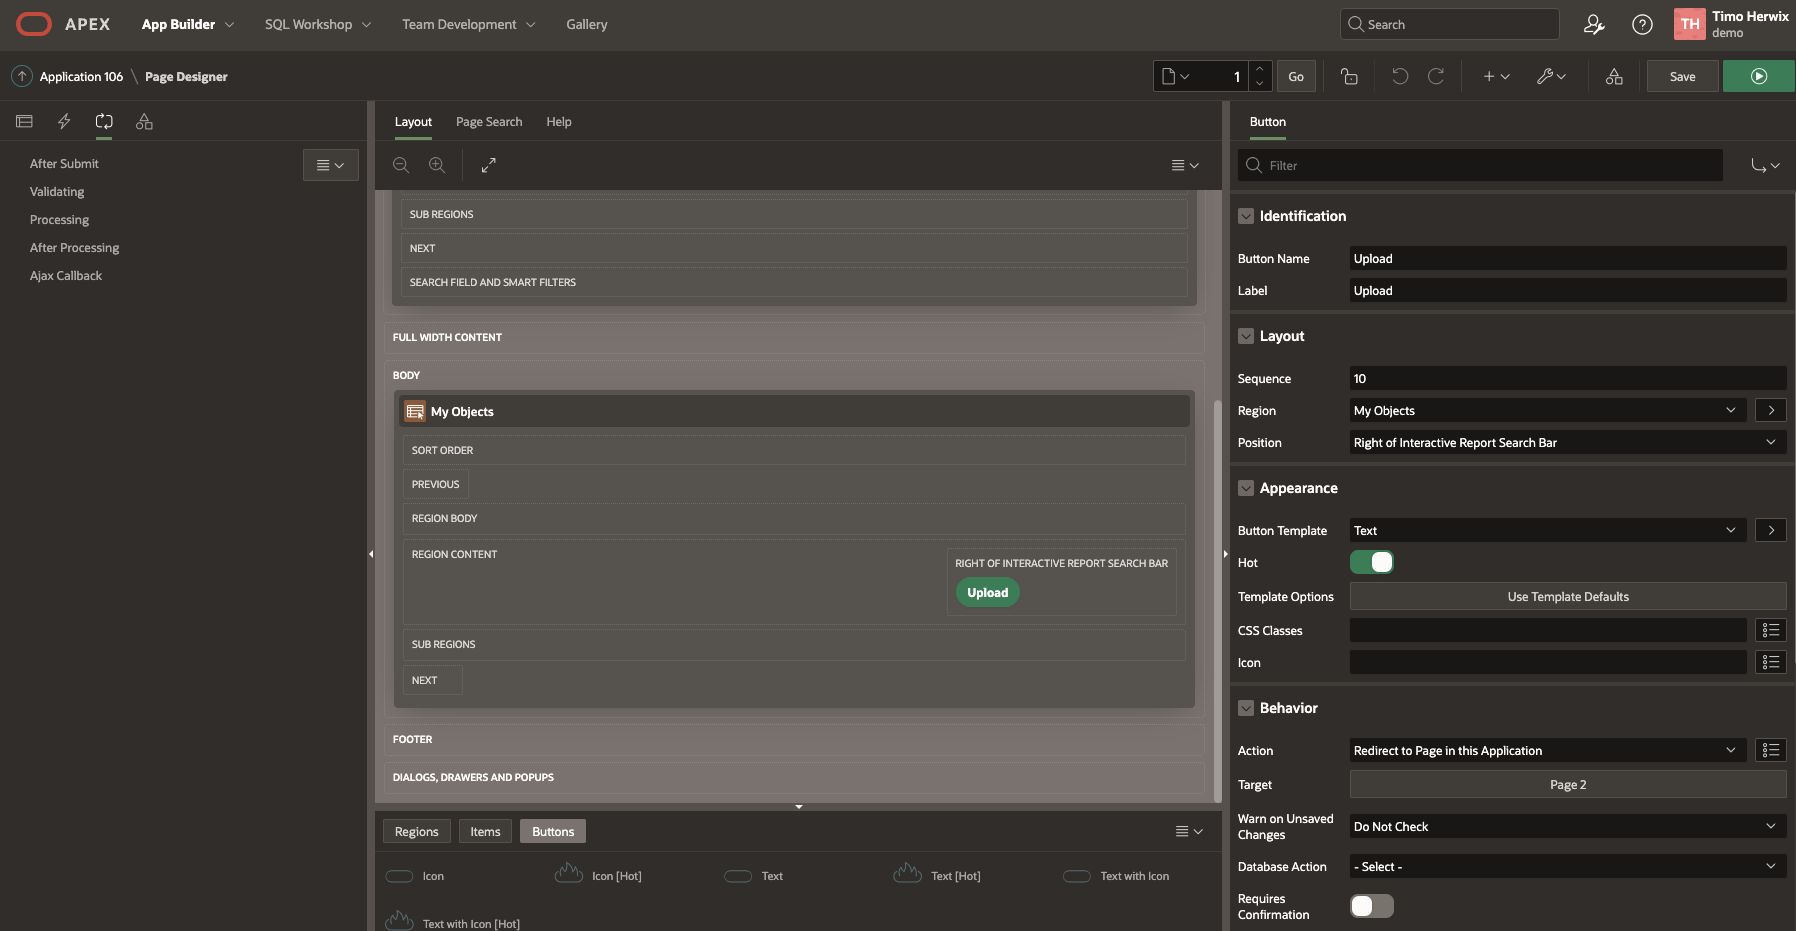
Alright, click Save and Run to save your changes, and give it a test run to make sure everything is working fine in your application.
Fantastic! You now have the ability to upload new files by simply clicking on the Upload Button.
To make sure your file has been uploaded to the Object Storage, just go back to the OCI Console and have a look under "Storage > Bucket > Bucket Details" in the "Objects" section. You should see the file you just uploaded right there! 😊

And there you have it! That wraps up our easy step-by-step guide. Enjoy! 😎
Other Clouds?
With these steps, it's super easy to switch your object storage to AWS S3 or Azure Blob Storage! All you need to do is create new credentials in the database and adjust the substitution strings in your APEX application definitions. 👍
The AWS S3 and Azure blob storage URIs typically look like this.
AWS S3: https://s3-{region}.amazonaws.com/{bucket}/{objectname}
Azure Blob Storage: https://{account}.blob.core.windows.net/{container}/{objectname}
Conclusion
In conclusion, integrating OCI Object Storage with Oracle APEX applications significantly improves file management efficiency. By following the steps outlined in this guide, you can successfully set up OCI Object Storage, create necessary IAM resources, configure the DBMS_CLOUD package, and build an APEX application that utilizes these features. With this integration, you can enjoy a scalable, durable, and cost-effective solution for managing your application's file storage needs.


