

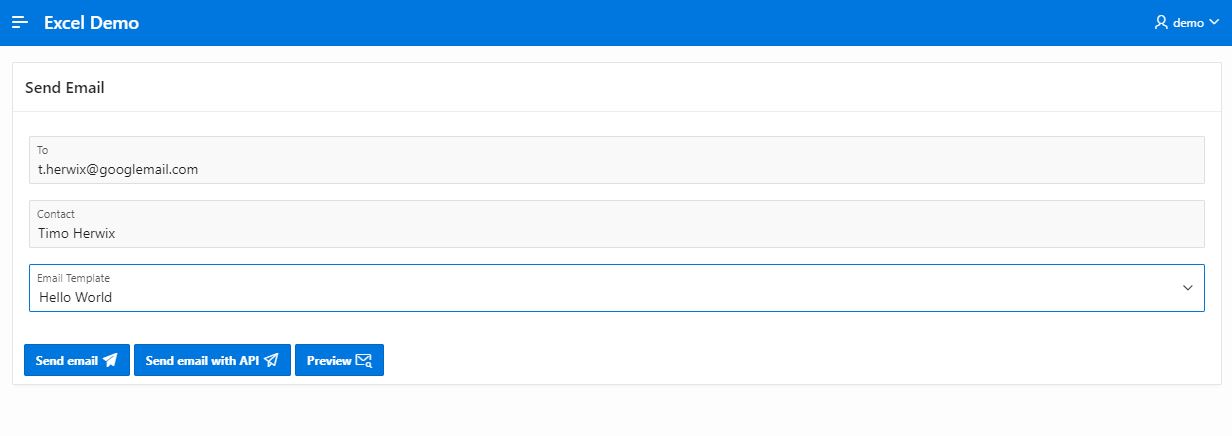
Preview of your email (APEX Mail #3)

Timo joined Hyand in Ratingen, Germany, as a Senior Consultant in 2019, focusing on Oracle databases and APEX applications. With a background as a Data Warehouse Specialist, he has expertise in Database Administration, performance tuning, and SQL development. Timo is passionate about web development, cloud computing, and the architecture behind it, and became part of the Oracle ACE Community in 2023. He enjoys sharing his knowledge at conferences and through blog posts. When he's not working, you can find him traveling, hanging out with his family, or cooking up something in the kitchen.
Introduction
As already mentioned, here you will find everything you need to know about sending emails with Oracle APEX. Let's continue with the third topic.
Background
If you want to preview the email before sending it, you can use another procedure from the "APEX_MAIL" package. This can be very handy, especially if the content of the email is dynamic.
Let´s start by creating (or modifying) a demo app
For the preview, we will again use the demo application that we have already created in the previous blogs, so that we don't have to describe everything from the beginning.
To display the preview, we add another button on page 1, which then opens a modal dialog. So add a button "Text and Icon (Hot)" to the "Help" position. Name the button "PREVIEW" and use e.g. "fa-envelope-search" as the icon and "Preview" as the label.
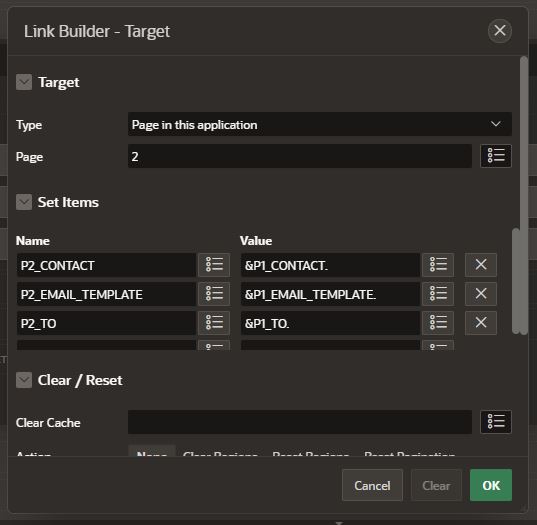
Next, we need a branch that will open the modal dialog when you click the Preview button and set items on the target page. Therefore, switch to Processes in the tree structure and create a new branch. For example, name it "Show Preview" and select the type "Page or URL". The target page doesn't exist yet, but we can still enter the information. So enter page "2" under "Target" and the following information for "Set Items".
Name: P2_CONTACT
Value: &P1_CONTACT.Name: P2_EMAIL_TEMPLATE
Value: &P1_EMAIL_TEMPLATE.Name: P2_TO
Value: &P1_TO.
It should look like this:
If you start the application now, it should look like this.
Create a new page to preview the email
Next, we need a new page to preview the email when we click the "Preview" button. So, click on "Create page" in the APEX-Builder and select "Blank page" as page type. Set the page number to "2" and name it "Preview" for example. The page mode could be a "modal dialog", but choose what you want here. Navigation is not required, so don't create a new entry here.
First we add a "Static Content" region to the page and create 6 new page items.
P2_TO as Hidden (This will have the address of the email recipient)
P2_CONTACT as Hidden (This will have the name of the recipient)
P2_EMAIL_TEMPLATE as Hidden (This will have the email template that we will preview)
P2_SUBJECT as Hidden (This will have the subject of the email template)
P2_BODY_HTML as Hidden (This will have the HTML Body of the email template)
P2_BODY_TEXT as Hidden (This will have the Plain Text of the email template)
Then we need a new process that generates the preview. To do this, create a new "Before Header" process under "Pre-Rendering" and name it e.g. "Create Preview". The Process executes PL/SQL Code, so choose the type "Execute Code" and enter the following PL/SQL code:
declare
    l_placeholders CLOB;
begin
    -- build a JSON formatted string for the placeholders
    APEX_JSON.initialize_clob_output;
    APEX_JSON.open_object;
    APEX_JSON.write('CONTACT', :P2_CONTACT);
    -- If there are more placeholders
    -- they can be added here with another APEX_JSON.write
    APEX_JSON.close_object;
    l_placeholders := APEX_JSON.get_clob_output;
    APEX_JSON.free_output;

    -- Preview Email
    apex_mail.prepare_template (
         -- Static id string, used to identify the shared component email template
         p_static_id     => :P2_EMAIL_TEMPLATE
         -- JSON string representing the placeholder names along with the values
        ,p_placeholders  => l_placeholders
        -- The subject line generated from the template
        ,p_subject       => :P2_SUBJECT
        -- The HTML code for the email
        ,p_html          => :P2_BODY_HTML
        -- The plain text of the email
        ,p_text          => :P2_BODY_TEXT
    );
end;
Now we have generated the output for the preview and placed it in the page items. To display the items, we need 3 more "Static Content" regions. Create them with the following information:
Region 1
Title: E-Mail
HTML-Code:
<b>From:</b> &APP_EMAIL.</br><b>To:</b> &P2_TO.</br><b>Subject:</b>Template: Content Block using heading level 3
The recipient, the sender and the subject of the email are displayed here.
Region 2
Title: HTML Body
HTML-Code:
&P2_BODY_HTML!RAW.Template: Content Block using heading level 3
Here we want to display the email body in HTML. Therefore we have to escape special characters in the substitution value. To do this, we append "!RAW" to the item. "!RAW" preserves the original item value and does not escape characters. You can read more about "Controlling Output Escaping in Substitution Strings" here.
Region 3
Title: Plain Text
HTML-Code:
&P2_BODY_TEXT.Template: Content Block using heading level 3
Finally the plain text is displayed here.
So there you have it. Let's try to preview our email

And here is the link for the demo app.


