

Three ways to connect to your Compute Instance

Timo joined Hyand in Ratingen, Germany, as a Senior Consultant in 2019, focusing on Oracle databases and APEX applications. With a background as a Data Warehouse Specialist, he has expertise in Database Administration, performance tuning, and SQL development. Timo is passionate about web development, cloud computing, and the architecture behind it, and became part of the Oracle ACE Community in 2023. He enjoys sharing his knowledge at conferences and through blog posts. When he's not working, you can find him traveling, hanging out with his family, or cooking up something in the kitchen.
Introduction
In the last post, we created a new compute instance. To use the instance, the next step is to access the instance. A connection to a running Compute Instance is established by using a Secure Shell (SSH) connection. This blog post describes how to connect to an instance in three different ways.
Before we can begin
Make sure you know the public IP address of your instance.

Make sure you know the path to the private key file
(Optional) To use the full power of Bastion service (Part 3) create another instance but this time into a private subnet
Connect using Oracle Cloud Shell
The easiest way to connect to your instance is by using the Oracle Cloud Shell. Cloud Shell is available everywhere as long as you have access to the Oracle Cloud Console. Accordingly, you do not have to carry out any complex configuration or install missing software. So log in to your OCI console and click Cloud Shell in the top navigation to get started.

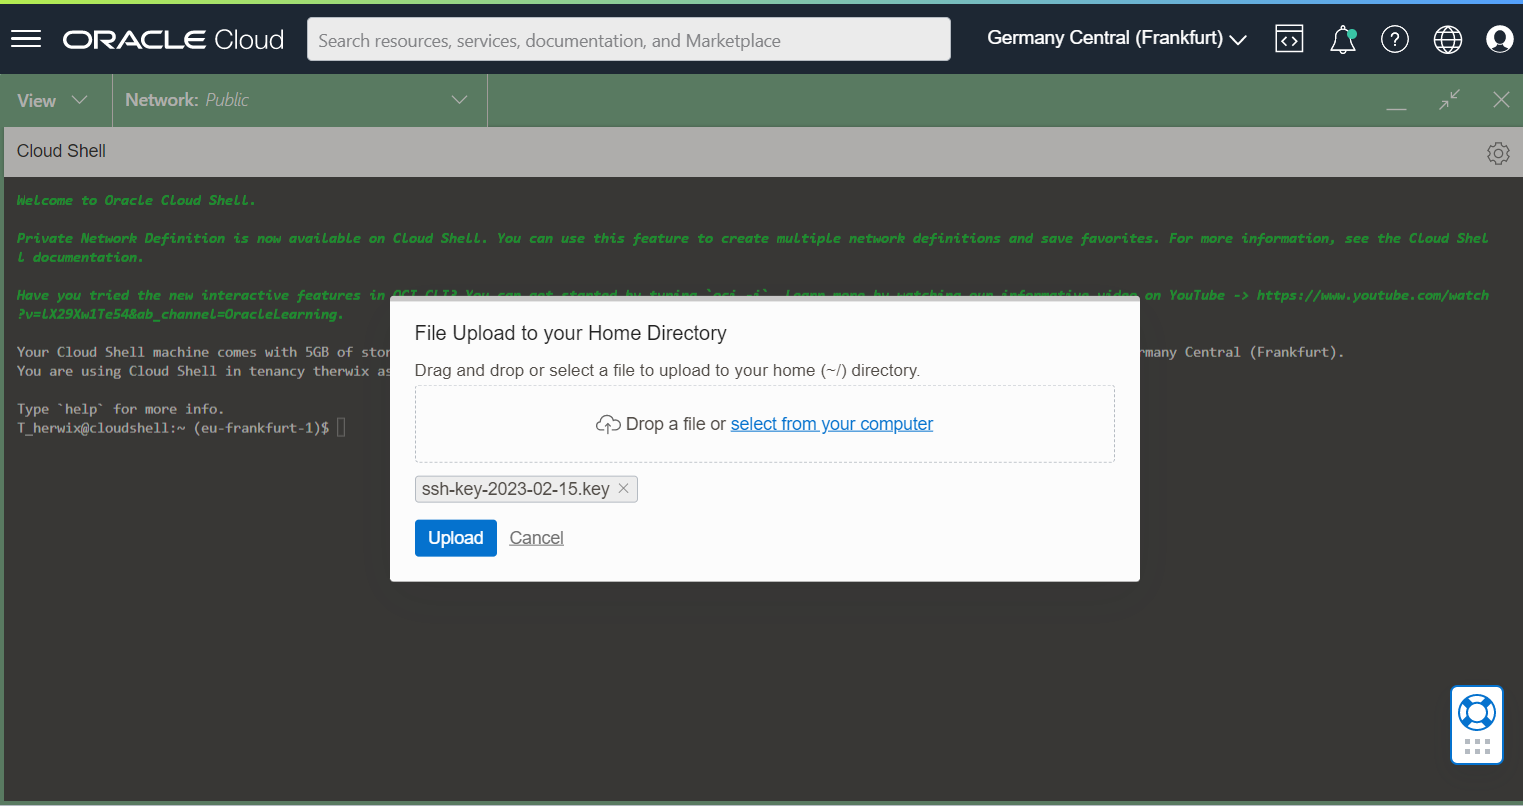
When the Cloud Shell has been started and is ready for use, you can upload the private key of the instance via Upload first. Open the Cloud Shell menu and click Upload. Then select the private key file from your instance and click Upload.
Next, a folder is needed where the keys will be stored. The default location for all user-specific ssh configuration and authentication files is .ssh.
SSH maintains a list of identifiers (known as host keys) for each server you connect to. This is the known_hosts file.
So create a new folder with the following command.
mkdir .ssh
Next, we move the uploaded private key to the .ssh folder using the following command.
mv <private_key_file> .ssh
Go to the folder and use the following command to set the file permissions so that only you can read the file.
cd .ssh
chmod 400 <private_key_file>
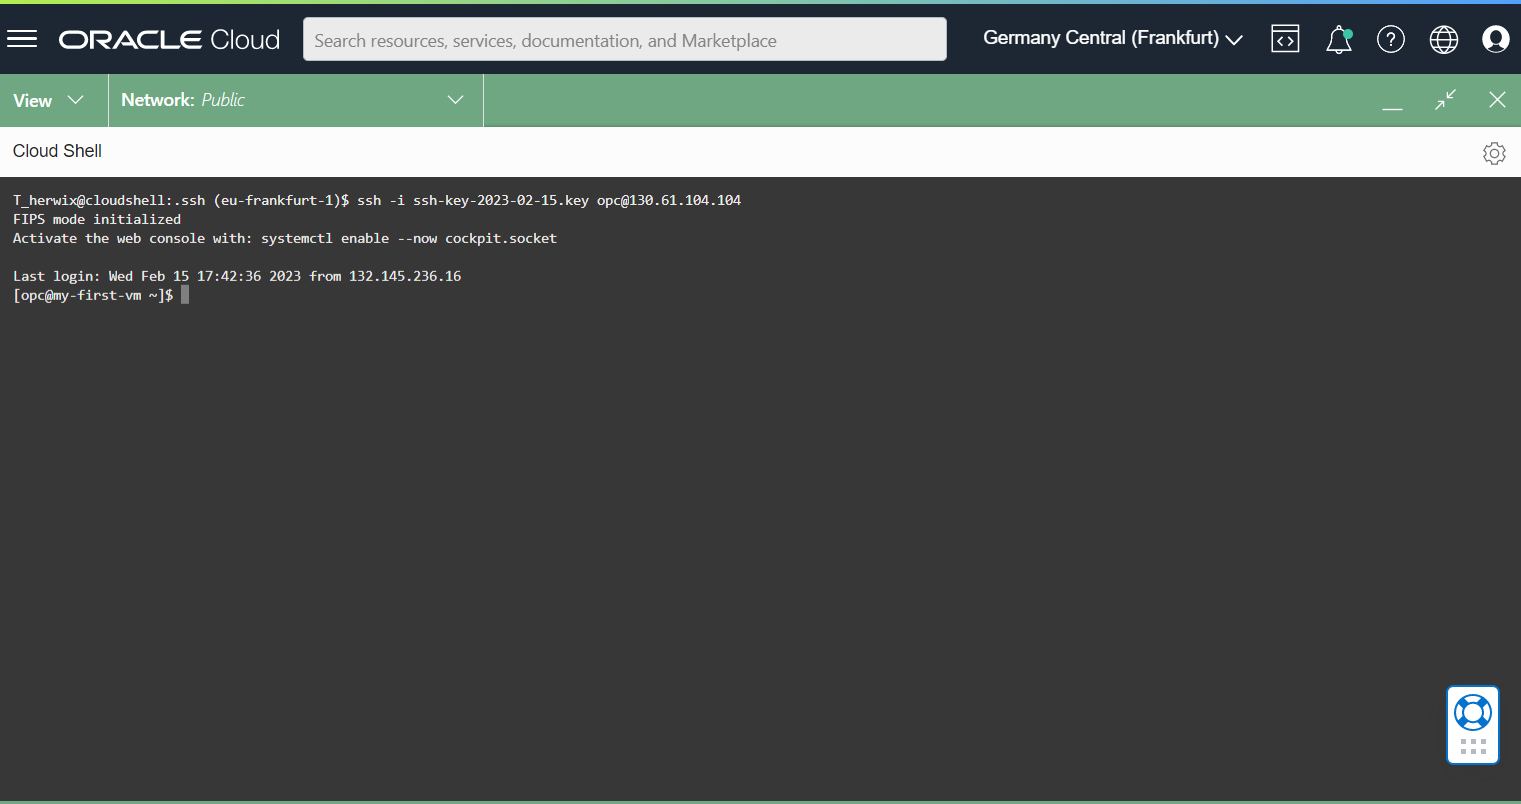
Now you can connect to your instance with the following command
ssh -i <private_key_file> <username>@<public-ip-address>
<private_key_file> is the full path and name of the file that contains the private key associated with the instance you want to access.
<username> is the default username for the instance. For Oracle Linux the default username is opc.
<public-ip-address> is the instance's IP address.
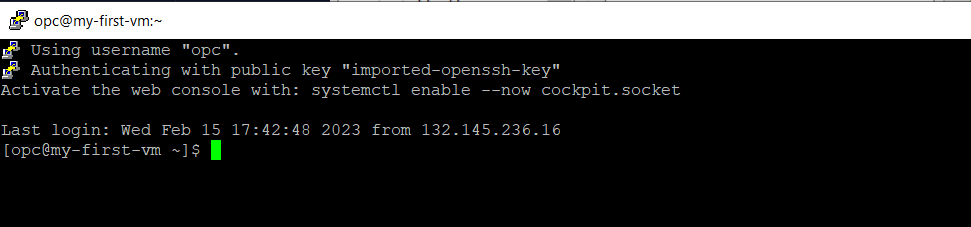
For example, the command looks like this
ssh -i ssh-key-2023-02-15.key opc@130.61.104.104
When you connect to this instance for the first time, you need to accept the fingerprint of the key. To accept the fingerprint, type yes and press Enter.
That's it! Very easy, right?
Connect using PuTTY
If you want to connect your instance with PuTTY, download and install PuTTY if needed. Go to http://www.putty.org/ and click the link Download PuTTY.
Before you can connect to PuTTY, you should make sure that the private key has a .ppk extension for PuTTY to work. If your private key is not in a ppk format, you must first generate one!
Generating an SSH key pair using PuTTY
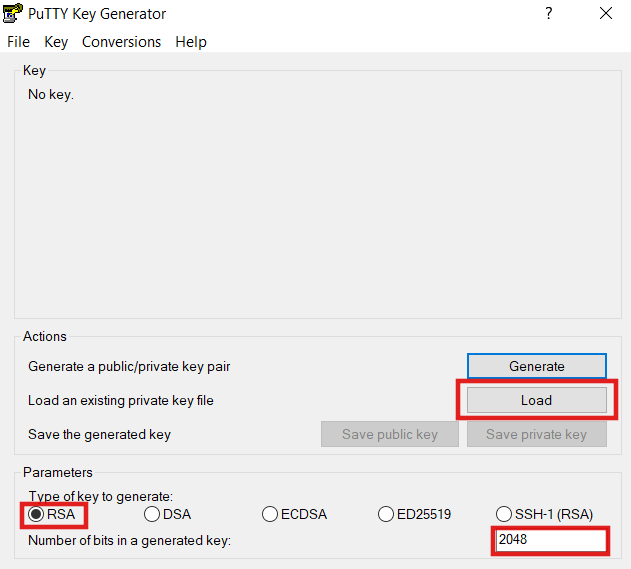
Start PuTTYgen by clicking Start > Programs > PuTTY > PuTTYgen. The PuTTY Key Generator panel is displayed. In the Parameters section select RSA for Type of Key to generate. For the Number of bits in a generated key, leave the default value of 2048. Click Load.
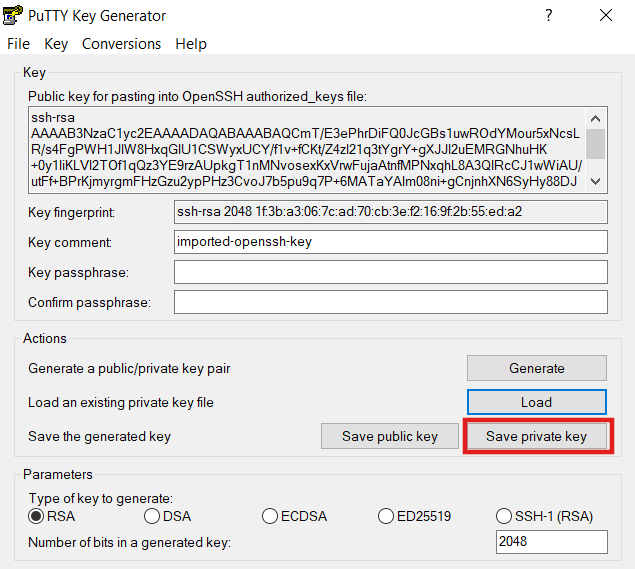
Change the PuTTY Private Key Files (.ppk) option in the drop-down menu to All Files (.*). Locate your private key from your instance and select it. In this example, it is called ssh-key-2023-02-15.key. Then click Open and OK in the PuTTYgen Notice dialog box.
Finally, click Save private key.
Close the PuTTY Key Generator and remember the location of the private key file to connect with PuTTY to your instance in the next step.
Setting up your SSH connection
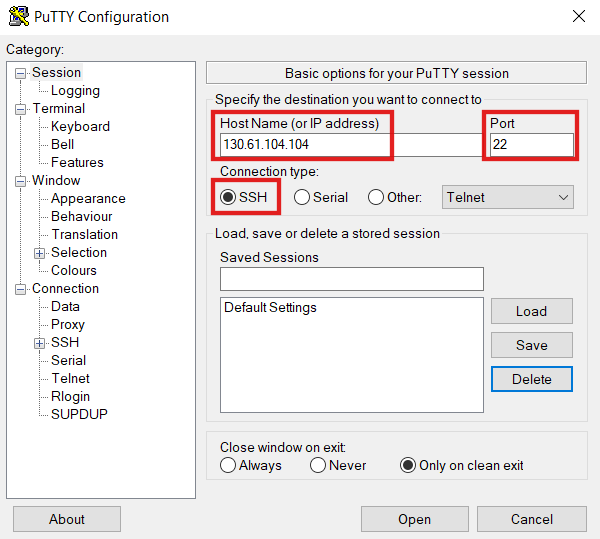
Run PuTTY and enter the following information:
Host Name (Or IP address):
<public-ip-address>Port:
22Connection type:
SSH
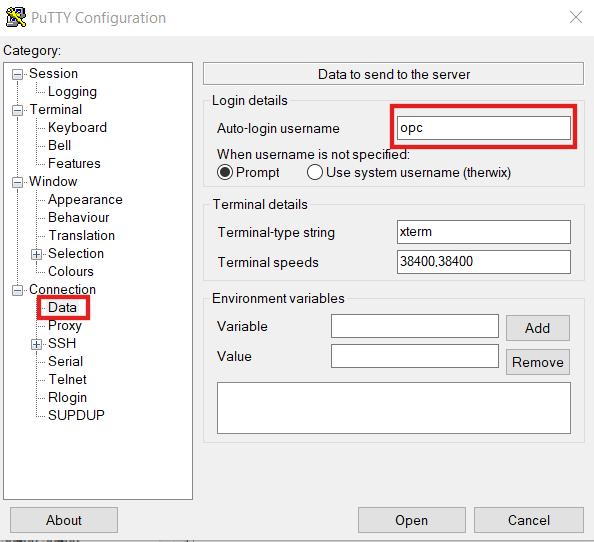
In the Category section, click Connection and then select Data. As an Auto-login username, you can enter opc for automatic login.
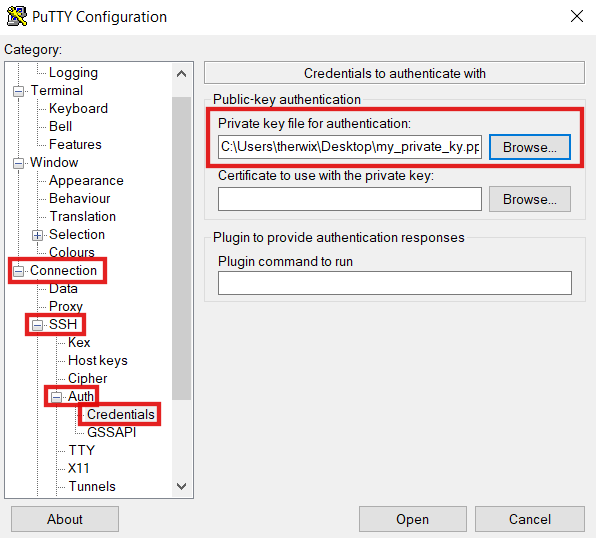
Finally, add your private key. To do this, switch to "Connection > Auth > SSH > Credentials" in the Category section. For "Private key file for authentication", click Browse and locate the file that contains your instance's private key. This private key should have a .ppk extension for PuTTy to work. If your private key is not in a ppk, generate one as described previously.
To save all your settings, navigate back to Session in the Category section. In the Saved Sessions section, name your session, for example MY_OCI_INSTANCE, and click Save.
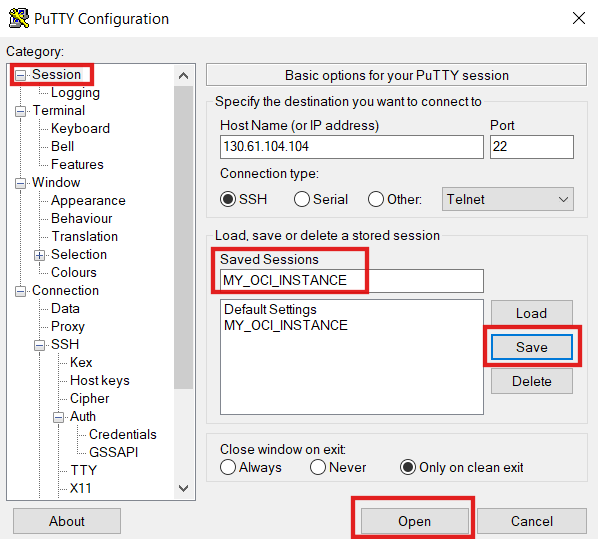
Now you are ready to connect to your Instance. For that click Open.
That's it. You are now successfully connected to your instance.
Connect using Bastion service
The Bastion service is cool for providing restricted and time-limited secure access to your instance that has no public endpoints and requires strict access controls for resources. For example, compute instances, autonomous databases, and other resources that allow SSH (Secure Shell Protocol) access. And the best...it’s free 😉
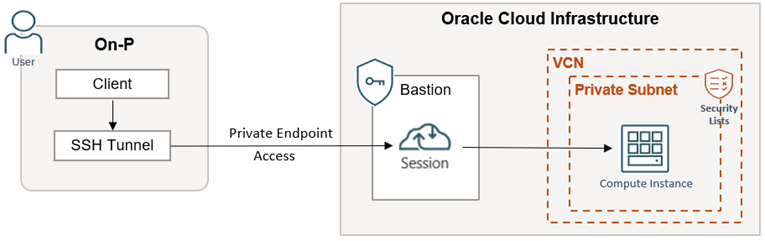
The diagram of the high-level architecture looks something like this.
Create Bastion Service
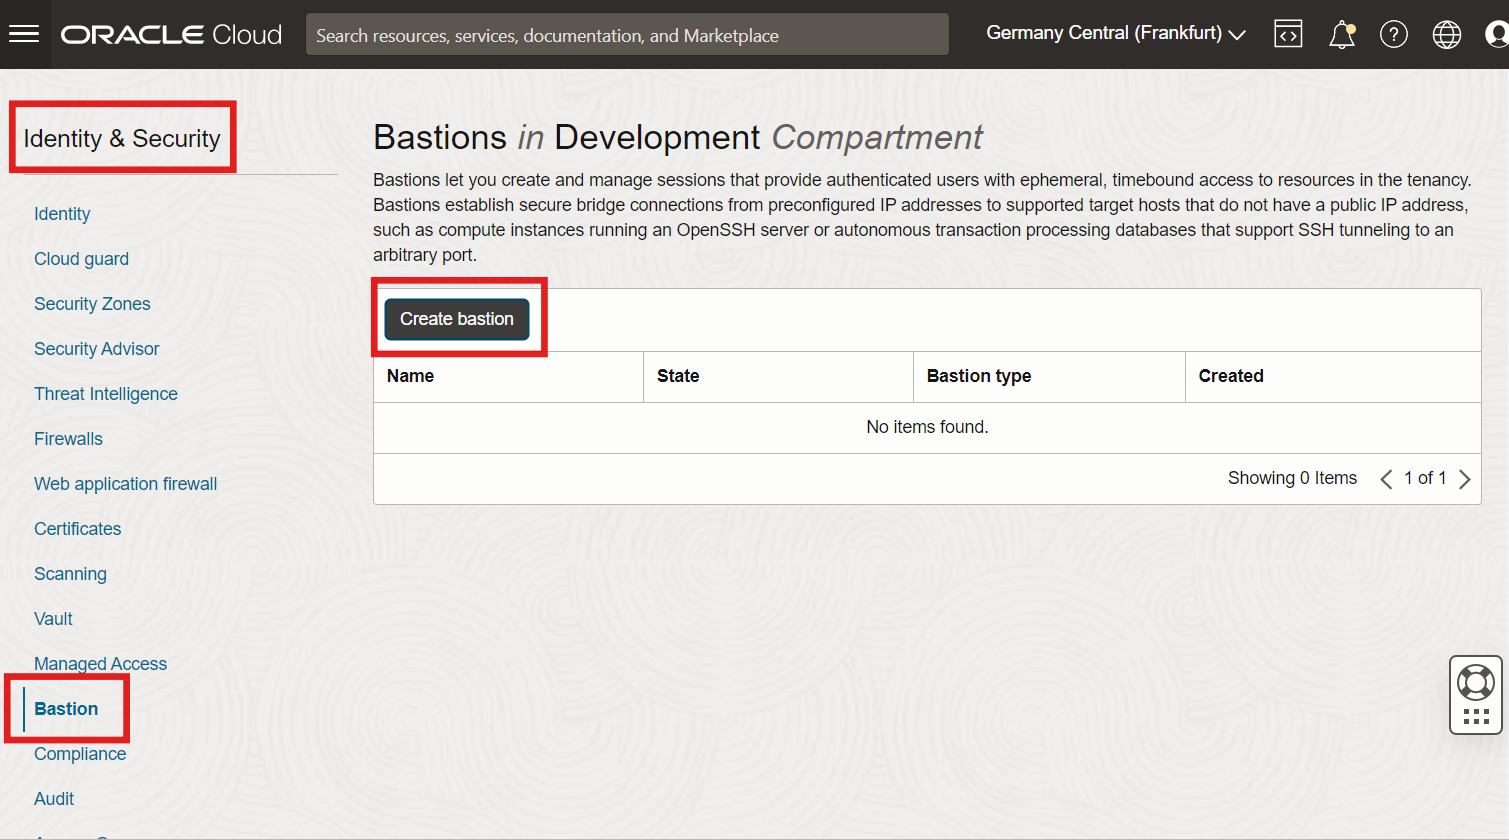
Log in to your OCI console and navigate to Identity and Security and then Bastion. Click here Create bastion.
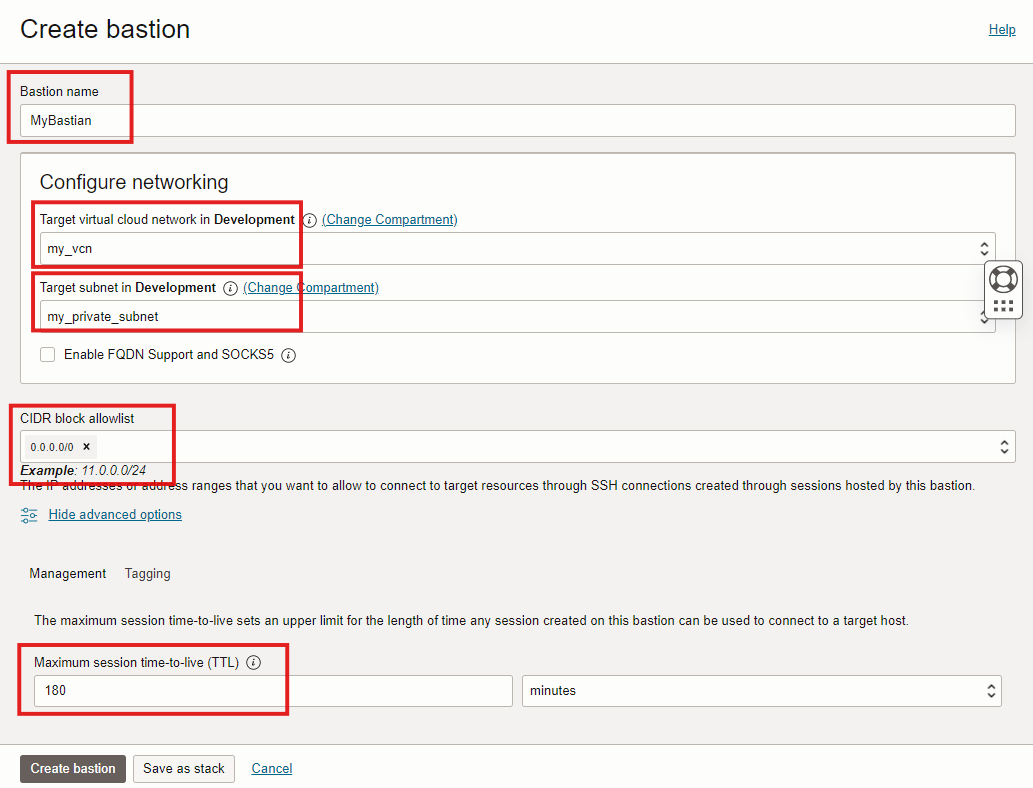
Enter a Name for the Bastion here, and then under Configure Networking, select the VCN on which your Compute instance is running as the target VCN. Next, select the target subnet. The Subnet must either be the same as the target resource subnet or it must be a subnet from which the target resource subnet accepts network traffic. in CIDR Block Allowlist, add one or more address ranges in CIDR notation that you want to allow to connect to sessions hosted by this Bastion. In this example, we want to connect this instance over the public internet via Bastion, so enter 0.0.0.0/0 here. Keep the default values for Maximum Session Time-to-Live on the Management tab in the Advance option section.
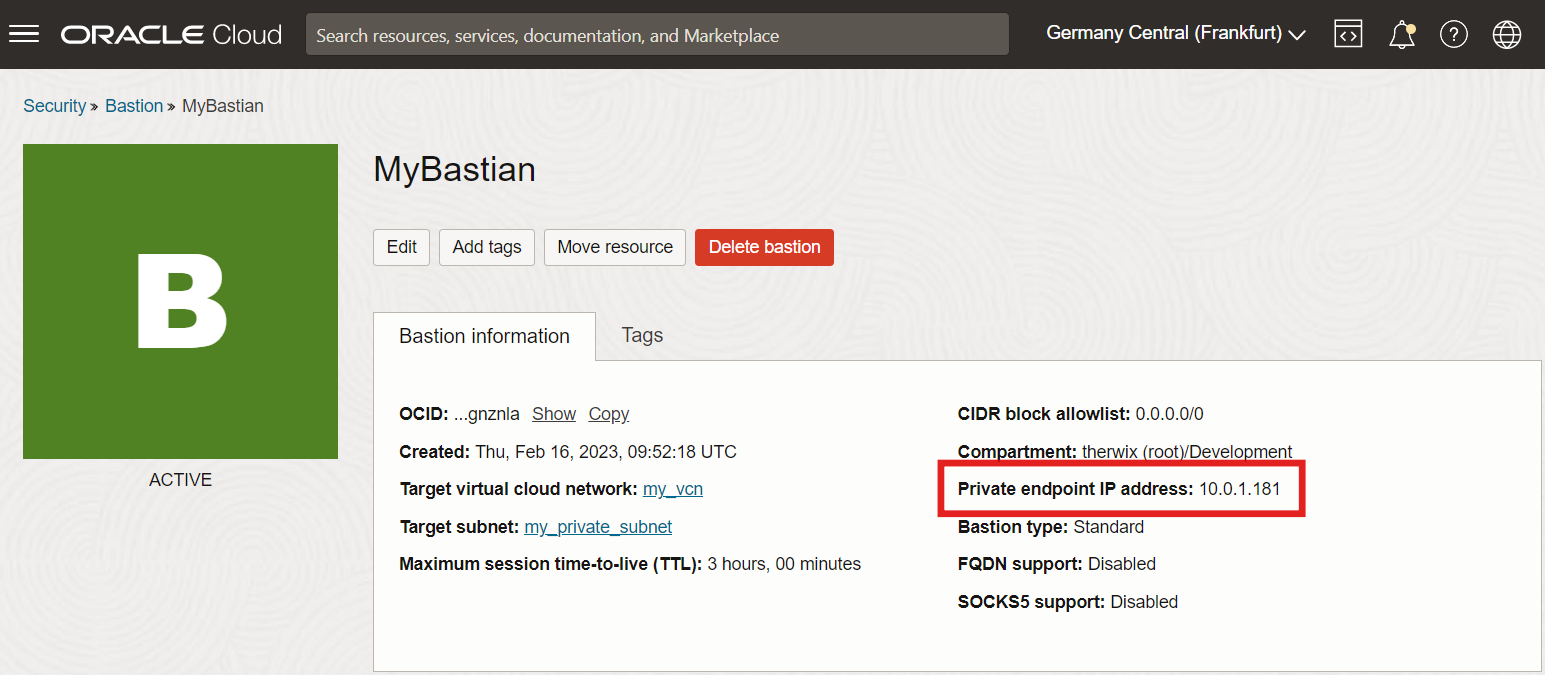
Once the Bastion service becomes ACTIVE, it creates a private endpoint IP address.
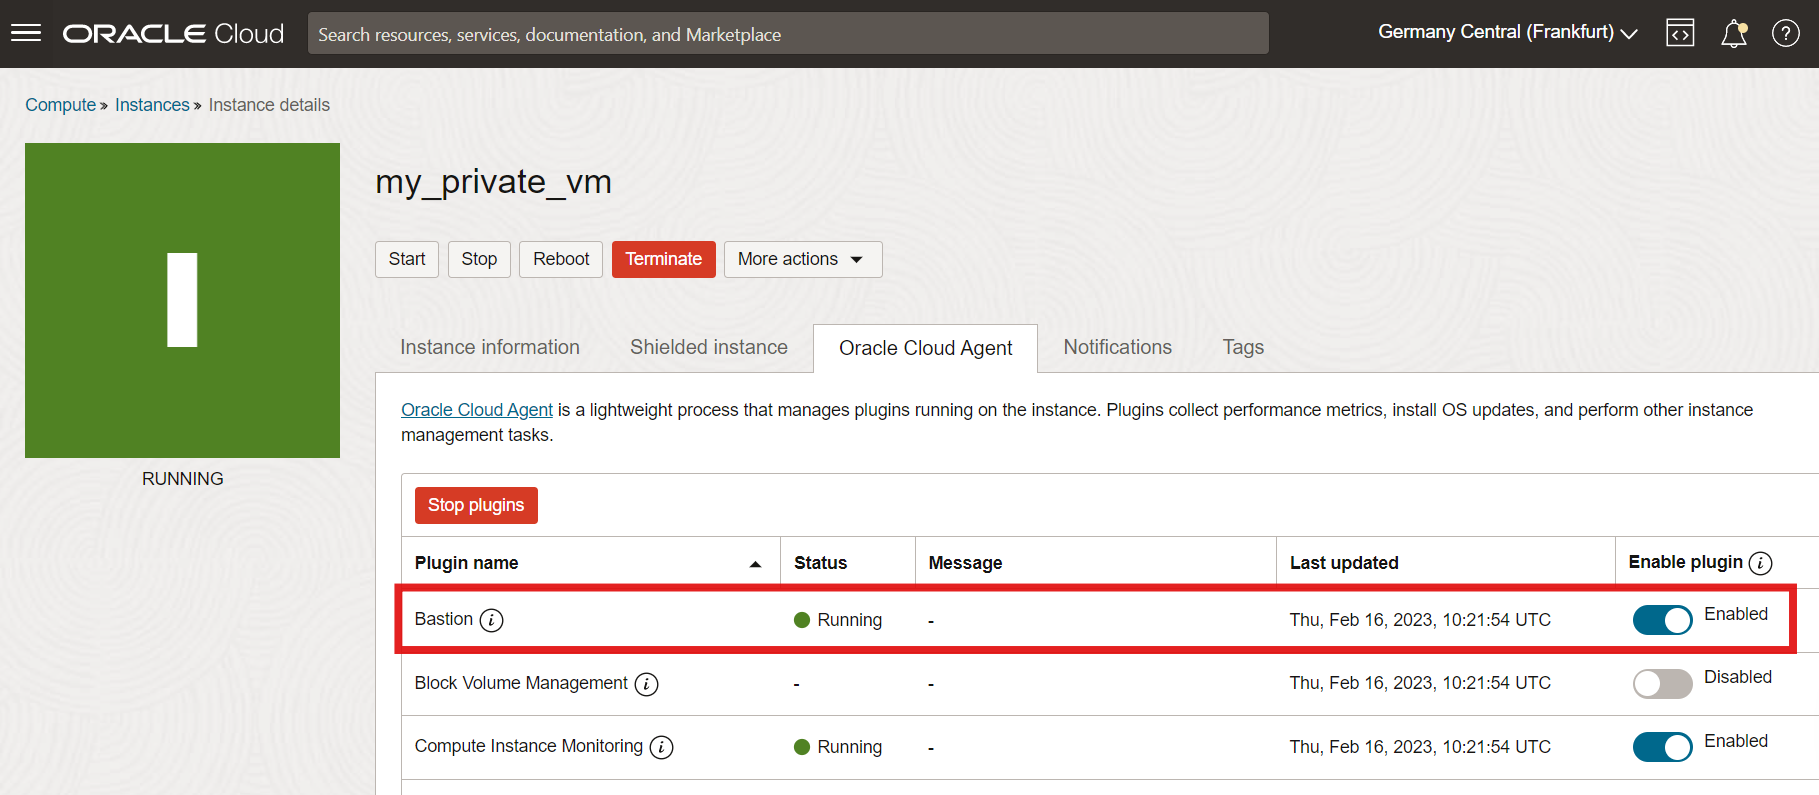
To allow Bastion Session to connect to the instance, start the Bastion plugin on the Compute instance. It will take a few minutes for it to start. To do this, navigate to "Compute >> Instances" and click on the instance name. Go to the Oracle Cloud Agent tab and enable the Bastion Plugin.
Once the status changes from STOPPED to RUNNING, create a session in Bastion Service to connect to this instance.
Create Bastion Session
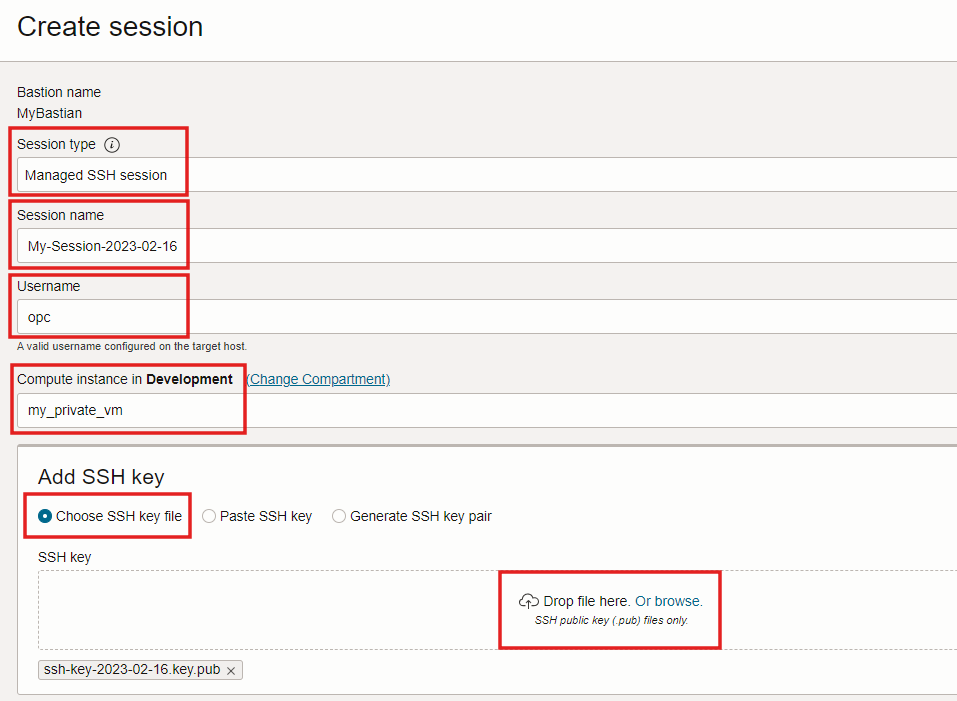
Navigate to Identity and Security and then Bastion again and click here on the Bastion created previously. Then click Create Session.
Select Session Type Managed SSH Session.
Managed SSH Session (Connect to a Compute instance that has a running OpenSSH server and has Oracle Cloud Agent enabled)
SSH Port Forwarding Session (Create an SSH tunnel to a specific port on the target resource. This type of session doesn’t require an OpenSSH server or the Oracle Cloud Agent to be running on the target resource)
Then enter a session name and a user name (for example, the opc user) and select the compute instance. Finally, Choose SSH Key file and locate the public key file of the SSH key pair that you want to use for the session.
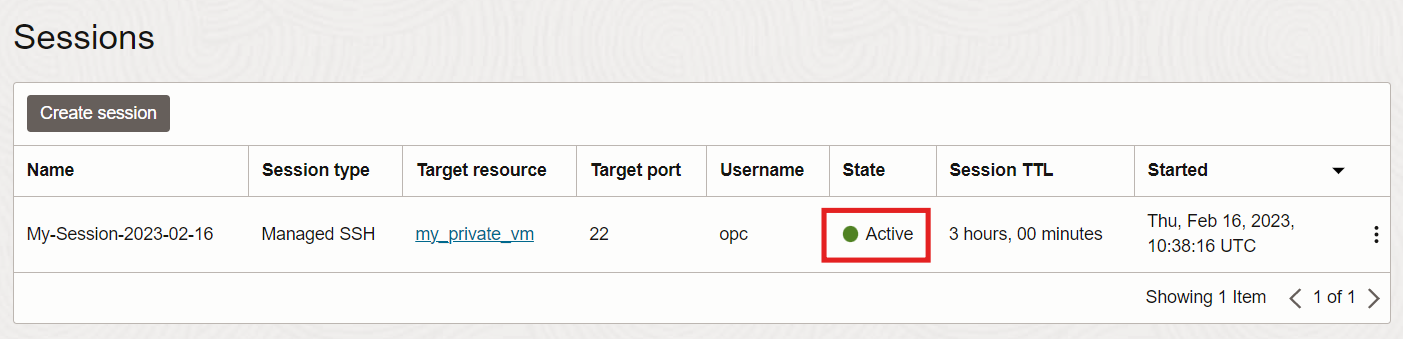
Click Create Session and wait until the session creation status changes from CREATING to ACTIVE.
Once the status becomes ACTIVE, copy the SSH command or view the SSH command. Replace with the path to the private key of the SSH key pair you specified when you created the private session key.
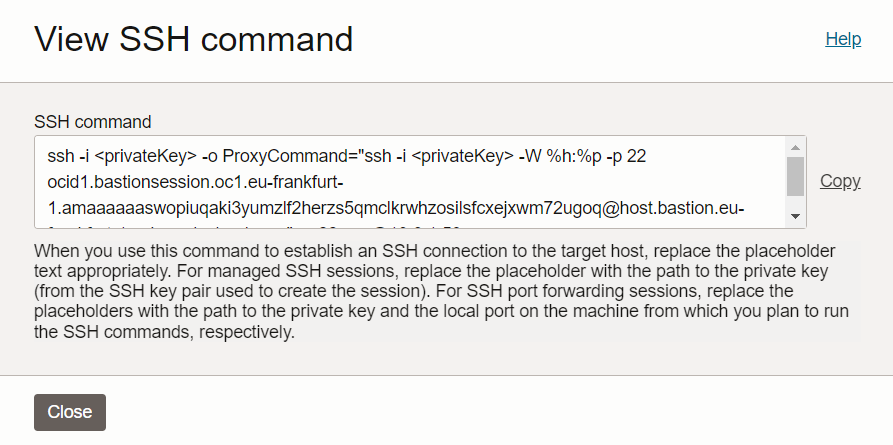
ssh -i ssh-key-2023-02-16.key -o ProxyCommand="ssh -i ssh-key-2023-02-16.key -W %h:%p -p 22 ocid1.bastionsession.oc1.eu-frankfurt-1.amaaaaaaswopiuqaki3yumzlf2herzs5qmclkrwhzosilsfcxejxwm72ugoq@host.bastion.eu-frankfurt-1.oci.oraclecloud.com" -p 22 opc@10.0.1.50
Then open a terminal of your choice (e.g. Windows Powershell) and run the ssh command to connect to the instance via Bastion.

Terminate a Bastion Session
To delete a session navigate again to Identity & Security >> Bastion. Select the Compartment where the bastion was created and click the name of the bastion that hosts the session you want to delete. Click the Action item for the session you want to delete, and then select Delete session. To validate enter the name of this session and click Delete again.

That's it 😎
We hope you found this useful


