


Introduction
At the end of February 2024, Kris Rice announced some exciting news: a new Pre-Built Function for creating PDF documents on the fly is now available in OCI. For many businesses and organizations, being able to generate PDFs dynamically is super important. Whether it's for reports, invoices, or any other kind of document, having an easy and efficient way to do this can really boost productivity.
In this blog post, we're going to dive into how you can effortlessly generate PDFs within an Oracle APEX application by using OCI functions.
But Stop! What is an OCI Function? 🤔
Before we dive in, let's take a moment to understand what OCI Functions are. OCI Functions is a serverless compute service that allows developers to create, run, and scale their applications without having to worry about the underlying infrastructure. It's like having an army of helpful elves taking care of the heavy lifting, so you can focus on the fun part: creating! These functions are tightly integrated with other Oracle Cloud Infrastructure services and SaaS applications, making your life even easier. And the best part? Since it's built on the open-source Fn Project, your creations can easily move with you across different clouds and even on-premises environments. These functions are designed to be quick, stateless, and focused on doing one thing really well. Plus, you only pay for what you use, which is pretty neat!
What are Pre-Built Function?
Pre-built Functions (PBFs) provide you a catalog of tasks or actions that are ready to go. The best part? You don't have to worry about writing, building, packaging, or maintaining the function code. Plus, pre-built functions make the most of the existing connections between OCI Functions and other OCI services (like Event Rules, and Connector Hub) to ensure everything works together smoothly.
The following pre-built functions are available with OCI Functions:
Database Secret Rotation with Wallet Function: This pre-built function automatically rotates database secrets using mTLS connection to the database.
Database Secret Rotation without Wallet Function: This pre-built function automatically rotates database secrets using TLS connection to the database.
Document Generator Function: This pre-built function Generates documents in an Object Storage bucket based on provided JSON data and an Office template document stored in Object Storage.
Media Workflow Job Spawner Function: This pre-built function triggers a workflow job for the given media workflow when video content uploads to an object storage bucket.
Object Storage File Extractor Function: This pre-built function integrates with the Data Integration service, or can be invoked using HTTP directly, to offer native support to unzip files and store them in Object Storage.
Object Storage File Zip Function: This pre-built function integrates with the Data Integration service, or can be invoked using HTTP directly, to zip one or more files in object storage and store the resulting zip file in another object storage location.
Zero Quota Policy Creator Function: This pre-built function creates a quota policy to prevent the creation of OCI resources to help enforce budgets and manage your OCI spending.
Prerequisites
Before we start, please make sure you have completed the following prerequisites listed below. This will enable you to move through this guide seamlessly.
OCI Tenancy ✅
OCI Object Storage ✅
Accessing an APEX Instance ✅
To follow this demo you need an APEX application that interacts with your Object Storage ✅
Setting Up
To kick things off with the OCI Document Generator, there are a couple of things we need to do. First up, you're going to need the OCI Function itself. Once that's up and running smoothly, you'll need an APEX application that can access the Object Storage and invoke the function to generate some PDF Documents.
Alright, we got some stuff to do, let's dive in 😎
Create Your Own OCI Serverless Function
Let's get started on setting up an OCI Pre-Built function. To do this, log in to your OCI tenancy, click on the navigation menu, head over to Developer Services, and then select Pre-Built Functions.

When you're on the Pre-Built Functions page, you will see all the ready-to-use Functions. Just click on Document Generator to get started.

Next up, simply click the Create function button. You'll see a dialog pop up where you can name your function, something like my_pdf_generator, and select an application in which you want to create the function. If you don't have an application that exists in the current compartment, just click Create new application and specify the details.
By default, OCI Functions sets up a dynamic group and an IAM policy with all the necessary permissions to get your pre-built function up and running smoothly. You don't need to do anything to keep this default setup.
But, if you prefer to handle the dynamic group and policy setup yourself, simply choose Do not create a dynamic group and IAM policy.
And there you go, just click Create and you're all set!

Ensure that the function has been created successfully.

If everything is good and things are running smoothly, note the Endpoint URL and move on to the next step.
Typically the Endpoint URL looks like this:
https://<unique-id>.<region>.functions.oci.oraclecloud.com/20181201/functions/<function-id>/actions/invoke
Test the function
Before we move on to APEX, let's make sure our function is working properly. The simplest way to do this is by using something like Postman to send a POST request.
Upload an Office Template file
First things first, we need an Office Template. So, let's create an document file, paste the following text into it, and save it as example.docx.
Hey there! I´m {data.first_name} {data.last_name}, and I´m a {data.job} at {data.company}.
As you can see, I've used some tags here. Think of a tag as a placeholder that the Document Generator can replace. For instance, a {basic_tag} can be used to inject text.
Once you've got that, go ahead and upload the file to your Object Storage.
Upload an JSON data file
Next, we need a JSON file filled with the data we want to insert into those predefined tags we talked about. Just paste in the following json path and save it as example.json.
{
  "data": {
    "first_name": "Timo",
    "last_name": "Herwix",
    "job": "Senior APEX Developer",
    "company": "MT GmbH"
  }
}
After you've done that, feel free to upload the file to your Object Storage next.
Invoke the function using Postman
Now we are ready to invoke the function and generate our first PDF Document 😎
To get Postman set up for OCI, just follow the steps outlined here. It's pretty straightforward!
The documentation for the Pre-Built Function Document Generator API can be found here.
Postman Example
Once everything is done and you're ready to invoke the function, just enter the Endpoint URL we noted before and choose POST for the request type. For the HTTP Request, enter the following:
{
  "requestType": "SINGLE",
  "tagSyntax": "DOCGEN_1_0",
  "data": {
    "source": "OBJECT_STORAGE",
    "namespace": "my_namespace",
    "bucketName": "my_bucket",
    "objectName": "example.json",
    "contentType": "application/json"
  },
  "template": {
    "source": "OBJECT_STORAGE",
    "namespace": "my_namespace",
    "bucketName": "my_bucket",
    "objectName": "example.docx",
    "contentType": "application/vnd.openxmlformats-officedocument.wordprocessingml.document"
  },
  "output": {
    "target": "OBJECT_STORAGE",
    "namespace": "my_namespace",
    "bucketName": "my_bucket",
    "objectName": "example.pdf",
    "contentType": "application/pdf"
  }
}
Just click the Send button to invoke the function 🚀

If everything works well have a look at your Object Stoarge and make shure that there is an PDF Document called example.pdf.

If it's there, let's download it and take a peek inside 🔍
So if all goes well and the Force is with us, the content should look something like this ✨

Great! The function works like a charm. Let's take the next step and integrate this cool stuff into Oracle APEX.
Implement the Document Generator in APEX
In this section, we're going to dive into how to make the OCI Document Generator work for us in APEX, in a super easy way. This will give us a good look at how we can use the Document Generator, call the OCI Document Generator REST Service, and parse the JSON response.
To keep our demo simple and clear, we've gone with the Object Storage Demo App. You can find a Step-by-Step Guide on how to set it up right here.
Create Web Credentials in Oracle APEX
First, we must create an APEX Web Credential to authenticate our requests to the OCI Object Store and OCI Document Generator API.
To create a new Web Credential in APEX, click on Workspace Utilities in the App Builder. Once you're there, look for Web Credentials and give it a click. Finally, click the Create button to make your new Web Credential.
Give it a name and a Static ID, for example, FN_CREDENTIALS. Keep the Authentication Type as Oracle Cloud Infrastructure (OCI), and then paste the following details.
OCI User-Id: Enter the OCID of the Oracle Cloud user Account. Your OCI User ID looks similar to ocid1.user.oc1..aaaaaaaa******wj3v23yla
OCI Private-Key: Open the private key (.pem file) of the Oracle Cloud user Account. Copy and paste the API Key.
OCI Tenancy-Id: Enter the OCID for Tenancy. Your Tenancy ID looks similar to ocid1.tenancy.oc1..aaaaaaaaf7ush****cxx3qka
OCI Public Key-Fingerprint: Enter the Fingerprint ID. Your Fingerprint ID looks similar to a8:8e:c2:8b:fe:****:ff:4d:40
Then click Create.
Configure OCI Document Generator REST API as REST Data Source
In this step, we're going to set up a REST Data Source using the OCI Document Generator REST API as our endpoint.
Navigate to the application home page and click Shared Components. Under Data Sources, click REST Data Sources.

Next, click Create, choose From scratch and then click Next. Now, under Create REST Data Source, you'll need to fill in some details.
Rest Data Source Type: Oracle Cloud Infrastructure (OCI)
Name: OCI Document Generator
URL Endpoint: Enter the Endpoint from the OCI function we noted earlier.

Once you've got that, click Next. Moving on to the Create REST Data Source - Remote Server section, click Next again. Then, when you get to Authentication, make sure to switch the toggle for Authentication Required to ON and select the FN_CREDENTIALS credentials we set up in the previous step. Click Create REST Source Manually.

The REST data source is successfully created. The next step to configure the POST operation parameters for this REST Data Source. To do this, click on the REST Data Sources page on OCI Document Generator. Select Operations Tab and click Edit icon for the POST operation. Change the Database Operation to -Not Mapped- and paste the following JSON:
{
  "requestType": "SINGLE",
  "tagSyntax": "DOCGEN_1_0",
  "data": {
    "source": "OBJECT_STORAGE",
    "namespace": "my_namespace",
    "bucketName": "my_bucket",
    "objectName": "example.json",
    "contentType": "application/json"
  },
  "template": {
    "source": "OBJECT_STORAGE",
    "namespace": "my_namespace",
    "bucketName": "my_bucket",
    "objectName": "example.docx",
    "contentType": "application/vnd.openxmlformats-officedocument.wordprocessingml.document"
  },
  "output": {
    "target": "OBJECT_STORAGE",
    "namespace": "my_namespace",
    "bucketName": "my_bucket",
    "objectName": "example.pdf",
    "contentType": "application/pdf"
  }
}
In the Operation Parameters section, click on Add Parameter. Then, in the Edit REST Data Source Parameter wizard, you'll want to add these 2 parameters, one right after the other:
| Type | Name | Direction | Default Value | Static | |
| 1 | Request or Response Body | RESPONSE | Out | ||
| 2 | HTTP Header | Content-Type | In | application/json | ON |
If everything is set up correctly, it should look something like this.

Finally, click Apply Changes.
Invoke the OCI Document Generator REST Data Source through a Page Process
In this step, we're going to set up a page process to call the OCI Document Generator REST Data Source we got ready in our last step.
If you're using the File Management Demo Application we mentioned earlier and run it, it should look something like this:

Navigate to Page 1 in the application and add a new Button to the My Objects Region in the Next position. Name it GeneratePDF and make sure that the Action for the Button is Submit Page. Then make an Right-click on the Body in the Rendering Pane and click Create Page Item. In the Property Editor, give the Page Item a Name, e.g. P1_RESPONSE and choose the Type Display Only.

Navigate to the Processing Tab on the left side, right-click on Processes, and choose Create Process. Let's name our process Generate PDF. For the type, select Invoke API. In the Settings Section, choose REST Source as the type, select OCI Document Generator for the REST Source, and POST for the Operation.

Lastly, we'll switch the Ignore Output for the RESPONSE parameter to off and select P1_RESPONSE for the Item.

And there we have it! We're all set up and ready to go. Let's run the application a to verify everything's running smoothly.

As you can see, the new Button and Response Output will show up. Let's go ahead and click the Generate PDF Button to create a new PDF Document.
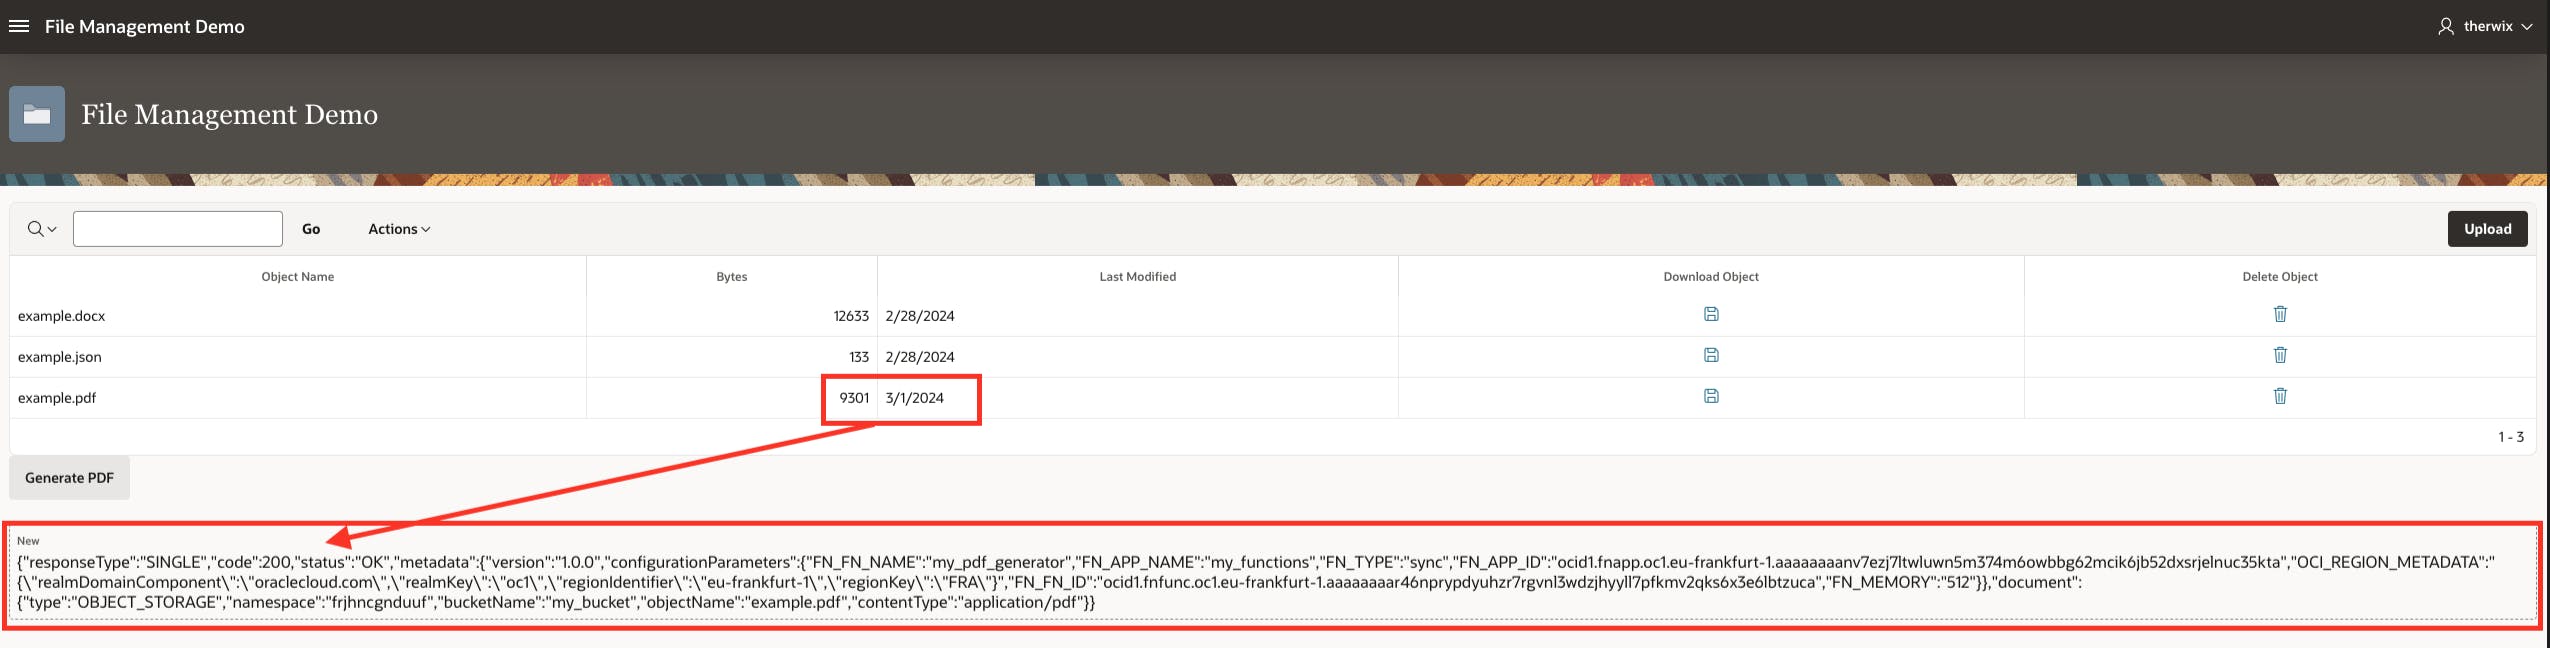
If all went well, you'll notice a new file has been created in Object Storage. In the Response, we get to see how the REST request did, and if things went smoothly, you'll see a Status 200 😎
Next Steps
I've tried to keep this post super straightforward, focusing on how the Document Generator function works and how to call the REST endpoint. We're just dipping our toes in here, covering the basics you'd need to start building a dynamic document generator solution.
But let's be real, the potential here is huge! You could dynamically generate lots of files with complex templates and many tags. And these tags? They can be dynamically transferred too, which means you'd create and store a JSON in the object storage before starting the generation process.
This article was all about getting familiar with the functionality and learning how to use it.
APEX Office Print vs. OCI Document Generator
In my first impression, the OCI Document Generator feels like it's taking a step towards APEX Office Print. They both use office templates and placeholders in a similar way. But, AOP is made for APEX and it's pretty easy to integrate. Plus, it's been around for a while, so it's been thoroughly tested and has kept getting better. Therefore, from my initial point of view, the OCI Document Generator isn't quite a replacement for AOP applications yet. But, it's definitely moving in the right direction and I'm excited to see how the OCI team will develop this further 👏
Cloud Functions pricing
Just one more thing before we wrap up. Wondering about the cost? From what I've seen, it's really affordable and manageable. To get started, you get a large amount for free. You could easily generate 1000 PDFs a day without costs.

Conclusion
Using OCI's Pre-Built Functions, like the Document Generator Function, is a game-changer for how companies handle document creation. Imagine integrating this feature into Oracle APEX apps or any other OCI-supported apps. Suddenly, you're whipping up PDF documents quickly and with ease. This boosts productivity big time and cuts down on the headache of making documents the old-fashioned way. Plus, with OCI's pay-as-you-go setup, you're only spending money on what you actually use, making it a super cost-effective way to meet your document generation needs. As tech keeps moving forward, tapping into such cool innovations is going to be crucial for keeping up and staying sharp in managing documents.